
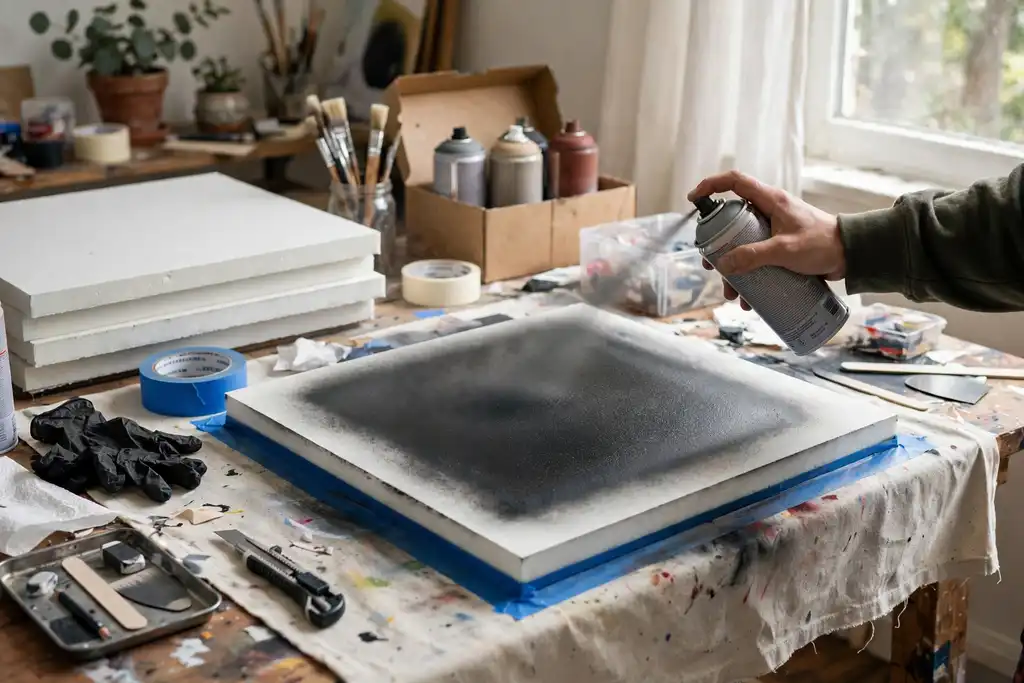
Yes, you can spray paint foam core, but only with light coats and the right formula, because harsh solvents in some aerosols dissolve the foam and cause melting under the paper facing.
Can you spray paint foam core? The common myth is that any spray paint will instantly melt the foam, but the truth is more specific: only solvent-based formulas attack the foam, while water-based and acrylic sprays are safe when applied correctly. Solvent is a substance that dissolves another material, and in this case it dissolves the foam, causing melting, a phase change from solid to liquid.
You will learn how to choose the right spray paint, prep the paper facing, and apply light coats at the proper distance to avoid melting. This article also covers primer selection, drying time between coats, test piece checks, ventilation, and sealing for a durable finish. Follow these steps to get it right the first time.
Can You Spray Paint Foam Core? the Straight Answer
Yes, you can spray paint foam core, but only if you pick the right paint and apply it in thin layers. The foam inside dissolves on contact with strong solvents, so one heavy coat can ruin the board before it dries.
| Situation | What it means | What to do |
|---|---|---|
| Standard foam core board | Polystyrene foam core with paper facing | Use acrylic or water-based spray paint |
| Solvent-based spray paint | Solvent dissolves the foam core | Avoid unless the board is sealed |
| First pass with paint | Light coats at 10 to 12 inches | Build coverage slowly, let each coat dry |
| Paper facing lifting | Paint soaks through and wrinkles | Seal edges with primer first |
| Unsealed foam edges | Exposed foam melts fast | Prime or tape edges before spraying |
| Test piece results | Shows how the paint reacts | Practice on scrap before the real board |
| Drying time | Typically 20 to 60 minutes per coat | Wait full time before recoating |
Recommended for this job

Rust-Oleum Low Odor Premium Spray Paint
Low-odor matte spray paint reduces fumes when coating foam core indoors.

VEVOR Foam Board
Acid-free foam core sheets give you practice boards for spray paint testing.

Odor/Particulate Multipurpose Respirator
Reusable respirator filters odors and particles while spray painting foam core.
What Actually Happens When Paint Hits Foam
Standard foam core is a polystyrene sheet, usually 3/16 to 1/2 inch thick, faced with paper on both sides. A solvent, a liquid that dissolves other substances, eats polystyrene on contact and turns it into a sticky puddle. That melting, a solid-to-liquid phase change, can happen within seconds of a wet coat.
Why Paper Facing Changes Everything
The paper facing slows the attack but does not stop it. Acrylic spray and water-based spray sit on the surface and dry without reaching the core. Solvent-based paint can soak through thin paper or bare cut edges and eat the foam underneath. Seal edges and cut lines with primer first, then hold the can 8 to 12 inches away.
The One-Minute Answer Before You Buy Paint
Choose acrylic or water-based spray paint and leave solvent-based cans on the shelf. Test on a scrap piece, apply light coats, and wait the full drying time, typically 20 to 30 minutes between coats. Spray outdoors or with strong ventilation, since aerosol fumes concentrate fast in a closed garage.
Your Spray Painting Game Plan: Test, Prime, Paint, Seal
A smart plan means testing first, then thin passes and patience. Here is the order that keeps foam core from melting or warping.
| Action | Why it helps | How to start |
|---|---|---|
| Pick a paint type | Water-based won't melt foam | Choose acrylic spray |
| Test a scrap piece | Confirms no solvent damage | Spray, wait, inspect |
| Prime the paper | Improves adhesion and blocks soak | Light water-based primer coat |
| Spray in thin passes | Prevents pooling and melting | Keep 8 to 12 inches away |
| Seal the surface | Protects paint and paper | Use compatible clear coat |
| Let it cure | Full hardness takes time | Wait 24 to 48 hours |
Pick a Paint That Won’t Eat the Foam
Solvent-based spray paint can dissolve the foam core’s inner foam, causing melting and pits. Choose a water-based or acrylic spray instead. Check the label before buying.
Test a Scrap Piece First
Always spray a test piece cut from the same board. Give it a light coat, wait a few minutes, and watch for bubbling or softening. If the paper wrinkles or foam melts, switch paints.
Prime Only If the Paper Needs It
A primer is a preparatory coating that helps paint grip. Bare paper facing usually takes spray paint fine, but a thin water-based primer helps if the surface feels slick or fuzzy.
Spray in Thin Passes
Hold the can 8 to 12 inches away and move in steady passes. Light coats dry faster and avoid solvent buildup. Work in a ventilated space, ideally outdoors or with fans moving air.
Seal and Let It Cure
Finish with a compatible clear sealer to protect the paper facing and paint. Then leave it alone: drying time runs 1 to 2 hours to touch, with full cure in 24 to 48 hours depending on humidity.
Is It Safe to Spray Paint Foam Board?
Solvent-Based Paints Can Melt the Foam
Most solvent-based sprays, where solvent means a liquid that dissolves other substances, attack the polystyrene core. Labels listing acetone, toluene, xylene, or lacquer thinner can wrinkle or turn the foam gooey within 5 to 15 seconds of contact. Keep those cans off bare foam core.
Water-Based Sprays Are the Safer Default
Acrylic spray and other water-based formulas usually sit on the paper facing without melting the core. Apply light coats from 10 to 12 inches, letting each pass flash off 1 to 2 minutes before the next. Always spray a test piece first.
Fumes, Ventilation, and the Paper Facing
Spray outdoors or in a garage with cross-ventilation; aerosol fumes are a respiratory hazard, so follow OSHA-style ventilation guidance and wear an organic-vapor respirator plus eye protection. Heavy wet coats soak the paper facing and cause bubbling or curling, so mist thin passes and respect the label drying time, often 15 to 30 minutes between coats.
What ‘Safe’ Means for a Craft Project vs a Prop
Safe means no melting and no lingering solvent smell after curing. For handled props, add a primer or sealer coat and cure fully, typically 24 hours at 65 to 75°F. For flame-resistant pieces, confirm with the manufacturer before painting.
Water-Based vs Solvent-Based Spray Paint: Which One Won't Eat Your Foam
How to Read the Label for Solvent Content
Flip the can and look for words like acetone, toluene, xylene, or lacquer thinner. Those are solvents, meaning liquids that dissolve other substances, and they will attack foam. If the label says water cleanup or soap and water cleanup, you are holding a water-based product.
Water-Based Sprays: Gentler, Slower-Drying
Acrylic spray and other water-based sprays usually sit on foam core without melting it. They dry slower, often 30 minutes to 2 hours to touch, so plan on light coats and patience. The paper facing may wrinkle slightly as moisture leaves, which a primer coat helps reduce.
Solvent Sprays: Faster Finish, Higher Melt Risk
Solvent-based cans flash off fast, sometimes 10 to 20 minutes between coats, but the solvent can eat straight into the foam and leave pits or a melted edge. Even a primer labeled for plastic may not protect bare foam. Skip these unless the board is fully sealed first.
The Scrap-Test Rule That Settles It
Cut a test piece from scrap foam core and spray one light coat from 10 to 12 inches away. Wait the full drying time, then check for melting, curling, or soaked paper. Only then commit to the real board, and keep ventilation strong per the manufacturer and OSHA guidance.
How to Spray Paint Foam Core Without Melting It
Sand the paper facing lightly with 220-grit paper, then wipe off the dust with a dry cloth. Test spray a hidden scrap and wait 10 minutes to see if the solvent attacks the foam. Apply a thin primer coat if the paper fuzzes. Hold the can 8 to 12 inches away and spray thin coats in steady passes. Let each coat flash off for 15 to 30 minutes, then cure 24 hours.
Follow these steps in order, and a bare foam core board will take paint without melting or warping.
Drying, Curing, and Keeping the Finish Clean
Drying Racks and How to Stack Boards
Give each board its own space on a flat rack so air reaches both faces. Stacking wet panels traps solvent vapor against the surface and can soften the paper facing.
Typical touch-dry time for light acrylic spray coats runs 15 to 30 minutes at room temperature. Wait until the surface feels dry before moving a board, then handle it by the edges only.
Full Cure Times Before Sealing
Let paint cure fully before you seal it, usually 24 to 72 hours depending on coat thickness and humidity. Sealing too early locks in solvent that needs to escape.
Once cured, apply a compatible clear coat or sealer in thin passes to protect the finish and keep moisture out of the paper facing.
Cleaning the Finished Surface
Dust with a soft dry cloth or a barely damp one, never a soaking rag. Water that seeps past the paper facing can swell the foam core and lift the paint.
Storing Foam Core so Edges Don’t Crush
Store boards flat or fully upright in a rigid sleeve, never leaning at an angle. Crushed edges show through any finish, so keep weight off the faces and corners.
A Real Project: Spray Painting a Foam Core Display Board
Choosing Water-Based Paint for a 24×36 Board
Use acrylic spray or any water-based spray labeled safe for foam. Solvent-based aerosols can melt foam and ruin the board. Check the label for foam compatibility and work in a ventilated space, ideally outdoors or with a fan. A 24×36 board typically needs one to two cans for full coverage.
Testing on the Cut-Off Edge
Always spray a scrap first. Use a test piece from the same board, apply one pass, and wait about 10 minutes to confirm no bubbling or melting. If the paper wrinkles or foam softens, switch products before touching your display board.
Two Thin Coats with a Drying Rack Between
Light coats beat heavy ones. Hold the can 8 to 12 inches away and mist in smooth passes, letting each coat sit 15 to 30 minutes. Set the board on a drying rack or propped supports so air reaches both sides and wet edges don’t stick. Two thin layers usually cover cleanly without soaking the paper facing.
Sealing and Mounting the Finished Board
Finish with a compatible clear acrylic sealer once the paint is fully dry, typically 24 hours. Sealing protects against scuffs and moisture. Mount with foam-safe adhesive or brackets after sealing, and keep weight off the painted face to keep edges crisp and colors intact.
When Spray Painting Foam Core Works Well
Water-Based or Foam-Safe Sprays
Start with acrylic spray or any water-based spray labeled foam-safe. These formulas skip the aggressive solvent, a substance that dissolves other materials, that eats foam on contact. Major craft brands sell foam-safe lines, so check the can before you buy. If the label lists acetone, lacquer thinner, or xylene, leave it on the shelf.
Thin Coats on Paper-Faced Board
The paper facing, the thin paper skin glued to both sides, is your first line of defense against melting. Mist on light coats from about 10 to 12 inches away and let each pass dry before the next. Two or three thin passes typically beat one heavy coat for coverage and safety.
Small to Medium Art and Display Pieces
Painting foam core for art projects is realistic when the piece is small to medium and handled gently. Sprayed surfaces stay soft, so plan on a sealing coat if the board will be touched. Larger panels flex more and crack the paint at the edges.
Indoor Projects with Good Ventilation
Spray indoors only with real airflow, an open window plus a fan pulling air out. OSHA treats aerosol mists as respiratory irritants, so wear a mask and keep the space vented through drying time. Move the piece to a dust-free spot for curing.
When It Doesn't: Foam Core That Will Melt or Warp
Solvent-Heavy Automotive Sprays
Automotive spray paint is usually a bad match for bare foam core. Those cans rely on a strong solvent, a liquid that dissolves other materials, and that same action can eat the foam underneath the paper facing. If you must use car paint, seal the board first and spray a hidden test piece.
Thick Wet Coats on Bare Foam Edges
Heavy coats are where warping and melting start. The exposed foam at cut edges has no paper facing to protect it, so a wet pass soaks in and softens the core. Keep coats light, hold a consistent distance of about 10 to 12 inches, and let each pass dry before the next.
High-Humidity Drying Without Airflow
Moist air plus no airflow keeps paint wet longer, and longer wet time means more chance for the paper facing to wrinkle. Move the board to a dry spot with steady ventilation and give it the full drying time on the can, typically 24 to 48 hours for a full cure. OSHA ventilation guidance applies indoors.
Large Boards That Need a Perfect Mirror Finish
Big panels show every flaw, and foam core flexes and warps under uneven coating. A primer and sealer first, then thin acrylic spray or water-based spray, gives the flattest result. For a true mirror finish, use a rigid substrate instead.
Spray Cans vs Spray Guns, and What It Actually Costs
Aerosol Cans: Cheap, Convenient, Limited Control
Aerosol cans cost $6, $15, cover a few small boards, and need no equipment. Tradeoff: fixed spray pattern and limited pressure adjustment, so keep a safe distance. Choose acrylic or water-based foam-safe spray; build light coats, not wet passes.
Spray Guns: Better for Large Runs, More Cleanup
Spray guns suit many boards or consistent finish, with controllable pressure and pattern. Catch: setup and cleanup each session. Budget $40, $150 for a gravity-feed gun, plus a compressor. For one small board, a can wins.
Craft Spray vs Automotive Spray Price per Square Foot
Craft sprays cost more per square foot; small cans cover 4-8 square feet, so large runs get expensive. Automotive and reducer-based systems cost more upfront but stretch further. Test compatibility first.
Cleaning and Maintaining Your Spray Equipment
Clean the gun immediately after each session, before paint cures. Flush with recommended solvent until it sprays clear. Wipe the tip, store dry, check seals; skip cleaning and you’ll fight clogged patterns.
Common Mistakes and How to Fix Them
User error, not the paint itself, causes most foam core failures. Here are the mistakes that ruin boards and how to prevent them.
Spraying Too Close and Melting the Foam
Keep the can 8 to 12 inches away and move in steady passes. A solvent in the paint dissolves the foam on contact, so close-up blasting causes instant melting and pitting.
Skipping the Scrap Test
Always spray a leftover piece first and let it dry fully. A test piece reveals whether your paint attacks the foam before you commit the good board.
Laying It on Too Thick in One Pass
Build light coats instead of one wet layer. Heavy passes soak the paper facing and warp the board; two or three thin coats with drying time between them stay flat.
Forgetting Ventilation
Spray outdoors or in a garage with the door open and airflow moving. Aerosol fumes build fast in closed rooms, so follow the label and OSHA guidance on respiratory protection.
Not Sealing the Paper Facing
Seal cut edges and the paper facing with primer or a water-based spray first. Bare paper drinks paint unevenly and can lift, while a sealed surface gives solvent-based coats a buffer.
- Keep 8 to 12 inches of distance and use steady passes to prevent melting.
- Test on a scrap piece and let it dry fully before spraying the real board.
- Apply two or three light coats instead of one heavy pass to avoid warping.
- Spray outdoors or with strong airflow and follow label and OSHA safety guidance.
- Seal paper edges with primer or a water-based spray so paint goes on evenly.
When to Call a Pro (or Switch to a Different Paint)
Large Automotive-Finish Projects
Stop and get a pro involved if you are trying to lay down a real car-quality finish on a big foam core panel. Aerosol cans cannot deliver that level of build and gloss consistently, and a botched clear coat on a large surface is hard to undo.
Solvent Fumes in a Closed Workspace
Call it quits if you cannot get real airflow where you are spraying. Solvent vapors build fast in a garage or spare room, and OSHA treats confined spray areas as a serious hazard. Move outside or wait for a proper booth.
Boards That Keep Warping No Matter What
If your test piece still curls after light coats and full drying time, the board is fighting you. Paper facing absorbs moisture unevenly, and no amount of technique fixes a bad sheet. Switch boards or switch methods.
Alternative Paints: Acrylic, Gesso, Brush-On Options
For most home projects, acrylic spray or water-based spray is the safer call, and a gesso or primer coat brushed on first helps paint grip without attacking the foam. These options cut solvent risk and give you more control. Brush-on acrylic also skips overspray and ventilation headaches.
- Stop if the foam starts visibly melting or bubbling under the paper facing.
- Stop if you feel dizzy, get a headache, or your eyes water while spraying.
- Stop if you have no respirator rated for organic vapor and no outdoor space.
- Stop if the project needs a durable automotive clear coat over a large area.
Can You Spray Paint Foam Core: Frequently Asked Questions
?Can You Spray Paint Foam Core Without Melting the Foam Inside?
Yes, if you choose the right paint and apply it carefully. The foam core's foam center is what melts, and solvent-based spray paint is the usual culprit. Use acrylic spray or a water-based spray, keep the can moving, and apply light coats. The paper facing protects the foam somewhat, but heavy wet coats can soak through and cause damage.
?Can You Spray Paint Foam Core Every Time, or Does It Melt with Certain Products?
Only with certain products. Solvent-based spray paint will attack the foam and cause melting, while acrylic and water-based formulas are much safer. Always check the label for solvent content and test on a scrap piece before touching your real board. One quick test saves a whole project.
?How Can You Spray Paint Foam Core Safely in a Small Room?
You can't do it safely in a small, closed room. Spray paint needs strong ventilation, so work outdoors or in a garage with the door open and a fan moving air. Wear a respirator rated for paint fumes. Keep the distance about 8 to 12 inches from the board and use light coats. If you can smell fumes building up, stop and air the space out.
?Why Does Spray Paint Sometimes Warp Foam Core Instead of Melting It?
Warping comes from moisture, not melting. Water-based spray paint and primer add moisture to the paper facing, which expands one side more than the other. Light coats with drying time between them reduce this. Seal the board first if you plan a heavy finish. If a board does warp, weight it flat while it dries to pull it back.
?is Primer Necessary Before You Spray Paint Foam Core?
It depends on the look you want, but a primer helps. Primer is a preparatory coating that gives the paint something to grip and blocks the paper facing from soaking up unevenly. Use a water-based primer made for craft or foam surfaces, apply it thin, and let it dry fully. Skip solvent primers, which can eat the foam.
?When Should You Skip Spray Paint and Use Something Else on Foam Core?
Skip spray paint when the board will be handled hard, will get wet, or needs a perfect smooth finish. Foam core dents and its paper facing tears. Brush-on acrylics or sealing the edges with tape give more control. If the piece is structural or outdoor, use foam board rated for it or a different material entirely.
?What is the Biggest Mistake People Make When They Spray Paint Foam Core?
The biggest mistake is spraying one heavy, wet coat from too close. That soaks the paper facing, reaches the foam, and causes melting or warping. Instead, use several light coats, hold the distance the can recommends, and let each coat dry before the next. Test on a scrap piece first, and seal the finished board to protect it.
Our Thoughts
Light coats, correct distance, and a solvent-free formula are what keep foam core intact. Hold the can 10 to 12 inches away and mist thin passes instead of soaking the surface. The paper facing hides trouble, so a test piece from the same batch tells you more than any label.
Your single best next step: buy an acrylic spray or water-based spray and test it on a scrap of foam core first. A primer made for foam adds bite without solvent attack. Work in ventilation, respect drying time between coats, and seal the finished piece to protect the paper facing.