
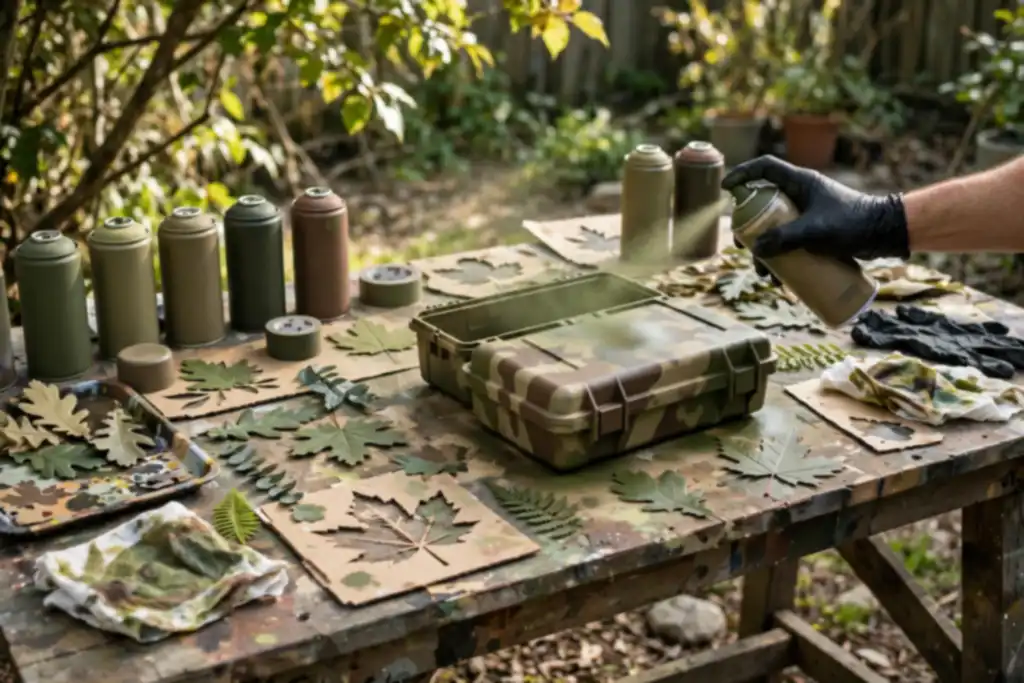
To camouflage with spray paint, start with a clean, primed surface and work in thin layers, because proper surface preparation and adhesion are what keep the pattern from flaking off.
What is the biggest mistake people make when they try how to camouflage with spray paint? Skipping the prep work. A camouflage pattern is only as good as the base it sits on, so you need to clean and prime the surface first. Primer, a preparatory coating put on materials before painting, gives the paint something to grip. Without it, adhesion (the interaction that makes dissimilar surfaces stick together) fails, and your pattern peels off in weeks.
You will get a step-by-step method for laying down a durable, good-looking camouflage pattern on metal, plastic, or fabric. The focus is on safety and avoiding common errors: choosing the right primer, using masking tape and stencils for crisp edges, controlling layering and drying time, and finishing with a clear coat. You will also learn which mistakes ruin adhesion and how to set up a safe workspace.
- Clean and prime the surface first for proper adhesion.
- Use thin layers and let each coat dry fully.
- Mask edges with tape or stencils for sharp patterns.
- Apply a clear coat to protect the camouflage pattern.
- Always work outdoors or ventilated and wear a respirator.
How to Camouflage with Spray Paint: Choose Your Surface and Pattern First
Before you shake a single can, settle two questions: what the surface is and where the object will sit. Getting these right keeps your camouflage pattern believable and your coating stuck.
| Your situation | What to do | Why |
|---|---|---|
| Bare metal gear | Scuff, degrease, then primer | Primer is a preparatory coating that gives spray paint something to grip |
| Plastic tools or cases | Clean and use a plastic-friendly primer | Weak adhesion causes flaking within weeks |
| Fabric or gear | Use fabric-specific spray paint | Standard paint cracks when the material flexes |
| Vehicle panels | Check local laws before spraying | Some states restrict certain colors and patterns |
| Hunting gear in woods | Woodland tones with layered stencils | Breaks up the outline at close range |
| Open desert terrain | Sand, tan, and light brown base coat | Matches bright, low-contrast ground |
| Urban surroundings | Gray and charcoal with sharp edges | Blends into concrete and shadow lines |
| One-off small project | DIY spray paint with masking tape | Cheap and quick for a single item |
| Full vehicle or fleet | Professional wrap or coating | Consistent finish and easier to reverse |
Recommended for this job

Rust-Oleum Ultra Cover 2X Camouflage Army
Non-reflective army green spray blends equipment into natural terrain and hunting surroundings.

Letter Stencils Set
Reusable letter stencils let you spray paint camouflage patterns, codes, and markings cleanly.

AirGearPro G-500 Reusable Respirator Mask
Reusable respirator with vapor and dust filters protects lungs while spray painting camouflage.
Match the coating to the material first, then the terrain, a suitable pattern still fails if the paint peels.
What Are You Painting? (Metal, Plastic, Fabric, or Vehicle)
Surface prep decides longevity. Metal: sand lightly, degrease, then primer for top-coat adhesion. Plastic needs plastic-specific primer; fabric needs flexible fabric paint. Vehicles require extra care for adhesion and legal rules.
Which Environment? Woodland, Desert, or Urban
Pick colors from the actual ground. Woodland: greens, browns, black in layered stencils. Desert: sand and tan. Urban: grays and charcoal with harder edges. Choose outdoor-rated camouflage spray paint.
Quick Decision: DIY Spray Paint vs. Professional Wrap
Small gear and one-off projects suit DIY spray paint with masking tape and stencils. Full vehicles, especially on public roads, warrant a professional wrap or coating. Check state rules on vehicle camouflage; some restrict colors or patterns.
Masking tape is removable tape used to cover areas you want to protect from overspray and to create crisp camouflage edges.
5-Minute Pre-Spray Check: Surface, Weather, and Legal Limits
Is the Surface Clean and Dry?
Yes, it has to be both, or your primer will fail. Wipe off dirt and oil with a degreaser, then give it 10 to 15 minutes to dry fully. Any moisture trapped under the base coat kills adhesion, which is simply how well the paint sticks to the surface.
Will Humidity or Wind Ruin Your Finish?
High humidity and gusty wind both wreck spray paint results. Skip the job if humidity tops 70 percent or rain is due within 2 hours, since moisture clouds the finish. Test wind with a strip of masking tape; if it flaps hard, move indoors or wait.
Are You Allowed to Camouflage That Vehicle?
Not always, so check before you spray. Many states restrict camouflage pattern paint on registered road vehicles, and insurers may object. Call your state DMV or insurance agent first if the item is a car, truck, or trailer. For gear and tools, no permit is needed.
Run these checks before you shake a single can, because fixing a bad surface or a legal problem afterward costs far more than five minutes now.
How Spray Paint Camouflage Works: Layering, Masking, and Curing
Adhesion and Coverage: Why Primer Matters
Primer is a preparatory coating applied before color that makes paint stick; without it, base coat can flake off metal, slick plastic, or oily wood within weeks. Scuff the surface, clean with a degreaser, then apply a primer rated for your material. Adhesion depends on that prep, skip it and no top coat will save the job.
Stencils and Masking: Building the Pattern
Build camouflage in layers, not one pass. Cut stencils from card stock or use masking tape, spray lightest color first and work darker.
- Apply base coat and let it flash off, typically 20 to 30 minutes.
- Tape or stencil, then spray next color with soft, irregular edges.
- Repeat with two or three tones, shifting stencil placement each time.
Curing: When It’s Truly Dry
Dry to the touch is not cured. Most spray paints feel dry in 30-60 minutes but need 24 hours or more before handling and up to a week for full hardness. Add a clear coat for durability, then let it sit in a dust-free space. Work outside or with strong ventilation and wear a respirator, since solvent vapors are the real hazard.
Before You Start: Gear, Safety, and Surface Prep
Respirator and Ventilation: Non-Negotiable
Wear a respirator rated for organic vapors, not a dust mask, and spray outdoors or in a garage with the door open and a fan pushing air out. Solvent fumes build fast in small spaces, so keep the area cross-ventilated until the clear coat is dry.
Tools and Accessories for Spray Painting
Gather everything before you shake the first can so you are not hunting for tape mid-coat.
- Masking tape and stencils: tape off glass, trim, and hardware, and cut stencils from card stock for crisp edges.
- Primer and clear coat: buy a primer made for your surface and a compatible clear coat for durability.
- Nitrile gloves and drop cloths: protect your hands and the floor from overspray.
Clean, Degrease, and Prime
Wash the surface with a degreaser, rinse, and let it dry completely, because paint will not stick to oil or dust.
Scuff glossy areas with fine sandpaper, wipe off residue, then apply a thin primer coat. Primer, a preparatory coating that helps the top coat bond, gives you strong adhesion so the camouflage pattern lasts.
- Respirator and ventilation: wear an organic vapor respirator and spray outdoors or with strong cross-ventilation until the clear coat dries.
- Masking tape and stencils: tape off glass, trim, and hardware, and cut card stock stencils for crisp pattern edges.
- Primer and clear coat: choose a primer made for your surface and a compatible clear coat for durability.
- Gloves and drop cloths: nitrile gloves and drop cloths keep your hands and floor clean of overspray.
- Degrease and dry: wash with a degreaser, rinse, and let the surface dry fully so paint bonds.
- Scuff and prime: sand glossy spots lightly, wipe off dust, then apply a thin primer coat for solid adhesion.
Step-by-Step: How to Camouflage with Spray Paint (Woodland Example)
Clean and Degrease the Surface
Wipe the entire surface with a degreaser to remove oil, dust, and fingerprints. Skip this and adhesion suffers, causing paint to flake off within weeks. Let it dry completely.
Mask off Areas You Want to Protect
Cover glass, lights, vents, and hardware with masking tape and paper. Press every edge flat so overspray cannot creep underneath.
Apply Primer and Let It Cure
Primer helps paint stick to metal, plastic, or wood. Use one made for your material and spray thin, even coats 10 to 12 inches away. Give it the full drying time, typically 1 to 2 hours.
Lay Down the Base Color
Choose three to four colors matching your surroundings, such as tan, olive, and brown for woodland. Spray the lightest shade as a base coat in thin passes and let it dry.
Add Mid-Tone Layers with Stencils
Cut stencils from cardstock or use leaves and branches for organic shapes. Hold each stencil close and spray light passes at varying angles. Finish with a clear coat once dry.
Follow these steps in order and your camouflage pattern will hold up and look right the first time.
Second Path: Camouflage for Vehicles and Hunting Gear
Vehicle Camouflage: Legal Checks and Panel-by-Panel Approach
Confirm your state’s motor vehicle rules on painted camouflage first, since some restrict patterns or colors on public roads. Work one panel at a time so the pattern lines up instead of smearing across seams.
Hunting Gear: Flexible Paints and Fabric-Safe Formulas
Use flexible paints labeled for plastic, rubber, or fabric, because rigid coatings crack on gear that bends. Spray in a ventilated area with a respirator rated for organic vapors, and keep coats thin.
Maintenance and Touch-Ups After Wear
Plan on a touch-up pass each season, or sooner if edges wear through. Clean the spot, feather the old coat, and respray the same color so the camouflage pattern stays consistent.
Treat a vehicle or a set of hunting gear like the surface it is, and the pattern will hold up through weather, wear, and washings.
Real-Life Walkthrough: Camouflaging a Hunting Truck Bed
Assessing the Surface and Local Laws
Wash the bed with a degreaser, then scuff all metal and plastic with 320-grit sandpaper so the primer bonds. Wipe with a tack cloth and let it dry 30 minutes. Before you buy spray paint, call your state DMV: some states restrict camouflage pattern coverage on registered trucks, and DOT reflectors or safety markings must stay visible.
Choosing a Woodland Pattern for Your Area
Pick three to four flat earth tones, such as olive drab, khaki, brown, and black, and layer lightest to darkest. Cut stencils from cardstock or use masking tape for hard edges; torn edges give softer shapes. Keep shapes 4 to 8 inches wide, matching the brush and timber where the truck parks.
From Primer to Clear Coat: a Weekend Project
Apply a self-etching primer for adhesion on bare metal, then wait the can’s recoat window, typically 1 to 2 hours. Build the base coat in thin passes, keeping the nozzle 8 to 12 inches away. Spray outdoors with a respirator rated for organic vapors and cross-ventilation. Leave 20 to 30 minutes between coats, then finish with two clear coat layers; full curing takes 5 to 7 days before washing.
Troubleshooting: Runs, Peeling, and Blotchy Patterns
Most camouflage spray paint failures trace back to skipping prep or rushing coats, and each one has a straightforward fix.
| Problem | Likely cause | Fix |
|---|---|---|
| Paint peeling | No primer or oily surface | Clean, then prime bare metal |
| Runs and drips | Coats sprayed too wet | Sand smooth, recoat in thin passes |
| Blotchy color | Uneven distance or overlap | Hold 8 to 12 inches, overlap 50 percent |
| Hard-edged shapes | Stencil lifted too early | Let paint set, then pull tape |
| Paint flaking on plastic | Poor adhesion | Scuff surface, use bonding primer |
| Fuzzy overspray | Can too far from surface | Move closer, use light passes |
| Tacky finish | Humidity or thick layers | Extend drying time, add clear coat |
Why is My Paint Peeling? (Primer and Cleanliness)
Peeling almost always means the paint never bonded to the surface. A primer is a preparatory coating that gives the top coat something to grip, and adhesion is simply how well those layers stick together.
Wipe the whole surface with a degreaser, scuff glossy areas, and let it dry fully before priming. Skip this and no top coat will save you.
Fixing Runs and Sags Without Starting Over
Runs come from spraying too wet in one pass. Let the coat dry, sand the drip flat, then rebuild with thin layers instead of one heavy coat.
Keep the can moving and overlap each pass about half. Several light coats also shorten total drying time between colors.
Blending Mistakes: How to Soften Hard Edges
Hard edges usually mean stencils or masking tape came off too soon. Pull tape while the paint is still slightly tacky, or score the edge first.
To blend colors, feather light passes across the border rather than spraying straight at it. Finish with a clear coat to lock the camouflage pattern together.
Cost Breakdown: DIY Spray Paint vs. Professional Wrap or Paint Job
Budget the job like a pro before you buy a single can, because spray paint camouflage costs far less than a wrap or shop paint job only when you account for prep, mistakes, and redo time.
| Option | Upfront cost | Ongoing cost | Notes |
|---|---|---|---|
| DIY spray paint kit (primer, 3 to 4 colors, clear coat) | $60 to $150 | Touch-ups every 1 to 3 years | Cost scales with surface area |
| Stencils and masking tape | $15 to $60 | Reusable if cleaned | Cut your own to save more |
| Respirator and ventilation setup | $30 to $80 | Filter replacements | Non-negotiable for safety |
| Vinyl camo wrap, DIY kit | $300 to $700 | Replacement panels | Needs clean, flat panels |
| Vinyl wrap, pro install | $1,500 to $4,000 | Re-wrap in 5 to 7 years | Labor drives the price |
| Professional camo paint job | $2,000 to $6,000 | Clear coat refresh | Prep and booth time billed |
| Hydro dipping, per item | $100 to $400 | Clear coat refresh | Best for small parts |
Ranges assume a mid-size item such as a truck bed rack, ATV panel set, or kayak, US pricing, and DIY labor at no charge. Larger vehicles and show-quality finishes push costs toward the top or beyond; quotes vary by region and shop.
DIY Spray Paint: What You’ll Spend on Paint, Primer, and Stencils
Expect roughly $60 to $150 for a mid-size project: primer for adhesion, three or four camouflage pattern colors, masking tape, stencils, and clear coat. Add $30 to $80 for a respirator and ventilation. Cheap cans cost more when adhesion fails and you strip and redo.
Professional Vinyl Wrap or Camo Paint: Typical Ranges
A pro vinyl wrap runs about $1,500 to $4,000 installed, while a shop camo paint job lands near $2,000 to $6,000. Hydro dipping small parts costs $100 to $400 per item. You pay for prep, booth time, and warranty.
When DIY Saves Money (and When It Doesn’t)
DIY wins on simple shapes, tight budgets, and gear you can touch up yourself. It loses when surface preparation is complex, curves fight stencils, or a failed base coat means stripping everything. Wrap or pro paint pays off on high-value vehicles.
Myths vs. Facts: Spray Paint Camouflage Edition
Myth: Any Spray Paint Works on Plastic
Wrong. Plastic needs plastic-specific paint or the base coat will flake off within weeks. Check the can’s labeling and test adhesion on a hidden spot. For camouflage work, use matte spray paint rated for the material: clean, scuff lightly, then apply a plastic primer so the base coat grips.
Myth: You Don’t Need a Respirator Outdoors
False. Outdoor air dilutes fumes but doesn’t eliminate them, and overspray drifts back toward your face. Wear a respirator rated for organic vapors and keep the wind at your back. OSHA treats spray paint solvents as a real exposure risk, indoors or out.
Myth: Clear Coat Makes It Bulletproof
No coating is bulletproof. Clear coat resists scratches, moisture, and fading but won’t stop impacts or heavy abrasion. Apply thin layers, usually 15 to 30 minutes apart, then let it cure fully. Surface prep and layering matter more than any single product.
Layering means applying several thin coats of different colors in sequence to build up the camouflage pattern.
Common Mistakes to Avoid When Spray Painting Camouflage
Skipping Primer on Metal or Plastic
A preparatory coating that helps paint stick is primer, so skipping it on metal or plastic invites peeling. Bare surfaces need a bonding primer rated for that material; without it, adhesion fails and your pattern flakes off.
Overcomplicating the Pattern
Too many colors and stencils turn a camouflage pattern into visual noise that stands out instead of blending. Pick three or four colors matched to your surroundings, then keep shapes irregular and simple.
Ignoring Drying Times Between Layers
Rushing layers traps solvents and produces wrinkling or lifting. Follow the can’s recoat window, typically 10 to 30 minutes for a fresh coat and 24 hours before clear coat.
- Forgetting surface preparation: sand, degrease, and dry before anything else, or nothing bonds.
- Spraying in poor ventilation: work outdoors or in a forced-air space and wear a respirator.
- Heavy base coat: thin passes beat one wet coat for even coverage and adhesion.
- Skipping clear coat: a top coat protects the pattern from scuffs and weather.
When to Call a Pro: Safety and Legal Red Flags
You’re Spraying a Vehicle Without Checking Local Laws
Camouflage paint on a street-driven car can violate state or local vehicle codes, and some jurisdictions treat it as impersonating a military vehicle. Check with your state DMV and local police before you touch a panel. If you can’t get a clear answer in writing, hire a pro who knows the rules.
You Lack Proper Ventilation or Respirator
Spray paint aerosols demand serious airflow and a fitted respirator rated for organic vapors. A garage with the door cracked open is not enough. If you can’t spray outdoors or in a properly ventilated booth, stop and book a professional shop.
You Want a Flawless, Long-Lasting Finish
Show-quality results depend on controlled conditions, correct primer and adhesion, and controlled drying time, which most home setups can’t deliver. Environmental impact matters too: overspray and solvent waste need proper disposal per EPA and local household hazardous waste rules. A pro handles both.
Stop and call a professional if:
- You're spraying a vehicle and haven't confirmed local laws allow camouflage paint on it.
- You don't have a fitted respirator and strong cross-ventilation for the entire spray session.
- You're painting a surface you can't properly prepare, so adhesion and primer won't hold.
- You need a flawless, long-lasting finish that only a controlled booth and trained hand can deliver.
- You have no safe plan for overspray, solvent waste, and disposal under EPA or local rules.
How to Camouflage with Spray Paint: Frequently Asked Questions
?Can Spray Paint Camouflage Actually Hold up Outdoors, or Will It Fail Fast?
It holds up if you do the prep and finish right. Spray paint camouflage lasts when the surface is clean and scuffed, a primer made for that material is applied, and a clear coat seals the top coat. Skip any of those and you get peeling, fading, or poor adhesion, which is when dissimilar surfaces fail to stick together.
?How to Camouflage with Spray Paint Without Ending up with a Blotchy Mess?
Work in thin layers and keep the can moving. Light passes from about 8 to 10 inches away, let each coat flash off, and build the camouflage pattern gradually instead of soaking one spot. Use masking tape and stencils for hard edges, and check your work from a distance so the pattern reads correctly rather than looking patchy up close.
?Why Does Spray Paint Camouflage Peel off Some Surfaces but Not Others?
Adhesion is the whole story. Bare metal, glossy plastic, and slick painted surfaces reject paint unless you scuff them and use the right primer, a preparatory coating that gives the topcoat something to grip. Clean off oils and dust first. If the surface stays glossy or contaminated, no amount of spray paint will stay put.
?How to Camouflage with Spray Paint Safely Without Breathing Fumes?
Spray outdoors or in a space with strong cross-ventilation, and wear a respirator rated for organic vapors, not a dust mask. Keep the can away from flames and hot surfaces, and let the base coat and top coat dry fully before adding layers. If you can smell solvent, your ventilation is not good enough, so stop and fix it.
?What is the Right Order for Layers When You Spray Paint a Camouflage Pattern?
Base coat first, then your lightest color, then darker tones on top, with masking tape or stencils between passes. Let each layer reach its drying time before masking, or tape will pull paint. Finish with a clear coat to lock the camouflage pattern in and protect it from UV and abrasion.
?When Should You Not Spray Paint Camouflage on a Vehicle or Gear?
Skip it when the item is leased, financed, or legally restricted, and check local rules before coating anything registered for the road. Also avoid spraying in high humidity, wind, or cold, since those conditions wreck adhesion and drying time. If you need a factory finish or resale value, a pro job is the safer call.
?Does How to Camouflage with Spray Paint Change for Plastic Versus Metal?
Yes, the prep changes even though the layering stays the same. Plastic needs a cleaning, a light scuff, and a primer formulated for plastic so the spray paint bonds instead of flaking. Metal needs degreasing and a rust-inhibiting primer. Fabric and gear take flexible coatings. Match the primer to the material first, then build your camouflage pattern.
Conclusion
Good camouflage work comes down to patience and safety, not luck. Clean and prime first, because primer is the preparatory coating that helps paint bond, and weak adhesion is the mistake that ruins most DIY jobs. Layer matte colors in thin coats, respect drying time between passes, and finish with a clear coat for durability.
Your next step: test your stencil layout on scrap material before touching the real surface. Spray outdoors or in a well-ventilated space, wear a respirator, and keep masking tape edges pressed flat so lines stay crisp.
Sources and further reading: guidance from EPA, OSHA.