
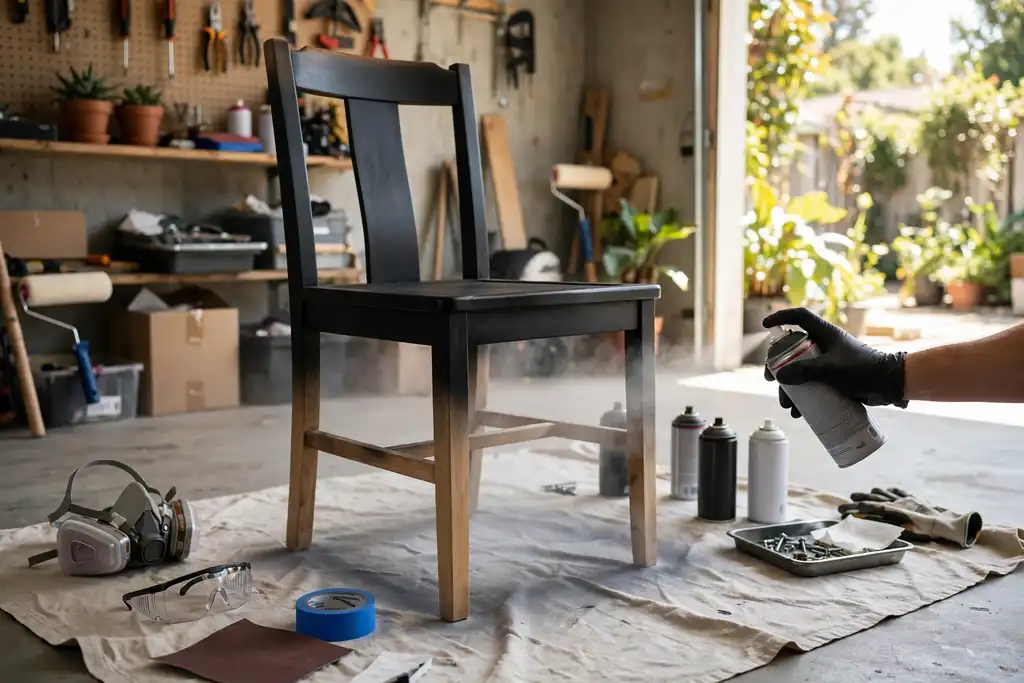
Yes, you can paint furniture with spray paint, but only if you use the right primer and prep; skipping either leads to peeling, poor adhesion, or a blotchy finish that wastes your time and money.
A single rattle can of spray paint can cover a small side table in under 30 minutes, yet most failed DIY paint jobs trace back to skipping primer or sanding. So can you paint furniture with spray paint without brush marks? Yes, but only when you prep the surface, control the environment, and respect the safety gear.
You will learn the exact steps to avoid common mistakes: choosing the right primer for wood, metal, or plastic, sanding for adhesion, setting up a drop cloth and painter’s tape, and using a respirator with ventilation. We also cover coats, drying time between layers, and when a rattle can beats a spray gun for a smooth finish.
Can You Paint Furniture with Spray Paint? Yes, Here's How
Yes, you can spray paint furniture, and rattle cans give you a smooth, even finish without brush marks. The catch is that results depend on prep and safety, not luck.
| Situation | What it means | What to do |
|---|---|---|
| Solid wood pieces | Porous surface holds paint well | Sand, prime, then apply thin coats |
| Metal furniture | Slick surface resists adhesion | Degrease and use a bonding primer |
| Plastic or laminate | May resist paint without a bond | Use a primer made for plastics |
| Painted or varnished wood | Old finish can lift or flake | Sand dull and test a hidden spot |
| Indoor use | Fumes build up fast | Spray outdoors or ventilate heavily |
| High-traffic pieces | Wear shows on thin finishes | Add extra coats and a clear topcoat |
Recommended for this job

Rust-Oleum Painter's Touch 2X Ultra Cover
Oil-based spray paint bonds to metal, wood, and plastic furniture surfaces.

Rust-Oleum Painter's Touch 2X Ultra Cover
White primer preps furniture surfaces so topcoat spray paint adheres evenly.

Odor/Particulate Multipurpose Respirator
Respirator filters paint odor and particles while spraying furniture indoors.
Why Spray Paint Works on Furniture
A rattle can lays down thin, even layers that level as they dry, so you skip the brush streaks. Adhesion, the bond between paint and surface, depends on a clean, scuffed surface plus the right primer, a preparatory coating applied before color. Nail those two and the finish lasts.
The Short Answer: It Depends on the Furniture
Solid wood, metal, and most plastics take spray paint well. Veneer, laminate, and factory-finished pieces need a bonding primer first. Repair loose joints and strip peeling layers before you spray.
What You Need to Know Before You Start
Work outdoors or in a garage with cross-ventilation, and wear a respirator rated for organic vapors. Lay a drop cloth, mask glass and hardware with painter’s tape, and sand lightly with 220-grit between coats. Apply two to three thin coats, not one heavy pass, waiting 15 to 30 minutes between them depending on humidity. A spray gun gives more control on large pieces; a rattle can handles most jobs.
Your Step-by-Step Action Plan for Spray Painting Furniture
Spray paint can transform furniture, but only if you prep and spray correctly. This action plan focuses on safety and avoiding common mistakes so you get a durable finish the first time.
| Action | Why it helps | How to start |
|---|---|---|
| Clean and sand | Promotes adhesion | Wipe with degreaser, then sand |
| Choose paint and primer | Ensures compatibility and durability | Match spray paint to surface type |
| Set up safety gear | Protects lungs and skin | Use respirator, ventilation, drop cloth |
| Apply thin coats | Prevents drips and uneven finish | Hold rattle can 8 to 12 inches away |
| Let dry and cure | Prevents smudges and extends life | Wait full drying time between coats |
Step 1: Clean and Sand the Surface
Yes, you can spray paint furniture, but adhesion starts with prep. Scrub the piece with a degreaser to lift oils and grime, then sand with 220-grit paper to dull the finish so the coating has something to grip. Wipe off dust with a tack cloth before you spray.
Step 2: Choose the Right Spray Paint and Primer
Match your spray paint and primer to the material, wood, metal, or plastic. A bonding primer is a preparatory coating that helps paint stick to slick surfaces like laminate or factory-finished metal. Two light primer coats beat one heavy pass.
Step 3: Set up Safety Gear and Ventilation
Work outdoors or in a garage with the door open, never in a closed room. Wear a respirator rated for organic vapors, plus nitrile gloves and eye protection. Lay a drop cloth and run painter’s tape over hardware and glass.
Step 4: Apply Thin Coats with Proper Technique
Shake the rattle can for 60 seconds, then spray in overlapping passes 8 to 12 inches from the surface. Apply two to three thin coats; heavy coats cause runs and poor adhesion. A spray gun gives more control on large pieces.
Step 5: Let It Dry and Cure
Recoat within 15 to 30 minutes or wait per the label, since timing varies by product. Full cure takes 24 to 72 hours depending on humidity. Reassemble only after that window.
Spray Paint vs. Brush Painting: Which Should You Choose?
A Decision Rule Based on Furniture Size, Detail, and Finish
Match the tool to the piece, not to your mood at the hardware store. Small, detailed, or hard-to-brush items favor aerosol; big flat panels favor a brush or roller. If you want a factory-smooth finish, plan on spray paint.
When Spray Paint Wins
Choose a rattle can for chairs, lamp bases, picture frames, and anything with spindles, curves, or tight corners. Aerosol reaches spots a brush can’t and lays down thin, even coats without lap marks. It also dries fast, typically 15 to 30 minutes to touch, so recoating goes quickly.
Two catches: you need real ventilation, and a respirator rated for organic vapors is worth the cost. Mask off glass and moving parts with painter’s tape, and spread a drop cloth well past the piece since overspray travels. Light coats beat heavy ones for adhesion.
When Brush Painting Wins
Pick a brush or roller for large flat surfaces like tabletops, dressers, and cabinets, where a rattle can runs out and sprays unevenly. Brushing also makes sense indoors when you can’t ventilate or move the piece outside.
You’ll still need sanding and a bonding primer for grip, plus more drying time between coats. A spray gun suits big jobs if you already own one and can control the mess.
Is It Okay to Spray Paint Wooden Furniture?
Yes, but Wood Needs Special Care
Yes, you can spray paint wooden furniture, often the fastest way to a smooth, even finish. But wood is porous and absorbs coating unevenly, so prep is essential. Use light coats rather than one heavy pass; thin layers dry faster and resist runs.
Preparing Wood for Spray Paint
Clean with a degreaser, then sand to open the grain and give the coating grip. Wipe off dust, apply primer (especially on bare or stained pieces), and mask hardware and glass with painter’s tape. Work outdoors or in a ventilated garage, wear a respirator, and use a drop cloth.
Best Spray Paints for Wood Furniture
Choose spray paint labeled for wood with a matching primer from the same brand. A rattle can works for small pieces; a spray gun suits larger furniture. Build two to three thin coats, respecting drying times (typically 30 minutes to a few hours), and let the finish cure several days before use.
Doing It on a Budget Without Cutting Corners
Cost Breakdown: Rattle Cans vs. Spray Gun vs. Professional
Typically, a single rattle can runs $6 to $12 and covers roughly 10 to 15 square feet per can, so a dresser may need four to eight cans. A spray gun costs $40 to $150 up front plus paint, though it pays off across multiple projects. Pro spraying often lands at $200 to $600 per piece.
Hidden Costs: Primer, Safety Gear, and More
Budget for the items that make the job last: primer (a preparatory coating that helps paint bond), sanding supplies, painter’s tape, and a drop cloth to catch overspray. A respirator and eye protection are non-negotiable, and OSHA recommends proper respiratory protection when spraying. Add 10 to 25 percent to your can budget for these extras.
Where to Save and Where to Splurge
Save on tape, cloths, and sandpaper by buying generic, but splurge on quality primer and paint, since adhesion and finish durability depend on them. Cheap cans often spray unevenly and need more coats, which costs more in the end.
When Spray Painting Furniture Works Best
Ideal Weather Conditions for Spraying
Spray outdoors or in a garage with the door open, and pick a day between roughly 60°F and 80°F with low humidity. That range keeps the aerosol atomizing evenly and helps the coating flow out without trapping moisture.
Avoid windy days unless you can block the breeze, since drift ruins adhesion and wastes product. Skip rain and high humidity too, because moisture slows drying time and can leave a hazy, uneven finish.
Furniture Types That Take Spray Paint Well
Wood, metal, and most rigid plastics are solid candidates for a rattle can job. Smooth factory finishes on laminate and melamine hold up if you scuff them first with sanding and a bonding primer, a preparatory coating that gives the topcoat something to grip.
Loose joints, peeling veneer, and heavy grease are the real deal-breakers, not the material itself. Fix or clean those first, or the new layer will fail.
Finish and Durability Expectations
Expect a decent, even look from a spray gun or can, but not factory-grade toughness on high-traffic pieces. Thin coats build a smoother surface than one heavy pass, and each layer needs proper drying time before the next.
Set up a drop cloth and mask edges with painter’s tape before you start. Wear a respirator and work with strong ventilation; per OSHA guidance, aerosol solvents are not something to breathe indoors.
How to Spray Paint Furniture: Step-by-Step Technique
Control comes down to distance and motion. Hold the can 8 to 12 inches away and keep it parallel to the surface.
Hold the Can Correctly and Maintain Distance
Keep your wrist locked and move from the shoulder. Too close floods the surface, too far causes a dry, gritty texture.
Use Smooth, Overlapping Strokes
Start the spray before the piece and stop after it. Overlap each pass by about half so no bare stripes appear.
Apply Multiple Thin Coats
Build two to three light coats, respecting the recoat window printed on the label. Thin layers bond better and level out.
Deal with Drips and Runs Immediately
Blot a run with a lint-free cloth, let it flash off, then sand the spot smooth before recoating.
Spraying furniture is straightforward once your can control is dialed in, so follow these steps in order and check your work as you go.
Quick Checklist Before You Start Spray Painting
Surface Prep Checklist
Clean and sand first, or the coating will peel. Degrease, then scuff lightly for grip.
- Clean: strip grease, wax, and polish with a degreaser; dry fully.
- Sand: scuff glossy and bare spots with 220-320 grit until dull, not scratched.
- Prime: use a primer made for your material (wood, metal, or plastic).
- Tape: mask glass, hinges, and pulls with painter’s tape.
Safety and Ventilation Checklist
Spray outdoors or in a garage with the door open and a fan moving air. Protect your lungs and floor.
- Ventilation: keep cross airflow moving; never spray in a closed room.
- Respirator: wear a NIOSH-approved respirator rated for organic vapor, not a dust mask.
- Drop cloth: cover floors, walls, and furniture before starting.
- Flammables: keep cans and spray guns away from pilot lights, heaters, and sparks.
Materials and Weather Checklist
Check the label and forecast together. Cold, damp, or windy air ruins adhesion and leaves a gritty finish.
- Temperature: spray when air and surface stay between 50 and 90°F.
- Humidity: skip rainy or muggy days; moisture clouds the finish.
- Coats: plan thin coats with drying time per the can, often 15-30 minutes between coats.
- Test: spray a scrap piece first to confirm color and adhesion.
- Clean: strip grease, wax, and polish with a degreaser, then let it dry fully.
- Sand: scuff glossy and bare spots with 220 to 320 grit so the surface feels dull, not scratched.
- Prime: use a primer (a preparatory coating) made for your material, wood, metal, or plastic.
- Tape: mask glass, hinges, and pulls with painter's tape, a removable pressure-sensitive tape that peels clean.
- Ventilation: keep cross airflow moving; never spray in a closed room.
- Respirator: wear a NIOSH-approved respirator rated for organic vapor, not a dust mask.
- Drop cloth: cover floors, walls, and nearby furniture with a drop cloth before you start.
- Temperature: spray when air and surface stay between 50 and 90 degrees F.
When Spray Painting Furniture Doesn't Work
Furniture with Heavy Damage or Peeling
Skip spray paint when a piece has deep gouges, water damage, or large areas of peeling veneer. Aerosol paint sits on the surface, so it won’t hide structural flaws or stop old layers from flaking. You can spray furniture with minor scratches after sanding (smoothing imperfections with an abrasive). Fill deeper defects first, then sand level. If damage spans more than a small patch, repair or replace the piece.
Certain Materials and Finishes
Shiny laminate, silicone-treated wood, and factory finishes with wax or oil can block adhesion, the bond that makes paint stick. Test a hidden spot first. If paint scratches off easily after curing, use a bonding primer (a preparatory coating applied before paint) or choose a spray gun for a heavier coating. Greasy kitchen pieces need degreasing before any primer.
Indoor Spraying Without Ventilation
Do not spray indoors without real airflow. Overspray and solvent fumes build fast; a respirator (a device that filters air for breathing) plus open doors and fans are the minimum. Set a drop cloth (a protective sheet for floors and surfaces) and use painter’s tape (removable pressure-sensitive tape) to mask edges. Better yet, move the piece outside or into a garage. Spray light coats and respect the labeled drying time between them.
Spray Painting Metal, Plastic, and More: Special Cases
Spray Painting Metal Furniture
Remove rust and grease, scuff with fine sanding, then apply a rust-inhibiting metal primer. Use thin coats; heavy coats run and chip.
Spray Painting Plastic Furniture
Many plastics resist adhesion. Clean with degreaser, sand lightly, and use a plastic-specific primer before color. For flexing pieces, choose flexible-surface paint.
Using a Spray Gun vs. Rattle Cans
Rattle cans suit small pieces and tight budgets; a spray gun pays off on large or multiple items, offering adjustable flow and less waste. Wear a respirator and work with strong ventilation, ideally outdoors.
Finishing with Clear Coat
A clear topcoat protects color and controls sheen. Apply two or three light coats after the color fully cures, respecting the recoat window. Skipping this makes DIY pieces look tired within a year.
Upcycling Furniture with Spray Paint
Old dressers and chairs are ideal. Remove hardware, mask edges, and use a drop cloth. Car paint in a rattle can gives metal a hard, glossy finish; practice distance and speed on scrap first.
Common Mistakes and How to Avoid Them
Skipping Primer
Primer is a preparatory coating that gives the topcoat something to grip. Without it, adhesion fails on slick surfaces like metal or glossy plastic, and the finish chips within weeks. Sand first, then apply a bonding primer made for your material.
Spraying Too Thick
Heavy passes cause runs, drips, and a gummy finish that never hardens right. Hold the rattle can 8 to 12 inches away and build thin coats instead. Two or three light passes beat one soaked layer every time.
Not Allowing Proper Drying Time
Rushing between coats traps solvent and leaves a soft, wrinkled surface. Follow the can’s recoat window, typically 1 to 2 hours, and let the piece cure 24 to 48 hours before use. Humidity stretches those times.
Ignoring Safety Gear
Aerosol fumes are no joke indoors. Spray outside or in a garage with cross-ventilation, and wear an organic vapor respirator, not a dust mask. Tape off glass and hardware with painter’s tape, and lay a drop cloth to catch overspray.
- Skipping primer: bare or glossy furniture needs a bonding primer or the topcoat peels.
- Spraying too thick: heavy passes cause runs and a gummy finish. Build thin coats instead.
- Not allowing proper drying time: rushing recoats traps solvent and wrinkles the surface.
- Ignoring safety gear: fumes need outdoor or cross-ventilated spraying plus an organic vapor respirator.
- Missing prep: sanding and painter's tape protect the piece and prevent overspray mistakes.
- Using the wrong can: pick a formula matched to wood, metal, or plastic for real adhesion.
When to Call a Pro (Real Warning Signs)
Antique or Valuable Furniture
Stop if the piece is antique, signed, or worth real money. A rattle can finish can cut resale value by hundreds or thousands, and stripping it back is often impossible. Have a restorer or appraiser look first.
Large or Complex Pieces
Call a pro when the furniture has curves, carvings, glass, or many moving parts. Those details punish amateur spray paint work with drips and thin spots. A shop with a spray gun handles them in one pass.
Health and Safety Concerns
Do not spray indoors without real ventilation and a proper respirator, and never near a pilot light or water heater. If you cannot spray outside or in a garage with strong airflow, hire someone who can.
- Stop if the finish is peeling, cracked, or unknown, since adhesion and lead risk need a pro’s call.
- Stop if the piece is veneered, and sanding through the thin top layer would ruin it.
- Stop if anyone in the home has asthma or chemical sensitivity.
- Stop if you lack space for a drop cloth and painter’s tape setup that keeps overspray off cars and walls.
Can You Paint Furniture with Spray Paint: Frequently Asked Questions
?Can You Paint Furniture with Spray Paint Without Sanding First?
No, skip sanding only if the surface is already clean, dull, and sound. Sanding is the process of scuffing the surface with an abrasive so the new coating can grip. Give glossy or previously finished pieces a light scuff, wipe off the dust, then apply primer. That prep step is what makes adhesion, the bond between coating and surface, actually hold up.
?How Many Coats of Spray Paint Does Furniture Need?
Plan on two to three thin coats, not one heavy pass. Light coats dry faster and resist runs, drips, and uneven color. Start with a primer coat, let it flash off per the rattle can label, then build color slowly. Respect the listed drying time between coats and let the piece cure fully before you use it, or the finish will stay soft.
?Can You Paint Furniture with Spray Paint Indoors?
Only with real ventilation, and ideally not at all. Overspray travels, so move the piece outside or into a garage with the door open. If you must work indoors, set up a drop cloth, tape off the area with painter's tape, and wear a respirator rated for organic vapors. A dust mask is not enough for solvent-based aerosol fumes.
?Why Does Spray Paint Peel off Furniture?
Peeling almost always traces back to poor prep, not bad paint. Grease, wax, dust, or a glossy surface blocks adhesion, so the coating never bonds and lifts later. Clean with a degreaser, scuff with sanding, and use a primer made for your material. Also check the label: some spray paint needs a compatible primer, and mixing systems can fail.
?What Spray Paint Finish Should You Use on Furniture?
Match the finish to the piece and the abuse it takes. Satin and semi-gloss hide imperfections and wipe clean, which suits most furniture; flat looks good but shows marks. For high-touch pieces, choose an enamel or a coating labeled for furniture. The finish is the surface treatment you see and touch, so test a sample first.
?is a Rattle Can or Spray Gun Better for Painting Furniture?
A rattle can wins for small pieces and one-off projects; a spray gun wins for large pieces and repeat work. A spray gun is a device that sprays coating through the air onto a surface, and it gives you control over volume and pattern. Rattle cans are simple but costly per ounce and inconsistent on big flat surfaces.
?Can You Paint Furniture with Spray Paint Over Old Paint or Stain?
Yes, if the old coating is sound and you prep it correctly. Sanding to dull the surface, cleaning off grease, and applying primer gives the new spray paint something to bite. Strip or sand off peeling, cracking, or chipping layers first. Never spray over failing paint and expect it to hold; the new finish will fail with it.
Our Thoughts
So yes, spray paint can work on furniture, but the primer and sanding step is what keeps it stuck. A preparatory primer coating bonds the surface so your color coats hold, and light sanding, the abrasive smoothing of the piece, gives that coating something to grip. Skip either and you get peeling, poor adhesion, or a blotchy finish.
Your single most useful next step: set up a safe workspace before you shake a rattle can. Move outdoors or into a garage with strong ventilation, lay a drop cloth, mask edges with painter’s tape, and wear a respirator rated for organic vapors. Then test your spray gun or rattle can on a hidden spot and check the finish before committing.
Sources and further reading: guidance from EPA, OSHA.