
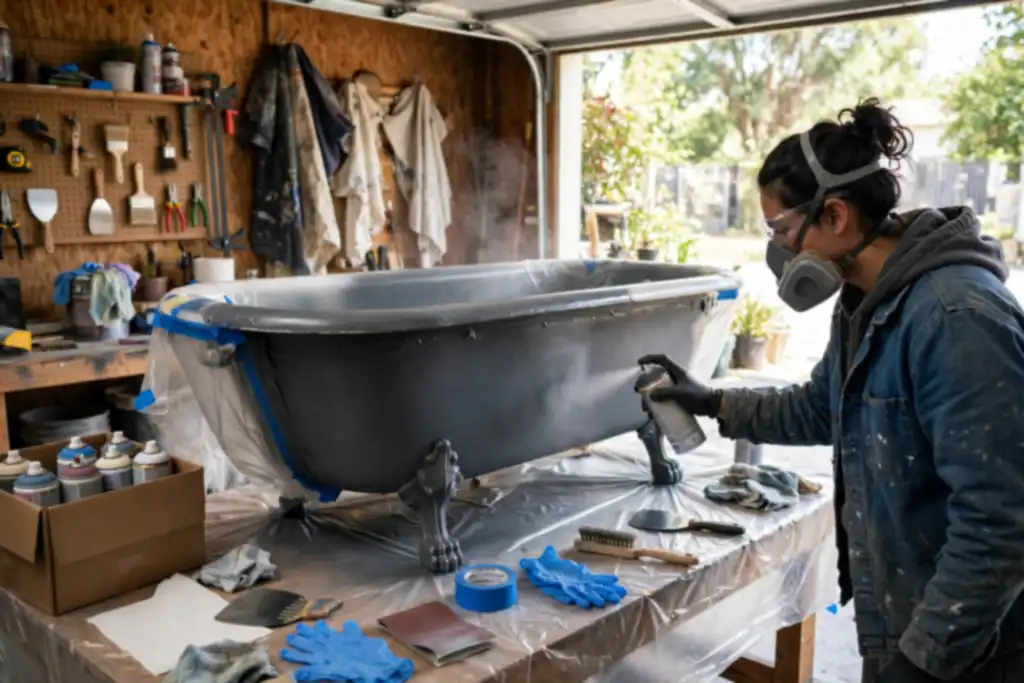
Yes, you can spray paint a bathtub, but only if you use an epoxy coating or a spray paint rated for wet, high-traffic surfaces and you nail surface preparation, because standard aerosol paint will peel.
The most common mistake is treating a bathtub like a piece of furniture and reaching for ordinary aerosol spray paint. Can you spray paint a tub? Yes, but only with a product made for wet, abrasive surfaces, and only after serious surface preparation. Standard paint will fail at the drain and along the curves within weeks.
You will learn which coatings actually hold up, how to prep and prime the surface so adhesion lasts, and how to set up ventilation and a respirator for safety. The steps below focus on avoiding the failures that force a do-over, from sanding grit to curing time.
Can You Spray Paint a Tub? the Straight Answer
Yes, you can spray paint a bathtub, and it can hold up for years if you pick a coating made for wet surfaces and prep the tub properly. Cut corners on surface preparation or ventilation and you will get peeling, bubbles, or a finish that fails within months.
| Situation | What it means | What to do |
|---|---|---|
| Which product to buy | Acrylic vs epoxy, water vs solvent | Choose a two-part epoxy coating for tubs |
| Tub material | Porcelain, fiberglass, acrylic, cast iron | Porcelain and fiberglass take coatings well |
| Spray method | Aerosol can or HVLP sprayer | Use an HVLP sprayer for even coverage |
| Surface prep | Cleaning, sanding, priming before coating | Sand, clean, and prime every square inch |
| Safety gear | Respirator plus cross ventilation | Wear a respirator and open windows |
| Dry and cure | Recoat window vs full curing time | Wait the full curing time before water |
| Durability check | How long a refinished tub lasts | Expect several years with gentle cleaners |
Recommended for this job


What Spray Painting a Tub Actually Means
Yes, you can spray paint a bathtub, but the product matters more than the spray can. You are applying a spray paint or epoxy coating that bonds to the old finish, not just coloring it. That bond depends on surface preparation: cleaning, sanding, and a primer made to grip slick surfaces.
Skip the prep and adhesion fails first, usually at the drain and along the curve where water sits.
What Tubs Take Spray Paint Well
Porcelain, cast iron, and fiberglass tubs accept a quality epoxy coating well when the surface is dulled and clean. Acrylic tubs are softer and more flexible, so check the label before you buy. Rust, chips, or peeling spots need sanding back to solid material first.
- Porcelain and cast iron: strong candidates
- Fiberglass: good with light sanding
- Acrylic: verify compatibility first
What You’re Really Committing to
Expect a few hours of prep plus a full curing time before the tub sees water, typically a few days depending on the product. Ventilation is non-negotiable: open windows, run a fan, and wear a respirator, a device that filters what you breathe. Aerosol cans work for small touch-ups; an HVLP sprayer gives more even coverage on a full tub.
Durability lands in the several-year range with gentle, non-abrasive cleaners. Abrasive scrubs wear the coating fast.
Is It Okay to Spray Paint a Bathtub?
Okay for Which Tub Material?
Yes, with the right product. Fiberglass and acrylic tubs accept spray-applied finishes well because the surface is non-porous and bonds easily with a quality epoxy coating. Cast iron is a different story: the porcelain enamel is slick and chips, so it needs aggressive sanding and a bonding primer (a preparatory coating applied before paint) to get real adhesion, the grip between two surfaces. Skip that step and the finish peels within months.
Okay for a Rental or a Forever Home?
For a rental, get written permission first, since a sprayed finish is hard to undo. In a forever home, a proper epoxy job can last years if you follow the curing time (the full hardening window) exactly. Cheap spray paint in a can is a short-term patch at best, so plan on epoxy for durability.
Okay for a Weekend DIY Timeline?
Only if you respect the clock. Surface preparation and sanding eat most of day one, spraying and recoating fill day two, and full cure can run 3 to 7 days before water touches the drain area. Rushing it ruins the finish.
Quick Pre-Spray Checklist: 8 Things to Confirm First
Before you buy a can or mix a batch, run this checklist. Each line prevents a specific failure, from peeling paint to a dangerous fume build-up.
- Confirm your tub material: Know whether you have acrylic, fiberglass, cast iron, or porcelain. Each takes different surface preparation and some coatings won’t bond to all of them.
- Confirm your coating type: Decide between acrylic vs epoxy. Acrylic sprays are easier to apply but less durable; epoxy coating resists chips and moisture far better for a wet bathtub.
- Confirm your ventilation: Set up cross-flow ventilation and a NIOSH-rated respirator before spraying. A respirator is a device that filters air for your lungs, and solvent fumes in a closed bathroom can overwhelm you fast.
- Confirm your cure window: Plan for the full curing time, often 24 to 72 hours depending on the product and humidity. Keep the drain clear and the tub unused until it fully hardens.
- Confirm your tub material: acrylic, fiberglass, cast iron, and porcelain each need different surface preparation and not every coating bonds to all of them.
- Confirm your coating type: acrylic sprays are easier to apply but less durable, while epoxy coating resists chips and moisture better for a wet bathtub.
- Confirm your ventilation: set up cross-flow ventilation and a NIOSH-rated respirator before spraying, because solvent fumes in a closed bathroom build up fast.
- Confirm your cure window: plan for the full curing time, often 24 to 72 hours depending on product and humidity, and keep the tub unused until it hardens.
- Check your sanding and primer plan: scuff the surface and apply a bonding primer, a preparatory coating that helps paint stick, for reliable adhesion.
- Protect the drain and surrounding surfaces: mask the drain and fixtures before you start spraying.
Your Spray-a-Tub Action Plan, Start to Finish
Spraying a bathtub works, but only if you treat it like a coating job, not a quick touch-up. Skip a step and the finish peels, blisters, or fails at the drain.
| Action | Why it helps | How to start |
|---|---|---|
| Degrease and sand | Removes soap film so coating bonds | Scrub, rinse, sand with 220 to 320 grit |
| Prime for adhesion | Primer helps coating stick to surface | Apply thin coat, let it dry fully |
| Mask and spray in thin coats | Prevents runs and overspray damage | Tape edges, spray 2 to 3 light passes |
| Cure before first shower | Wet use too early ruins durability | Wait 24 to 72 hours, follow label |
| Check ventilation | Fumes need airflow to clear safely | Open windows, run fan, wear respirator |
| Test adhesion | Catches weak bond before full recoat | Press tape on cured patch, pull |
| Clean the drain area | Coating fails where water pools | Remove hardware, sand and wipe dry |
Degrease and Sand
Surface preparation decides whether the finish lasts. Scrub away soap scum, rinse, then sand the whole tub with 220 to 320 grit to give the coating a grip. Wipe dust off and let it dry completely.
Prime for Adhesion
A primer is a preparatory coating applied before paint, and it helps the topcoat stick. Brush or spray one thin primer coat made for bathtub surfaces, then let it dry per the label.
Mask and Spray in Thin Coats
Thin passes beat one heavy coat every time. Tape off fixtures and the drain, set up ventilation, wear a respirator, and spray 2 to 3 light coats with 15 to 30 minutes between them. An HVLP sprayer gives the smoothest result.
Cure Before First Shower
Curing time is not dry time, so don’t rush it. Most epoxy coating brands call for 24 to 72 hours before water contact, and full durability takes several days. Follow the manufacturer’s schedule exactly.
When Spray Painting a Tub Doesn't Work
Cracked or Flexing Fiberglass
Skip it if the shell cracks or flexes underfoot. A flexible tub moves, and the coating cracks with it, so adhesion fails fast. Repairing structural cracks first is the only path, and replacement often beats patching.
Heavily Rusted Cast Iron
Heavy rust means the enamel is gone and the metal is pitted. Sanding won’t give you a sound base for a primer or epoxy coating, so peeling is likely within months. Light surface rust is fixable; deep pitting is not a spray paint job.
Tubs with Failing Previous Coatings
Old, flaking refinish layers must come off completely before anything new goes on. A fresh coat over a failing one traps weak adhesion and lifts within weeks. Strip, sand, and test a small area before committing.
High-Moisture Bathrooms with No Vent
Without real ventilation, moisture ruins curing and your health suffers. Use a respirator rated for the product and keep a window or fan running. Poor ventilation also cuts durability, so a spray-applied finish may fail early.
Spray Can vs HVLP Sprayer vs Brush-On Epoxy: Pick Your Weapon
The Decision Rule by Material and Budget
Match the tool to the tub, not the other way around. An acrylic bathtub flexes and needs a flexible coating, while a cast iron or porcelain tub holds rigid finishes well. Budget decides the rest: a spray can runs roughly $15 to $40, an HVLP sprayer $100 to $300 plus coating, and a brush-on epoxy kit $50 to $150.
If you are unsure, price the full job against a professional refinish, which typically runs $300 to $600 depending on region and tub condition.
Where Spray Cans Win
Spray cans suit small touch-ups and tight budgets, nothing more. They lay down thin coats with limited durability, so they work best on a rental refresh or a low-traffic guest bath. Coverage per can is small, and you will need several for a full tub.
Wear a respirator and set up real ventilation, because aerosol fumes build fast in a bathroom. Surface preparation still decides adhesion: sanding and a primer made for the tub material are not optional.
Where Brush-On Epoxy Wins
Brush-on epoxy coating wins for a full refinish you want to last. Two-part epoxy cures harder than acrylic and stands up to daily scrubbing, and it handles the whole tub with one kit. It also skips overspray, so masking is simpler.
Trade-offs exist: curing time runs 24 to 72 hours before use, and dust nibs are possible. An HVLP sprayer gives a smoother finish than either, but only if you already own one and can ventilate properly.
When Spray Painting a Tub Actually Works
Spraying a bathtub can hold up well, but only when the surface and products cooperate. Get these four conditions right and a spray-applied finish can last several years with normal use.
Solid, Non-Flexing Surfaces
Rigid tubs hold coating best. Cast iron and solid acrylic bathtubs give spray paint a stable base, while flexing fiberglass panels crack coatings as they move. Press on the floor of the tub: if it gives noticeably, expect the finish to fail early.
Proper Degreasing and Sanding
Adhesion, the bond that makes paint stick to a dissimilar surface, depends on a clean, scuffed tub. Scrub away soap scum and oils first, then sanding with 220 to 400 grit creates a mechanical grip. Rinse and let the tub dry fully before any primer goes on.
Compatible Primer and Topcoat
Primer, a preparatory coating applied before paint, must match the topcoat chemistry. Acrylic vs epoxy matters here: epoxy coating systems bond hard and resist water, while acrylic sprays are easier to apply but wear faster. Follow one manufacturer’s system rather than mixing brands.
Full Cure Before Water Contact
Most spray tub finishes need roughly 3 to 7 days of curing time before water hits them, depending on product and humidity. Wait the full window, since early showers soften fresh coatings. Afterward, clean with mild soap and avoid abrasive pads to protect durability.
How to Spray Paint a Tub Without Peeling
Degrease Until the Rag Squeaks
Grease and soap film kill adhesion, which is how well the coating sticks to the tub. Wipe the whole bathtub with a degreaser and a microfiber rag, swapping rags until one comes away clean.
Sand to the Right Grit
Sanding, the process of scuffing and smoothing the surface with an abrasive, gives the coating something to grip. Scuff with 220-grit paper on a block, then remove every speck of dust with a damp cloth.
Match Primer to Coating
Primer, a preparatory coating applied before paint, must be compatible with your topcoat. Use a bonding primer made for your epoxy coating, rolling edges and brushing around the drain.
Spray Thin, Overlapping Coats
Thin passes prevent runs and puddling. Load an HVLP sprayer with a 1.3 to 1.5 mm tip, wear a respirator, and open windows and run a fan for ventilation.
Wait the Full Cure
Curing time decides durability, so don’t rush it. Let each coat flash 20 to 30 minutes, then keep water off for 24 hours and wait 3 to 7 days before heavy use.
Follow these steps in order and your tub coating will bond instead of blistering off in sheets.
Three Spray-a-Tub Myths That Cause Callbacks
Myth: Any Spray Paint Works
No, standard spray paint will fail on a bathtub. Water, heat, and constant cleaning break down ordinary acrylic fast, so it peels within months. Use a two-part epoxy coating made for tubs, or a tub-specific refinishing kit. Epoxy bonds chemically and holds up to moisture; acrylic does not.
Myth: You Can Skip Sanding
Skipping sanding guarantees poor adhesion, which is simply how well the new coating sticks to the old surface. You must scuff the entire tub with abrasive pads or paper, then clean and rinse thoroughly. Sanding removes soap scum, gloss, and imperfections so the primer and topcoat grab. Apply a bonding primer before spraying.
Myth: It’s Dry When It’s Dry to Touch
Dry to touch means nothing for a tub. Epoxy needs full curing time, typically 3 to 7 days depending on the product and humidity, before water touches it. Check the manufacturer’s label and wait. Using the tub early ruins durability and forces a redo.
Masking the Drain, Faucet, and Tile Like a Pro
Tape and Film Order
Mask the small stuff first, then cover the large areas. Tape the faucet and spout edges before you drape plastic film over the surrounding walls and floor.
Use painter’s tape for edges that need a clean line and masking film for broad coverage. Press tape down firmly so spray paint can’t creep underneath.
Protecting the Drain and Overflow
Pull the drain plug or cover the opening with tape and film so no coating drips into the plumbing. Stuff a rag into the overflow opening, then tape over it.
Seal both openings completely before you start. A stray drop of epoxy coating in the drain line can harden and cause a clog you’ll have to pay to clear.
Keeping Overspray off Tile and Grout
Overspray drifts farther than most people expect, so cover tile and grout with plastic film taped at the edges. Extend the film at least a few feet past the bathtub rim.
Spray paint mist settles on nearby surfaces, and it bonds to grout fast. Before spraying, set up cross-ventilation with a fan pulling air out, and wear a respirator rated for organic vapors.
The Peeling-Prevention Checklist Nobody Follows
Skipping Degreaser
Soap scum and body oils kill adhesion, the bond that lets the new finish grip the old surface. Wash the whole tub with a degreaser, rinse, and let it dry completely before you touch it again.
Wrong Grit, Wrong Primer
Too fine a grit leaves nothing for the coating to bite into. Sand with 220 to 320 grit to dull the gloss, wipe the dust, then apply a primer made for the tub material, since primer is the preparatory coating that bridges old and new.
Coating Too Thick
Heavy coats trap solvent and peel from the inside out. Build thin layers with an HVLP sprayer, an air-driven gun that lays an even film, and keep your respirator on with the window open for ventilation.
Showering Too Soon
Most acrylic and epoxy tub coatings need 24 to 72 hours before water contact and several days to fully cure, depending on the product. Wait the label’s full curing time, then expect durability of roughly 5 to 10 years with gentle cleaners and no abrasive scrubbing.
- Degrease the tub before sanding: soap scum and oils block adhesion and cause peeling.
- Use 220 to 320 grit for sanding: too fine leaves no tooth for the primer to grip.
- Match primer to the tub material: a general-purpose primer may lift on fiberglass or acrylic.
- Spray thin coats with an HVLP sprayer: thick passes trap solvent and peel later.
- Keep ventilation and a respirator on: solvent vapors build fast in a small bathroom.
- Wait the full curing time before showering: water too early softens the film.
- Expect 5 to 10 years of durability: abrasive cleaners shorten the life of any spray-applied finish.
When to Hire a Professional Instead
Deep Cracks or Structural Flex
If the tub shell moves underfoot or cracks run deeper than the finish, stop and call a pro. Spray paint and epoxy coating sit on top of the surface, so they cannot fix a structural problem in the bathtub itself.
Failed DIY Coating
A coating that peeled, blistered, or lifted usually means adhesion failed, and spraying over it repeats the mistake. Strip it back or hand the job to a refinisher who can prep and bond the surface correctly.
No Ventilation or Respirator
Spray paint fumes concentrate fast in a small bathroom, and a respirator is a device that filters what you breathe. If you cannot rig strong ventilation and wear the right cartridge respirator, do not spray; call a professional instead.
Rental or Resale Timeline
Landlords and buyers notice a rushed refinish, and curing time for epoxy can run several days. If you need the tub back in service quickly, professional refinishing is the safer call.
- Stop if the tub flexes or the damage goes beyond the surface.
- Stop if old coating is peeling and you cannot strip it fully.
- Stop if you lack ventilation and a proper respirator.
- Stop if a rental lease or sale deadline leaves no curing time.
Can You Spray Paint a Tub: Frequently Asked Questions
?Can You Spray Paint a Tub Without a Sprayer, Using Just Cans?
Yes, but only with the right product. Standard spray paint in a can won't hold up to water and cleaning; you need a two-part epoxy coating sold in an aerosol can made for bathtub refinishing. Cans work for small tubs and tight budgets, but coverage is thin and you'll need several coats. An HVLP sprayer gives a smoother, more durable finish on larger jobs.
?How Long Does Spray Paint Need to Cure on a Tub Before You Use It?
Plan on 48 to 72 hours before any water touches the surface, and up to a week before full durability. Epoxy coating cures by chemical reaction, not just drying, so cool or humid bathrooms stretch curing time. Run ventilation, keep the room warm, and don't rush it. Using the bathtub early is the fastest way to ruin a fresh finish.
?Can You Spray Paint a Tub That Has Chips and Cracks?
Yes, but only after you repair them. Spray paint and epoxy coating sit on top of the surface, so any chip or crack telegraphs through and starts peeling from the edges. Fill defects with an epoxy putty made for tubs, let it harden, then sanding it flush. Skip this and the whole coat fails at the weakest point.
?Why Does Spray Paint Peel off a Bathtub so Often?
Poor adhesion, almost every time. Adhesion is how well the coating sticks to the surface, and it fails when the tub isn't scoured, rinsed, and dried completely. Soap film, mold, and glossy porcelain reject paint. Surface preparation is the whole game: sanding with 220-grit, a bonding primer, and a spotless surface. Skip a step and peeling is guaranteed.
?What Safety Gear Do You Need When You Spray Paint a Tub?
A respirator rated for organic vapors, gloves, eye protection, and real ventilation. A respirator is a mask that filters what you breathe, and a dust mask won't cut it with epoxy fumes. Open windows, run a fan pulling air out, and keep the bathroom door sealed from the rest of the house. Fumes linger, so plan to stay out of the room while it cures.
?Can You Spray Paint a Tub and Still Use the Drain Normally?
Yes, if you mask it properly. The drain and overflow plate must be taped or plugged before any spray paint or epoxy coating goes on. Paint in the drain threads or the overflow channel causes leaks and clogs. Remove hardware where you can, mask the openings, and pull the tape while the coating is still slightly soft so it doesn't tear the edge.
?is Acrylic or Epoxy Spray Paint Better for a Bathtub?
Epoxy, for a tub that sees daily use. Acrylic sprays dry fast and are easy to apply, but they soften under hot water and scrubbing. Epoxy coating forms a harder, more water-resistant shell with far better durability. The tradeoff is fussier mixing, stronger fumes, and longer curing time. For a rental flip or a decorative piece, acrylic can work; for a working bathtub, go epoxy.