
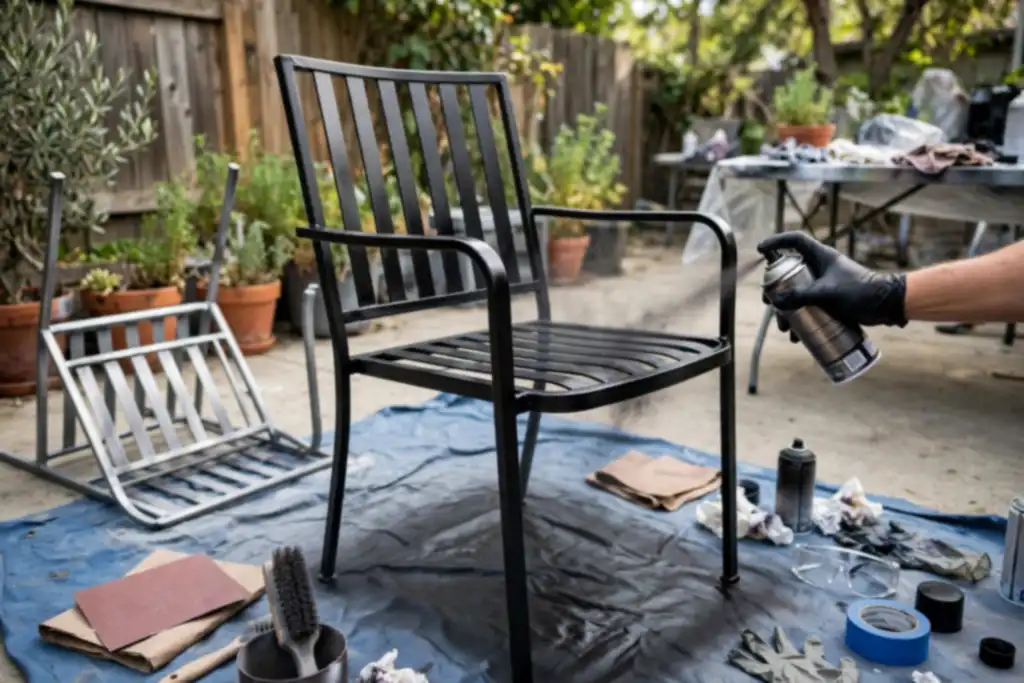

Spray painting metal patio furniture works only if you clean, sand, and prime first, because spray paint sticks to prep, not to rust or grease. Skip those steps and the finish flakes within weeks.
You can either spend a weekend prepping correctly or spend the next season touching up peeling paint. The difference comes down to following a proven method for how to spray paint metal patio furniture that prioritizes safety and avoids common mistakes.
You will learn the exact order of cleaning, sanding, rust removal, priming, and topcoat application. Get the details on painter’s tape, drop cloth, respirator, and spray gun setup, plus realistic drying time and curing windows. This is the do-it-right-once approach for US DIY homeowners who want a durable finish without guesswork.
- Clean and degrease metal patio furniture before any sanding or priming.
- Remove all rust with sanding or a wire brush, then wipe clean.
- Apply a rust-inhibiting primer to ensure spray paint adhesion.
- Wear a respirator and use a drop cloth in a ventilated area.
- Respect drying time between coats and full curing before use.
How to Spray Paint Metal Patio Furniture: the Quick Decision Before You Start
Decide on your spray setup and check the furniture's condition before you buy anything. Those two calls prevent most wasted paint and failed finishes on metal patio furniture.
| Your situation | What to do | Why |
|---|---|---|
| Small set, one color | Spray cans | Cheap start, no cleanup |
| Large set or many pieces | Spray gun | Faster coverage, better finish |
| Tight budget, few pieces | Spray cans | Lower upfront cost |
| Frequent repainting | Spray gun | Pays off over several jobs |
| Light surface rust | Rust removal, then primer | Restores adhesion |
| Deep pitting or holes | Replace or pro refinish | Paint will not fix structure |
| Wobbly joints or cracks | Walk away | Safety risk outdoors |
| Peeling in large sheets | Strip, sand, prime | New paint needs a sound base |
Recommended for this job

Rust-Oleum Stops Rust Clean Metal Primer
Prime bare or rusty metal first so topcoat paint bonds evenly and resists peeling.

Rust-Oleum Painter's Touch 2X Ultra Cover
Covers metal patio furniture in flat black with fast-drying, durable oil-based protection.

Odor/Particulate Multipurpose Respirator
Filters spray paint odors and particles while you coat metal furniture safely.
Spray Can or Spray Gun: Match the Tool to the Job
Use aerosol cans for one or two pieces and a spray gun for four or more. Aerosol spray paint runs about $8 to $15 per can, and one can covers roughly 10 to 15 square feet. A spray gun with a 1.3mm to 1.5mm nozzle lays an even coat faster and cuts overspray waste.
Budget for a quart of primer and a quart of topcoat to cover a bistro set. Plan on two to three coats, with 2 to 4 hours between coats and 24 to 48 hours of drying time before reassembly.
When to skip the DIY refresh
Walk away if rust has eaten through the metal or welds are cracked. Sanding and spray paint hide color, not structural failure, and patio furniture carries wind loads and body weight.
- Rust that flakes off in sheets under a putty knife
- Wobbly joints that tightening bolts cannot fix
- Cracks at welds or bent frames
Light surface rust is fine. Remove it with 80 to 120 grit sanding, wipe with a degreaser, then apply primer for adhesion. Deeper damage needs a pro weld repair or replacement.
The 5-Minute Diagnostic: Check These Before Any Work
Five minutes with a screwdriver, putty knife, and magnet tells you whether this is a paint job or a repair job. Do this before cleaning or sanding.
How Much Rust is Too Much Rust?
Surface rust is fixable; thinned or pitted metal is not worth painting. Probe deep spots with a screwdriver, if the tip sinks in or flakes fall away, remove rust to sound metal or replace. Painting over active rust traps moisture and blisters within a season. Treat light rust with a rust converter, then sand smooth before primer.
Is the Existing Finish Sound or Flaking?
Sound finish needs only scuff sanding; flaking finish must come off. Press painter’s tape onto an area and peel: if paint lifts, strip that section. Feather edges with 120-grit paper.
Painter's tape is removable, tearable pressure-sensitive tape that masks joints, glides, and hardware so overspray does not stick to them.
What Metal Are You Actually Working with? (Aluminum, Wrought Iron, Steel)
Each metal needs a different prep path. Aluminum won’t hold a magnet and needs etching primer; steel and wrought iron grab a magnet and take rust-inhibiting primer.
- Aluminum: scuff with 220-grit, then self-etching primer.
- Wrought iron: remove rust from joints, then direct-to-metal primer.
- Steel: sand to bare metal where rusted and prime same day.
Set up your drop cloth and respirator before opening primer or spray gun; OSHA recommends a fitted respirator with organic vapor cartridges for solvent-based coatings.
A drop cloth is a hardware accessory laid over the ground to catch overspray and keep paint off concrete or grass.
Before you touch a can of spray paint, run this five-minute check so you know exactly what you're dealing with.
How Spray Painting Metal Patio Furniture Actually Works
Why Adhesion on Metal Patio Furniture Depends on Prep, Not Paint
Adhesion is how well the coating bonds to the surface, and on metal patio furniture it depends on prep, not paint. Spray paint sticks to a dull, oil-free surface and fails on wax, chalky oxidation, or flaking old finish. Skip prep and expect peeling within one season.
Start with cleaning: scrub with a degreaser and a Scotch-Brite pad to strip oils and chalk, then rinse and let it dry fully. Follow with 120- to 220-grit sanding to dull the surface and feather chips. Remove rust down to bare metal with a wire brush or 80-grit, then wipe dust with a tack cloth before spraying.
The Role of Primer and Topcoat on a Metal Finish
Primer is a preparatory coating applied before paint; it bonds to bare metal and gives color a surface to grip. Apply two thin coats of rust-inhibiting metal primer, about 8 to 12 inches from the surface, and let each flash off per the label.
Topcoat adds wear and UV protection; a clear enamel topcoat over color extends life outdoors. Respect curing: hardening continues for 5 to 7 days after touch-dry, so keep furniture out of rain and heavy use until it sets.
Safety and Tools That Prevent Do-Overs
Spray outdoors or in a garage with the door open, and wear a solvent-rated respirator plus nitrile gloves; solvent-based spray paint off-gasses VOCs for hours. Mask non-painted areas with painter’s tape and cover the ground with a drop cloth. A spray gun with a 1.4mm tip gives smoother coverage than rattle cans on large pieces.
Before You Start: Tools, Materials, and Safety You Actually Need
Gather Supplies and Choose the Right Spray Paint
You need a direct-to-metal spray paint, a primer, an abrasive pad, and a degreaser before you touch the furniture. Pick a paint labeled for metal and outdoor use, and match the primer to it so adhesion holds up through weather.
Safety Precautions and PPE: Fire and Inhalation Risks Explained
Solvent-based aerosols are flammable and their fumes are harmful, so treat both seriously. Wear a respirator rated for organic vapors, plus gloves and eye protection, and keep all ignition sources away from your spray area.
Set up a Safe Spray Area
Spray outdoors or in a garage with the door open and a fan moving air through, never in a closed room. Lay a drop cloth over the ground and weight the edges so overspray does not stain concrete or grass.
Mask off Areas You Do Not Want Painted
Apply painter’s tape to joints, glides, and any hardware you want to keep clean, pressing the edges down firmly. Tape plus paper works better than tape alone on wide surfaces, since it blocks overspray from drifting onto the rest of the piece.
Step-by-Step: How to Spray Paint Metal Patio Furniture
Follow these steps in order for a durable finish that resists weather and wear.
Clean the Furniture Thoroughly
Wash all surfaces with a degreaser to remove dirt, pollen, and oils. Rinse and dry completely.
Remove Rust and Old Paint
Scrape or brush away loose rust and flaking paint; a wire brush reaches joints and welds sandpaper misses.
Sand the Surface for Adhesion
Scuff with 120-grit paper until uniformly dull. Wipe off dust and let dry.
Apply Primer
Primer bonds to bare metal and helps paint grip. Spray one thin, even coat; dry 2 to 4 hours per label.
Apply Thin, Even Coats of Spray Paint
Hold 8-12 inches away, use steady overlapping passes, and build two or three light coats, respecting drying times.
Wear a solvent-rated respirator, work outdoors or in a ventilated garage, mask joints and moving parts, and use a drop cloth.
Work through these steps in order and the finish will hold up to weather and wear, not peel off by next season.
After the Paint: Reassembly, Touch-Ups, and Weatherproofing
Reassemble and Touch up
After the final coat has cured for 24 to 48 hours, reattach the hardware you removed. Use the original screws and bolts, and tighten them snugly but not so tight that you crack the paint. Touch up any scratches or thin spots with a small brush or spray can, matching the color. Let the touch-ups cure for at least 24 hours before use.
Weatherproofing and Maintenance Tips
Apply a clear topcoat or a coat of paste wax to add a protective layer that helps the finish resist moisture and UV rays. Reapply wax every 6 to 12 months, depending on exposure. Clean the furniture with mild soap and water every few months, and avoid abrasive cleaners that can dull the paint or damage the topcoat.
A Simple Maintenance Schedule to Extend the Finish
Inspect your furniture every few months for chips, rust spots, or loose joints, and address any issues promptly to prevent further damage. Cover or store the furniture during harsh weather to prolong its life. With regular care, your refreshed patio set can look good for years.
Once the paint has cured, put the furniture back together carefully and protect the finish so it lasts.
Doing It on a Budget Without Cutting Corners
Where to Save: Spray Cans vs Spray Gun for Small Projects
For one or two chairs, aerosol cans cost less up front than a spray gun and compressor. A spray gun pays off on larger or repeated projects, applying even coats faster with less waste. Buy cans with adjustable nozzles and a fan pattern; cheap fixed nozzles give uneven coats and extra sanding.
Where Not to Save: Primer and Topcoat
Never skip primer or cheap out on topcoat. Primer helps paint stick to bare or rusty metal; a quality topcoat seals against weather. Bargain paint dries brittle and chips within a season. Spend on rust-inhibiting primer and exterior-grade enamel.
Drying Times and Recoating Windows That Affect Your Schedule
Follow the label: most primer needs 2 to 4 hours before recoating, paint 2 to 4 hours between coats in mild, dry weather. Full curing takes days to a week. Recoating too early causes wrinkles and poor adhesion. Work on a low-humidity day and follow manufacturer windows exactly.
Troubleshooting: Fixing Runs, Orange Peel, and Poor Adhesion
Most spray paint failures on metal patio furniture trace back to three things: too much material, wrong distance, or a surface that wasn't prepped. Fix the cause, not just the visible mess, or it returns on the next coat.
| Problem | Likely cause | Fix |
|---|---|---|
| Runs and drips | Holding the can too close or moving too slowly | Sand smooth, then recoat with lighter passes |
| Dry spray or rough feel | Spraying from too far away | Wipe down and recoat at a closer distance |
| Orange peel texture | Paint too thick or solvent flashing too fast | Sand level, thin coats, adjust distance |
| Peeling or flaking | Poor adhesion from missed cleaning or no primer | Strip, clean, sand, and prime again |
| Blisters or bubbles | Moisture trapped under the finish | Remove the coat, dry fully, reapply primer |
| Soft or tacky finish | Insufficient drying time between coats | Let it cure longer in warm, dry air |
| Rust returning | Rust removal skipped or topcoat too thin | Sand to bare metal, prime, add topcoat |
Why Paint Runs and How to Fix Them
Runs happen when you hold the can too close or linger in one spot. Let the coat dry, sand the drip flat, and recoat with lighter passes at the recommended distance.
What Causes Orange Peel Texture?
Orange peel comes from paint going on too thick or drying too fast. Sand it level, then apply thinner coats and keep the can moving steadily.
Paint Peeling? Here’s What Went Wrong
Peeling means poor adhesion, usually from skipped cleaning or no primer. Strip the loose finish, sand the surface, and start over with primer.
Cost: DIY vs Professional Spray Painting
Budgeting for a patio furniture refresh? Compare typical DIY and professional spray painting costs with clear assumptions so you can decide which route fits your time and wallet.
| Option | Upfront cost | Ongoing cost | Notes |
|---|---|---|---|
| DIY supplies (spray paint, primer, sanding, cleaning, tape, drop cloth, respirator) | $40 to $120 | None after initial purchase | Covers one set of 4 chairs and a small table; assumes you already own basic tools. |
| Professional spray painting (single color, basic prep) | $200 to $500 | None | Includes labor, materials, and setup; price varies by region and furniture size. |
| DIY with spray gun (if you own compressor) | $30 to $80 for paint and primer | Electricity and maintenance | Spray gun and compressor not included; assumes you have them. |
| Professional with premium topcoat or custom color | $400 to $800 | None | Adds cost for specialty finishes and longer curing. |
| DIY mistakes (rework due to poor adhesion or rust) | $20 to $60 extra | Time and additional materials | Common if cleaning or rust removal is rushed. |
| Professional warranty or guarantee | Included in pro price | None | Some pros offer limited warranty on finish durability. |
Costs are typical US ranges for a 4-chair and small table set, assuming average condition with minor rust. DIY assumes you own basic tools and a respirator; pro assumes one color and standard prep. Prices vary by region and furniture size.
Typical DIY cost runs $40 to $120 for supplies like spray paint, primer, sanding, cleaning, painter’s tape, drop cloth, and respirator, assuming you already own tools. Professional spray painting for the same set costs $200 to $500, including labor and materials.
Typical DIY Cost Breakdown (Assumptions Stated)
DIY supplies for a 4-chair set and small table range from $40 to $120. That covers spray paint, primer, sanding, cleaning, painter’s tape, drop cloth, and respirator, but not tools you likely own. Add $20 to $60 if rework is needed due to poor adhesion from skipped rust removal.
Typical Professional Cost Breakdown (Assumptions Stated)
Pro spray painting for the same set runs $200 to $500 for one color and standard prep. Premium topcoat or custom color pushes it to $400 to $800. This includes labor, materials, setup, and sometimes a limited warranty.
When DIY Cost Equals Pro Cost
DIY cost can match pro cost if you need to buy a spray gun, compressor, or respirator, or if mistakes force rework. For a single set, pro pricing often makes sense when your time and rework risk outweigh supply savings.
Real-Life Scenario: Restoring a Rusty Wrought Iron Patio Set
Assessing the Damage
Check how deep the rust goes. Surface rust on metal patio furniture often lifts with a wire brush, but pitting requires removal down to bare metal. Remove flaking paint and loose joints, or the new finish will fail.
Choosing the Method
For wrought iron, a spray gun or aerosol beats brushing. Use oil-based or direct-to-metal exterior spray paint plus matching primer. Work outdoors on a calm day with a drop cloth and painter’s tape; wear a solvent-approved respirator.
Step-By-Step Execution
- Remove rust and old paint with a wire brush or orbital sander, then wipe down.
- Clean with degreaser and dry fully.
- Apply primer in a thin coat.
- Apply thin, even spray paint coats, keeping the can moving.
Respect 10-30 minute drying times; cure 24-48 hours before use.
Final Result and Lessons Learned
Rushing prep ruins the job, skipping sanding or primer causes peeling within a season. Thin coats beat thick ones; full curing makes the finish last years.
Common Mistakes to Avoid When Spray Painting Metal Furniture
Skipping Primer
Primer is a preparatory coating that gives spray paint something to grip, so skipping it is the fastest way to a peeling finish. Bare or slick metal needs that bonding layer for real adhesion.
Spraying Too Far Away or Too Close
Distance controls your finish more than technique does. Hold the can or spray gun 8 to 12 inches from the surface and keep it moving.
Not Allowing Proper Curing Time
Curing is the process of the coating hardening fully, and it takes longer than drying time. Wait 24 to 48 hours before reassembly, and up to a week before heavy use.
Painting Over Rust Without Treatment
Rust removal comes first, or the corrosion keeps spreading under the topcoat. Light surface rust can be sanded and primed, but flaking or pitted rust needs stripping back to bare metal before you spray.
- Skipping primer: bare metal needs a bonding layer for adhesion, so prime first.
- Spraying too far or too close: keep the spray gun 8 to 12 inches away and moving.
- Not curing: drying time is not curing; wait 24 to 48 hours before reassembly.
- Painting over rust: light surface rust can be sanded and primed.
- Untreated deep rust: flaking or pitted rust must be stripped to bare metal first.
When to Call a Pro (Real Warning Signs)
Structural Damage or Heavy Rust
Stop if the frame wobbles, welds are cracked, or rust has eaten through the metal. Patching those spots hides a failure that can dump a guest on the patio. A welder or refinisher can repair it properly.
Large or Intricate Projects
Call a pro when you face a full dining set with lots of scrollwork or a piece too big to move. Pro shops typically charge $150 to $500 per piece, depending on size and prep, while DIY materials often run $40 to $100.
Safety Concerns with Spray Equipment
Hire out the job if you cannot spray outdoors with good airflow or lack a proper respirator. OSHA treats solvent vapors as a real hazard, and a spray gun plus compressor setup can cost more than paying someone.
- Stop if the metal is cracked, bent, or rusted through and needs welding.
- Stop if you cannot wear a respirator or spray in a ventilated area.
- Stop if the piece is too heavy or detailed to prep and coat evenly.
- Stop if your total spray paint and equipment cost exceeds a pro quote.
How to Spray Paint Metal Patio Furniture: Frequently Asked Questions
?Can You Spray Paint Metal Patio Furniture Without Sanding First?
Only if the surface is already clean, dull, and rust-free. Otherwise, sanding creates the mechanical bite that helps spray paint bond to metal patio furniture. Scuff the whole piece with medium-grit paper, feather the edges, then wipe it down. Skipping this step is the number one reason paint peels off metal patio furniture within a season.
?How Long Does Spray Paint Need to Dry on Metal Patio Furniture Before You Use It?
Plan on 24 to 48 hours before light handling and up to 7 days for full curing. Most spray paint feels dry in an hour, but curing hardens the coating into a durable film. Reassemble gently after a day, then keep heavy use and cushions off the metal patio furniture for about a week.
?What is the Best Primer for Metal Patio Furniture Before Spray Paint?
A rust-inhibiting primer made for bare or rusty metal is the right call. Primer is a preparatory coating applied before paint to improve bonding and block corrosion. Spot-prime bare spots and rust-removal areas, then coat the whole piece if the finish is worn. Follow the can's recoat window so the spray paint bonds properly.
?Why Does Spray Paint Peel off Metal Patio Furniture?
Poor adhesion almost always traces back to grease, moisture, or a glossy surface. Cleaning is the separation of unwanted oils, dirt, and residue from the surface, so degrease thoroughly and rinse. Then scuff, prime bare metal, and spray in the right temperature and humidity. If the metal patio furniture was damp or dusty, the paint will lift.
?How Do You Spray Paint Metal Patio Furniture in Windy or Humid Conditions?
Don't spray in wind or high humidity if you can avoid it. Wind blows overspray onto you and ruins coverage, and humidity slows drying and can dull the finish. Move the metal patio furniture into a garage or sheltered area, set up a drop cloth, and wear a respirator. If you must work outside, pick a calm morning.
?What Safety Gear Do You Need to Spray Paint Metal Patio Furniture?
At minimum, a respirator rated for paint vapors, gloves, eye protection, and long sleeves. A respirator is a device that filters the air you breathe, and it matters because spray paint particles hang in the air. Add a drop cloth to catch overspray and painter's tape to mask joints. Work outside or ventilate the space hard.
?When Should You Use a Spray Gun Instead of Cans for Metal Patio Furniture?
Use a spray gun when the set is large or you want a smoother, faster finish. A spray gun is a device that atomizes coating and pushes it through the air onto the surface. It gives better control and less waste on big jobs, but it needs thinning, cleanup, and practice. For one small chair, rattle cans are fine.
Conclusion
Getting a finish that lasts comes down to patience: thorough cleaning, real rust removal, a proper primer for adhesion, and thin coats with full drying time between them. Rushing the prep or spraying heavy passes is what causes peeling, runs, and uneven color.
Your most useful next step: check the weather and set up a ventilated work area with a drop sheet before you start. Skip spraying in wind, high humidity, or direct sun, and wear a respirator. Then follow the full curing window, often several days, before regular use, so the topcoat hardens fully.
Sources and further reading: guidance from EPA, OSHA.