
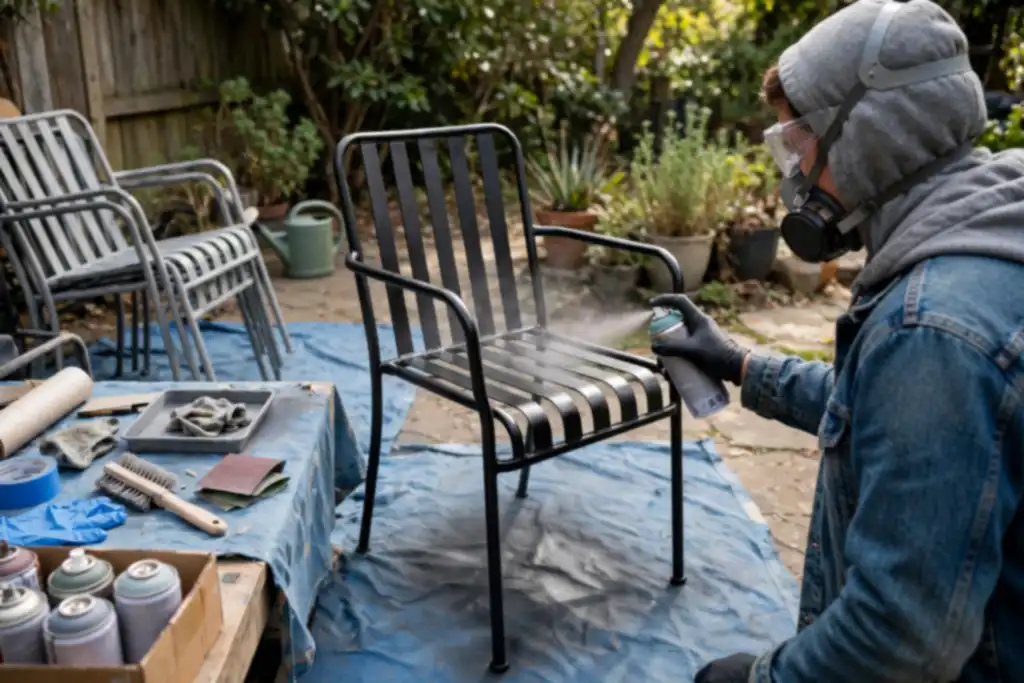
Spray painting metal outdoor furniture works best when you prep for adhesion and safety: remove rust, sand, degrease, prime, then apply thin coats. Skip any step and the finish fails early.
Here is a clear, practical look at how to spray paint metal outdoor furniture.
The common myth is that spray paint sticks to any metal surface without prep. The truth: rust, oil, and chipped paint are why most DIY coatings peel within a season. To learn how to spray paint metal outdoor furniture correctly, you need a sequence: rust removal, sanding for profile, and degreasing before any primer or topcoat touches the metal.
You will get a step-by-step order that prioritizes safety and avoids rework. That means a respirator rated for organic vapors, a drop cloth to catch overspray, and patience with drying time and curing. We cover aerosol can versus spray gun choices, weather resistance expectations, and the mistakes that cause runs, bubbles, or poor adhesion. Do it once, properly.
- Remove all rust and loose paint before sanding; adhesion depends on bare, clean metal.
- Degrease after sanding, then apply a metal-specific primer before any topcoat.
- Use thin, overlapping coats from an aerosol can or spray gun; avoid heavy passes.
- Wear a respirator and lay a drop cloth; spray outdoors or in ventilated space.
- Respect full curing time before weather exposure for lasting weather resistance.
How to Spray Paint Metal Outdoor Furniture: Decide This First
Before you buy a single can, make one call: is this a spray-and-go job or a strip-and-repaint job? That decision saves you hours and a failed finish.
| Your situation | What to do | Why |
|---|---|---|
| Light rust, sound metal | Spray paint after rust removal and sanding | Fast, cheap refresh with weather resistance |
| Peeling paint over bare metal | Strip, prime, then spray | Spray paint bridges poorly and will flake |
| Deep pitting or holes | Replace or weld repair | Coating won't fix structural weakness |
| Oily or greasy surface | Degreasing before any sanding | Paint won't bond to contamination |
| Windy or humid day | Wait for calm, dry conditions | Poor adhesion and rough finish |
| Unknown old coating | Test a hidden spot first | Prevents wrinkling or lifting |
| Large flat panels | Spray gun gives even coverage | Aerosol can streaks on big areas |
Recommended for this job

Rust-Oleum Painter's Touch 2X Ultra Cover
Gloss black topcoat sprays from any angle for even coverage on metal furniture.

Rust-Oleum Stops Rust Clean Metal Primer
Flat white primer bonds to bare metal, giving the topcoat a stable base.

Odor/Particulate Multipurpose Respirator
Reusable respirator filters paint odor and particles while spraying outdoor furniture.
Is Your Furniture a Spray Paint Job or a Strip-and-Repaint Job?
Spray paint works when the metal is sound and the old coating is mostly intact. If you see peeling layers or bare rust patches wider than a few inches, plan on strip-and-repaint instead.
When Spray Painting is the Wrong Call
Skip spray paint if the frame is pitted through or wobbly. Deep rust removal exposes thin metal that needs replacement, not a topcoat. Also walk away if the piece has intricate cast details that trap drips.
The 30-Second Condition Check
Press a screwdriver handle against the metal and listen for soft spots. Then run a rag over the surface: chalky residue means oxidation that needs sanding and primer. Finally, check for oil near joints, which calls for degreasing before anything else.
The 5-Minute Diagnostic: What Are You Actually Dealing with?
Five minutes with a rag, coin, and putty knife tells you if you can scuff and coat or need full rust removal. Miss it and the topcoat fails within one season.
Rust, Chalky Paint, or Bare Metal?
Rub a white rag across the frame. A chalky white residue means the old finish is breaking down, so strip it before primer. Probe rust pits with a coin; flaking or pitted metal needs grinding to bare steel, not a cover-up coat.
- Dull gray patches are bare metal: degrease, then primer within 24 hours.
- Orange dust on the rag means active rust; treat with a rust converter first.
Does the Finish Peel or Just Look Tired?
Lift a loose edge with a putty knife. Peeling in sheets means poor adhesion, so the whole coat must come off before spray paint. Faded but tight paint only needs 220-grit sanding and a fresh topcoat.
- Bubbles that flex under your thumb signal trapped moisture or rust underneath.
- Wear a respirator and lay a drop cloth before any sanding or degreasing.
Wobble, Cracks, and Structural Checks
Wobble every leg and inspect welds with a flashlight. Paint hides cracks, and a weak frame won’t survive another season outdoors. Tighten bolts and mark cracks with tape before you sand or spray.
Run these checks before you touch a can, because five minutes of inspection decides whether you clean and coat or strip and rebuild.
How Spray Paint Bonds to Metal (and Why Prep Decides Everything)
Adhesion, Etching, and Primer in Plain English
Mechanical grip, not magic, is how spray paint sticks. A clean, scuffed surface gives the coating something to bite into, while a glossy or greasy one lets it peel.
Start with degreasing to strip oils and residue, then sanding to dull the finish and knock down rust after rust removal. Wipe the dust off and let it dry fully.
Apply primer, a preparatory coating that bonds to bare metal and gives your color coat a uniform base. Thin primer passes, not one flooded layer, set up the adhesion your metal outdoor furniture needs.
Why Thin Coats Beat Thick Coats
Thin coats dry evenly and resist runs, sags, and trapped solvent. Heavy passes stay wet underneath, cure unevenly, and peel or wrinkle within a season.
Mist on two or three light layers of spray paint, respecting the label drying time between coats, then finish with a topcoat for weather resistance. Full curing can take days, so keep furniture out of rain until it hardens.
Weather resistance is the coating's ability to withstand sun, rain, and temperature swings without peeling, fading, or rusting.
Before You Start: Materials, Tools, and Safety Gear
Get your gear together before you touch the furniture. A little prep now saves a repaint later.
Gather Materials and Tools
Collect spray paint, primer, sandpaper, degreaser, a drop cloth, and masking tape. Add a wire brush for rust removal and clean rags for wiping down frames.
Safety Precautions and Respiratory Protection
Wear a respirator rated for paint vapors, plus gloves and eye protection. Spray outdoors or in a ventilated space, and keep aerosol cans away from heat and flames.
Aerosol Can or Spray Gun: Which Fits Your Project?
Choose an aerosol can for one or two chairs; pick a spray gun for larger sets or smoother coverage. A spray gun needs a compressor and cleanup time but lays down an even topcoat.
Set up a Safe Spraying Area
Lay a drop cloth on a flat, wind-sheltered surface and elevate pieces on blocks. Mask off moving parts and keep the area clear of pets and kids.
- Gather spray paint, primer, sandpaper, degreaser, and a drop cloth before starting.
- Add a wire brush for rust removal and clean rags for wiping frames.
- Wear a respirator, eye protection, and gloves while spraying.
- Work outdoors or in a ventilated space away from heat and flames.
- Pick an aerosol can for small jobs and a spray gun for larger sets.
- Set up a drop cloth on a flat, wind-sheltered surface and elevate pieces on blocks.
- Mask off moving parts and keep pets and kids away from the spraying area.
Step-by-Step: Spray Painting Metal Outdoor Furniture the Right Way
Work outside or in a ventilated garage with a drop cloth, respirator, and eye protection, OSHA treats solvent vapors and fine dust as real hazards.
Clean the Furniture Thoroughly
Wash surfaces with a degreaser to strip oils, pollen, and lotions; rinse and dry fully, since trapped moisture causes blistering.
Remove Rust and Old Paint
Scrape or brush loose coating and rust to sound metal; spot-treat stubborn rust with a rust converter, then wipe residue clean.
Sand the Surface
Scuff with 120-220 grit so primer can bite; feather chipped edges and remove dust with a tack cloth.
Apply Primer
Use a rust-inhibiting metal primer in thin passes; cure per label (typically 30 minutes to 2 hours) before recoating.
Choose the Right Spray Paint
Pick exterior-grade enamel or lacquer labeled for metal that bonds to your primer. An aerosol can suits small pieces; a spray gun pays off on full sets.
Build the topcoat in thin coats 8-12 inches away, overlapping each pass by half. Respect drying time, then cure 24-48 hours for full weather resistance.
Follow these steps in order and you will get a coating that holds up to sun, rain, and the occasional bump against the patio.
Reassemble, Maintain, and Keep It Looking New
Reassemble and Maintain Furniture
Wait the full cure window on the label, often 24 to 48 hours, before bolting anything back together. Hand-thread every bolt first, then tighten with a wrench until snug.
The Long-Term Maintenance Schedule That Extends Its Life
Wipe frames with a damp cloth monthly and check joints every few months for rust. Reapply a thin topcoat every two to three years to refresh weather resistance.
Preventing Future Rust and Wear
Touch up chips promptly with matching paint and seal exposed metal. Store furniture under cover or indoors over winter to slow rust and wear.
Once the finish has cured, careful reassembly and a light maintenance routine keep your work looking new for years.
Troubleshooting: Peeling, Uneven Finish, and Other Spray Paint Problems
Most spray paint failures on metal outdoor furniture trace back to prep shortcuts, not bad paint. Match the symptom to its cause and you can fix it without stripping the whole piece.
| Problem | Likely cause | Fix |
|---|---|---|
| Peeling or flaking | Paint applied over rust, oil, or bare shiny metal | Strip, rust removal, degreasing, then primer |
| Uneven finish or blotches | Can held too far or moved unevenly | Hold 8 to 12 inches, overlap passes by half |
| Runs and drips | Too heavy a coat or can too close | Sand smooth, recoat in thin layers |
| Orange peel texture | Paint drying before it levels, often hot or windy conditions | Spray in mild weather, light coats |
| Paint rubs off later | Handled before full curing | Wait the full drying time and curing window |
| Rust returns | No primer or topcoat with weather resistance | Use primer plus a rust-inhibiting topcoat |
Why is My Spray Paint Peeling?
Peeling almost always means the paint never bonded. Rust removal, sanding, and degreasing must all happen first, then a primer, which is a preparatory coating that grips the metal and gives paint something to hold.
Fixing Uneven Finish, Runs, and Orange Peel
Uneven coverage, runs, and texture come from technique, not the aerosol can. Hold it 8 to 12 inches away, overlap each pass by half, and build thin coats instead of one wet one.
Common Mistakes That Cause Peeling or Uneven Finish and How to Avoid Them
- Skipping degreasing, so oil and fingerprints block adhesion.
- Spraying in wind or direct sun, which causes texture.
- Handling furniture before full curing, when the finish is still soft.
- Skipping the topcoat, which supplies weather resistance.
Wear a respirator, a device that filters what you breathe, and lay a drop cloth. Use a spray gun for large frames and check drying time on the label.
Doing It on a Budget Without Cutting Corners
Where to Save and Where Never to Skimp
Save on drop cloths (plain plastic works) and buy the least expensive respirator rated for organic vapors, commodity items.
Never skimp on primer or paint. Cheap aerosol cans with weak pigment force extra coats, costing more. One quality can beats three bargain ones.
- Save: drop cloth, gloves, wire brushes, tack cloths
- Skimp never: primer, topcoat, respirator filters
Cheap Primer vs Cheap Paint: What Actually Matters
Paint quality matters more than primer price for weather resistance, but bad primer ruins adhesion regardless. Buy a rust-inhibiting primer from a known manufacturer, then a mid-grade topcoat.
Cheap spray-gun paint clogs nozzles and wastes product. For aerosols, check the label for outdoor metal use.
Gather tools first: 80 and 220 grit sandpaper, degreaser, drop cloth, respirator, spray paint, and primer. Missing items cause rushed mistakes.
Cost: DIY Spray Painting vs Professional Refinishing
Spray painting metal outdoor furniture yourself usually costs a fraction of professional refinishing, but the gap depends on prep supplies and how many pieces you have. Plan for ranges, not exact prices, and budget for the mistakes that eat savings.
| Option | Upfront cost | Ongoing cost | Notes |
|---|---|---|---|
| DIY, one chair, aerosol | $15 to $40 | $5 to $15 per touch-up | Primer, paint, sandpaper, respirator |
| DIY, full set, aerosol | $60 to $150 | $10 to $25 yearly | Six to eight cans typical |
| DIY with spray gun | $80 to $200 | $15 to $40 per project | Gun, compressor, paint, thinner |
| Pro refinishing, per chair | $75 to $250 | Low for 3 to 5 years | Sandblasting and shop coating |
| Pro refinishing, full set | $400 to $1,200 | Low for 3 to 5 years | Pickup and delivery often extra |
| Replacement, basic set | $150 to $600 | None until wear | Compare against refinish quote |
Ranges reflect typical US retail and service pricing for mid-size pieces, one to two coats of primer and topcoat, and DIY labor valued at zero. Pro quotes vary by region, coating type, and rust removal needed.
Typical Ranges and Assumptions
Expect $15 to $40 in supplies for one chair and $60 to $150 for a full set using aerosol cans. A spray gun setup runs $80 to $200 upfront but cuts paint cost per piece.
Cost Comparison: Spray Paint vs Professional Refinishing
Pro refinishing runs $75 to $250 per chair and $400 to $1,200 for a set, so DIY saves real money on labor. Your supplies, drying time, and cure window are the tradeoff.
When the Numbers Say Replace Instead
Skip both if rust has eaten through joints or a refinish quote nears replacement cost. Sanding and degreasing can’t fix structural rot.
Weather, Season, and Climate: When to Spray Outdoors
Temperature and Humidity Limits
Between 50 and 90°F, with humidity under about 60 percent, is when to spray, keeping air and surface temperatures in that range. Below 50°F, most paint won’t flow or cure properly, leaving a soft, tacky finish. Check your product label for its exact range. Morning is often calmest but more humid; late afternoon gives drier air and better drying.
Weather Considerations for Outdoor Spraying
Wind is the deal-breaker, anything above 10 mph blows overspray onto cars, siding, or fences and ruins an even coat.
- Spray with the wind at your back, never into it.
- Skip rainy days and the 24 hours before rain.
- Set up a drop cloth and windbreak before starting.
Humidity, Salt Air, and Coastal Furniture
Coastal air loads metal with salt, so degrease, remove rust, and use a primer and topcoat rated for salt exposure. Wash and dry the piece fully, then coat on a low-humidity day. High humidity slows curing and can trap moisture under the film; near the ocean, allow longer drying between coats and inspect for flash rust before the final pass.
Common Mistakes That Ruin a Spray Paint Job
Skipping Prep and Skipping Primer
Prep is the job. A clean, dull surface and a proper primer keep the finish bonded and rust out.
- No degreasing: oils cause peeling. Wash with degreaser, rinse, dry fully.
- Weak rust removal: sand every rust spot to bare metal, wipe dust off.
- No sanding on glossy factory paint: scuff it so the new coat grips.
- No primer: bare or rusted spots need rust-inhibiting primer before color.
Overcoating Too Fast
Thick coats trap solvent and sag. Apply thin coats and respect the recoat window.
- Flooding the first coat: two or three thin layers beat one heavy layer.
- Ignoring drying time: recoat within the stated window or after full curing.
- Assembling too early: let the topcoat cure for days; weather resistance builds with full cure.
Spraying Too Far Away or Too Close
Too far gives gritty dry spray; too close floods and runs. Hold the aerosol can or spray gun 8 to 12 inches away in steady overlapping passes.
- Setup errors: a drop cloth and respirator belong in the plan.
- Degrease and scuff first: oils and gloss cause peeling, so wash, rinse, and sand before painting.
- Remove rust to bare metal: wire-brush spots and wipe dust so the primer can bond.
- Always prime bare or rusted areas: a rust-inhibiting primer is the base for a lasting finish.
- Apply thin coats of spray paint: several light passes beat one heavy coat that sags.
- Respect the recoat window: recoat within the stated drying time or after full curing, never between.
- Hold 8 to 12 inches away: too far dries gritty, too close floods and runs.
- Set up a drop cloth and respirator: protect the surface and your lungs before you spray.
When to Call a Pro (or Replace the Furniture)
Cracked Welds and Cracked Welds and Frames
Stop if you find a cracked weld or a frame that rocks under gentle pressure. A fresh coat of paint hides nothing structural and may mask a failure that drops someone mid-cookout. A welding shop can often repair a joint for a modest fee, so ask before you toss the piece.
Disposing of Leftover Paint and Solvents Safely
Leftover aerosol cans and solvent rags are household hazardous waste in most communities, so do not put them in the trash. Check your county waste program or the EPA’s household hazardous waste guidance for drop-off days. Keep cans away from heat and never puncture them.
Before and after photos help you judge whether a piece is worth the work. If the before shot shows deep pitting or a bent leg, call a pro or replace it.
Stop and call a professional if:
- Stop if the frame has deep pitting or rust that has eaten through the metal.
- Stop if a weld is cracked or the frame rocks and cannot be stabilized.
- Stop if the furniture is load-bearing and you are unsure it can hold weight safely.
- Stop and call your local household hazardous waste program before discarding leftover paint, solvents, or aerosol cans.
How to Spray Paint Metal Outdoor Furniture: Frequently Asked Questions
?Can I Spray Paint Metal Outdoor Furniture Without Removing the Old Paint?
Yes, but only if the old coating is well-adhered and you sand it thoroughly. Sanding (using an abrasive to smooth and roughen the surface) creates a profile for the new paint to grip. If the old paint is flaking or peeling, strip it completely. Skipping this step is a top cause of peeling. Always degrease after sanding to remove dust and oils.
?How Long Should I Wait Between Coats When Spray Painting Metal Outdoor Furniture?
Follow the aerosol can or spray gun instructions, typically 10-30 minutes for a recoat. Wait until the surface is tack-free (not sticky) before adding another coat. Rushing causes runs and solvent trapping. After the final coat, let it cure (harden fully) for at least 24-48 hours before reassembling or placing it outdoors, even if it feels dry.
?What Primer Should I Use for How to Spray Paint Metal Outdoor Furniture?
Use a rust-inhibiting primer made for metal. Primer is a preparatory coating that helps paint bond and blocks rust. For bare metal, an etching primer works; for previously painted metal, a bonding primer is fine. Apply a thin, even coat and let it dry per the label. Skipping primer on metal outdoor furniture invites rust and peeling.
?Does How to Spray Paint Metal Outdoor Furniture Require a Respirator?
Yes, always wear a respirator (a device that filters airborne particles and vapors) when spray painting, even outdoors. Aerosol cans and spray guns release fine particles and solvents. A simple dust mask isn’t enough; use a NIOSH-approved respirator for organic vapors. Also wear safety glasses and gloves, and keep the area ventilated.
?Why is My Spray Paint Not Sticking to Metal Outdoor Furniture?
Almost always because of poor prep: leftover oils, wax, or rust. Degreasing (removing grease and grime) and sanding are non-negotiable. Also, spraying too far away or in high humidity can cause a rough, non-adherent coat. Ensure the metal is clean, dry, and within the product’s temperature range. Use a primer designed for metal to improve adhesion.
?When Should I Apply a Topcoat Over Spray Paint on Metal Outdoor Furniture?
Apply a topcoat (a protective clear coat) after the color coat has fully cured, usually 24-48 hours later. A topcoat boosts weather resistance and guards against UV and scratches. Not all spray paints need it, but for outdoor furniture, it’s cheap insurance. Choose a clear coat compatible with your paint and apply thin coats.
?is How to Spray Paint Metal Outdoor Furniture Safe to Do in a Garage?
Only with forced ventilation and a respirator, but outdoors is safer. Spray painting in a garage traps vapors and overspray, creating fire and health risks. If you must work indoors, open doors, use fans to exhaust air, and wear a respirator. Never spray near open flames or pilot lights. A drop cloth (a protective sheet) helps contain overspray and make cleanup easy.
Conclusion
Getting a finish that lasts comes down to the boring stuff: thorough rust removal and degreasing before you touch a can, thin coats instead of heavy ones, and respecting the full drying time and curing window before the furniture goes back outside. Skip the respirator or spray indoors and you invite trouble, so work outside or in a well-ventilated space with a drop cloth down.
Your best next step: read the primer and topcoat labels side by side and confirm both are rated for exterior use, then plan your spray days around the weather. That small check protects the weather resistance you just worked for.
Sources and further reading: guidance from EPA, OSHA.