
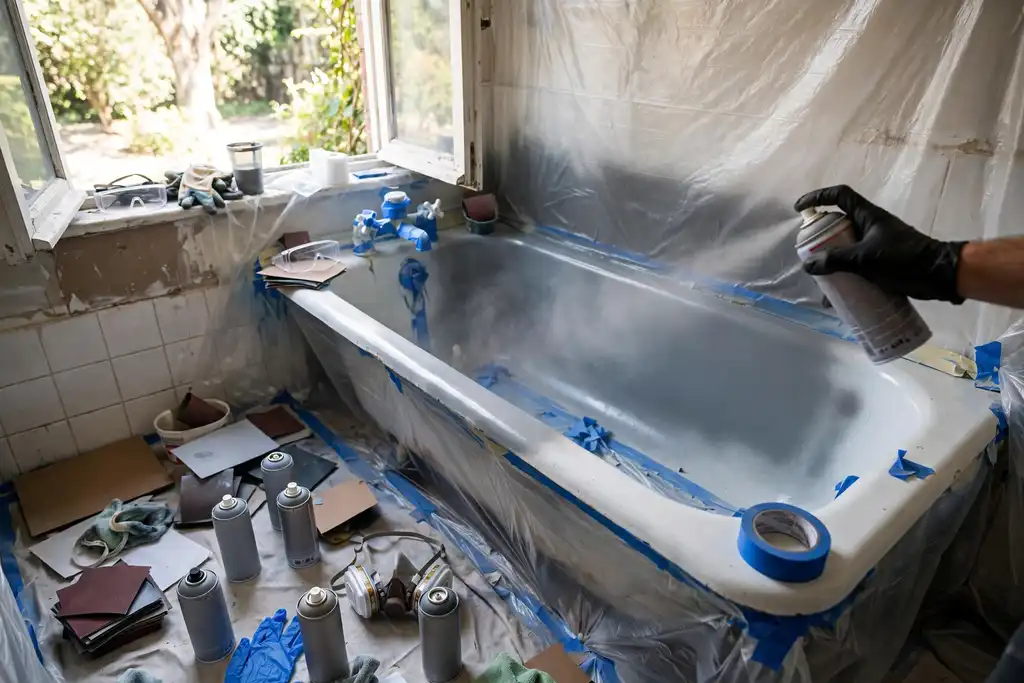
Yes, you can spray paint a bathtub with can spray paint, but only if you use an epoxy-based product and prep the surface correctly, because ordinary aerosol paint will peel and fail under water and wear.
You want a smooth, durable bathtub finish that survives daily showers and cleaning without peeling or chipping. You can you paint a bathtub with can spray paint, but the result depends entirely on choosing an epoxy or specialty tub spray paint and following a strict preparation process. This article gives you the safety steps and mistake-avoidance tactics that separate a lasting refinish from a costly do-over.
You will learn which spray paint products actually bond to a bathtub, how to prep with sanding and cleaning, why primer and ventilation matter, and how to cure the finish for maximum durability. Each step is designed for a careful planner who wants to get it right the first time, with no guesswork and no shortcuts that compromise adhesion or safety.
Can You Paint a Bathtub with Can Spray Paint?
Yes, you can spray paint a bathtub with aerosol paint, but only if you accept the tradeoffs and prep the surface properly. Skipping steps here means peeling paint and a redo within months, so treat this as a surface-prep job first and a spraying job second.
| Situation | What it means | What to do |
|---|---|---|
| Peeling or flaking finish | Poor adhesion from skipped sanding | Sand, clean, and use a bonding primer |
| Dull or uneven color | Thin coats or rushed passes | Apply several light coats, not heavy ones |
| Paint lifting near drain | Trapped moisture or poor cleaning | Dry fully, degrease, and seal edges |
| Strong fumes in bathroom | Aerosol overspray and solvent vapor | Use ventilation and a respirator |
| Chipping after weeks | Spray paint lacks epoxy durability | Expect touch-ups or choose epoxy instead |
| Tacky surface after days | Incomplete curing | Wait the full cure window before use |
Recommended for this job
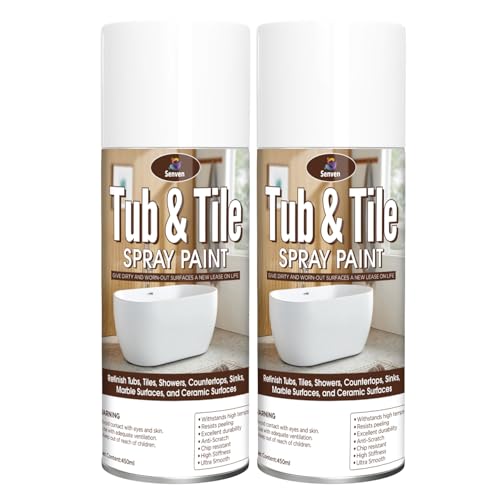
Tub and Tile Spray Paint White
Waterproof white gloss spray designed specifically for refinishing bathtubs and surrounding tile surfaces.

Rust-Oleum Tub & Tile Gloss White 2-Part
Two-part epoxy kit provides durable waterproof coating for bathtub and tile refinishing projects.

Odor/Particulate Multipurpose Respirator
Respirator protects lungs from paint fumes and particles when spraying a bathtub indoors.
Spray paint for a bathtub means aerosol cans, not a spray gun. That changes how much control you get and how durable the finish will be.
What ‘Can Spray Paint’ Means for Bathtubs
In this context, it means refinishing the tub surface with aerosol spray paint instead of a professional reglazing system. Aerosol cans give you convenience, but they lay down thinner coats than sprayed epoxy.
The Short Answer: Yes, but with Caveats
You can do it, and it works best as a short-term fix rather than a permanent finish. The pros are low cost, usually $50 to $150 in materials, and a weekend timeline. The cons are weaker durability, limited adhesion on slick surfaces, and heavy fumes that demand real ventilation and a respirator.
A respirator is a fitted face mask with organic vapor cartridges that filters solvent fumes a dust mask cannot stop.
Spray Paint vs. Professional Reglazing: Key Differences
Professional reglazing uses catalyzed epoxy or acrylic systems that bond harder and last years longer. Spray paint is easier to source and apply, but it cures thinner and chips sooner with regular cleaning. If you want done right once, weigh prep time, sanding, primer, and curing against a pro quote.
Your Action Plan for Spray Painting a Bathtub
Spray paint can work on a bathtub, but only if you treat it as a surface prep job first and a painting job second. Skip the prep and the finish peels within months.
| Action | Why it helps | How to start |
|---|---|---|
| Choose the right coating | Epoxy or tub-specific spray holds up; generic paint fails | Check the label for bathtub or epoxy use |
| Set up ventilation | Aerosol fumes build fast in a bathroom | Open windows, run a fan, wear a respirator |
| Clean and degrease | Soap scum blocks adhesion | Scrub with an abrasive cleaner, rinse, dry fully |
| Sand the surface | Scuffing gives the coating a mechanical grip | Use medium then fine grit, wipe dust |
| Apply primer | Primer bonds the topcoat to the tub | Use a tub-rated primer in thin coats |
| Spray light coats | Thin layers prevent runs and sags | Hold the can 8 to 12 inches away, overlap passes |
| Let it cure fully | Early water contact ruins durability | Wait several days before first use |
Tools and Materials You’ll Need
Buy a two-part epoxy spray paint kit made for bathtubs, not standard aerosol enamel, because the epoxy resists standing water and adhesion holds on porcelain or fiberglass. Add 120-grit and 220-grit sandpaper, a tack cloth, painter’s tape, and a drop cloth. Use a respirator rated for organic vapors and a box fan pulling air out of the room, since spray paint fumes build fast in a small bathroom.
Step-by-Step Process for a Successful Finish
Prep the bathtub by cleaning with an abrasive cleaner, sanding the entire surface to a dull scuff, then wiping with a tack cloth. Tape off the drain, overflow, and fixtures, apply a bonding primer in two thin coats, and let it dry per the label. Spray the epoxy topcoat in 6 to 8 inch passes, keeping the can 8 to 10 inches from the surface and moving steadily to prevent runs.
Drying and Recoating Times Explained
Recoat within the label window, typically 30 minutes to 2 hours, or the epoxy may wrinkle. Wait 72 hours before water contact and 7 days before heavy use so durability and adhesion fully set. Run ventilation the whole curing period, per OSHA respirator guidance.
Caring for Your Spray-Painted Bathtub
Cleaning Products to Use and Avoid
Use a pH-neutral dish soap diluted in warm water, about 1 teaspoon per quart, and a soft microfiber cloth. Skip abrasive powders, bleach-heavy scrubs, and melamine sponges, which dull the finish and weaken adhesion within months. Rinse fully so soap film does not build up.
Keep solvent-based cleaners away from the tub. They soften the spray paint film and lift edges near the drain or overflow within minutes of contact.
Preventing Chips and Scratches
Set a rubber suction mat or a small plastic stool on the tub floor to absorb impact. Never drop metal objects like razors or bottles onto the surface, and store them off the tub between uses.
Treat any chip within 24 hours. A dime-sized touch-up with matching epoxy seals the breach before water creeps under the coating and starts a peel.
Long-Term Maintenance Schedule
Inspect the finish monthly under bright light for wear, and plan a light recoat every 12 to 24 months depending on daily use. Full durability depends on proper curing and preparation, so treat the first 7 days gently.
- Weekly: wipe down with mild soap and water.
- Monthly: check seams, edges, and the drain collar.
- Yearly: assess for recoating or spot repair.
When Spray Painting a Bathtub Doesn't Work
Bathtub Materials That Reject Spray Paint
Some surfaces simply won’t hold an aerosol finish, no matter how careful your prep is. Fiberglass with deep flex or heavy gelcoat wear, and certain acrylic tubs, resist adhesion because the coating can’t bite into a moving, slick surface.
If the tub flexes underfoot or the finish is chalky and soft, skip the can. A professional reglazing job using a catalyzed epoxy system is the realistic path there.
Severe Damage or Rust: When to Replace
Rust that has eaten through the enamel or a crack that moves means replacement, not refinishing. Spray paint over compromised metal or cracked porcelain will fail fast and can hide a worsening problem.
Hire a pro when damage covers large areas or the tub is cast iron with pitting. A pro can tell you whether reglazing is viable or whether replacement is the smarter spend.
High-Traffic Bathrooms and Longevity Expectations
DIY spray finishes typically last a few years in a lightly used bathroom, while professional reglazing often comes with a multi-year warranty. A busy family bathroom with daily showers will wear through a spray coating faster.
Weigh that against cost: a DIY kit runs roughly $50 to $150, professional reglazing $300 to $600 or more. If you need it done right once, hire out and keep the warranty.
Spray Paint vs. Brush-On Epoxy: Which Wins for Your Tub?
Decision Rule: When Spray Paint is Acceptable
Only on a sound, fully cured tub with no cracks, rust, or flexing should you use aerosol spray paint. If the surface fails the tap test or peels at the drain, stop and choose another route.
Stick to a product made specifically for bathtubs, and treat preparation as non-negotiable. Sanding, cleaning, and a bonding primer decide whether the coating holds; skip any step and adhesion fails.
When Brush-On Epoxy is the Better Choice
Brush-on epoxy wins on worn, chipped, or slightly flexible tubs where a thicker film and better adhesion matter. Two-part epoxy also lets you control coverage around drains and curves.
For heavy damage, call a pro for reglazing instead of coating over problems. Ventilation and a respirator matter either way, since both products off-gas during curing.
Cost Breakdown: DIY Spray Paint vs. Professional Reglazing
DIY aerosol kits typically run $50 to $150 in materials, plus your sanding and cleaning time. Professional reglazing usually lands around $300 to $600 depending on tub condition and region.
Budget for durability too: a careful DIY coating may last a few years, while pro reglazing often holds longer. If you want it done once, weigh that against the lower upfront cost.
Safety First: Ventilation and Respiratory Protection
Choosing the Right Respirator for Toxic Fumes
Aerosol coatings release solvent vapors that a dust mask cannot stop. Wear a NIOSH-approved respirator with organic vapor cartridges, and check the fit before you start. If the cartridge smells fumes or you feel lightheaded, leave the room and swap it out. Keep a spare set of cartridges on hand for a full bathtub job, since cartridges load up faster in a small, closed room.
Ventilation Strategies for Enclosed Bathrooms
Bathrooms trap fumes, so you need moving air, not just an open window. Set a box fan in the doorway blowing outward and crack a window on the opposite side to create cross flow. Run the exhaust fan the whole time and for at least an hour after you finish. Seal the door from the rest of the house with tape and a towel, and keep kids and pets out until the smell is gone.
Environmental and Health Considerations
Solvent-based aerosols are flammable and pollute indoor air, so treat the job like a small hazmat operation. The EPA and OSHA both flag organic solvents as a health concern in poorly ventilated spaces, which is exactly what a bathroom is. Collect used rags and empty cans for proper disposal, and never pour leftover product down the drain. If you have asthma or chemical sensitivity, hire a pro for reglazing instead of risking a reaction.
Is It Okay to Spray Paint a Bathtub?
What the Experts Say
Yes, you can use aerosol spray paint on a bathtub, but only with the right product and process. A standard decorative can won’t hold up to water and cleaning. Manufacturers of refinishing coatings expect you to use an epoxy or acrylic bathtub-specific spray paint.
OSHA and the EPA matter here. Aerosol solvents demand a NIOSH-approved respirator and real ventilation, not just an open window. Skip that and you’re risking your health in a small bathroom.
Realistic Expectations for Durability
Expect a few years of service, not a lifetime. Curing time runs roughly 3 days before water contact and 7 days before heavy use before full water exposure, depending on the product and humidity. Rush it and the finish fails early.
Durability hinges on adhesion. Poor sanding, leftover soap residue, or a skipped primer layer means peeling within months. Proper preparation and a bonding primer give the coating a fighting chance.
Pros and Cons Revisited
Spray paint is cheap and DIY-friendly, but it’s unforgiving. Overspray, drips, and thin spots are common mistakes that show up fast on a curved tub surface.
- Pros: low cost, no spray gun needed, fast coverage.
- Cons: strong fumes, limited durability, tricky adhesion.
Professional reglazing lasts longer but costs more. If your tub is cracked or heavily worn, spray paint won’t fix the underlying problem.
When Spray Painting a Bathtub Works Best
Ideal Bathtub Types and Conditions
Solid tubs with smooth, intact surfaces like porcelain or acrylic, and only when the finish is sound, are where aerosol refinishing works best. Deep chips, rust, or a flexing fiberglass floor will cause the coating to crack. Skip cracked tubs or surfaces that move underfoot.
Surface Preparation Steps for Success
Preparation is the real job; painting is the reward. Work through these steps in order:
- Scrub with degreaser, rinse, and dry completely.
- Scuff with 120- to 220-grit paper for grip.
- Repair chips and cracks with epoxy filler, then sand smooth.
- Wipe with tack cloth and mask fixtures and drains.
Set up ventilation before opening a can and wear an organic-vapor respirator. A bathroom fan isn’t enough; keep the door open and add a box fan pulling air out.
Primer Selection and Application
Choose a primer made for the tub material and compatible with your topcoat, ideally an epoxy-based bonding primer for porcelain or acrylic. Skip all-purpose primer; adhesion on a wet, slippery surface demands a dedicated product.
Apply two thin coats rather than one heavy pass, letting each flash off per the label. Thin coats prevent runs and support durability and even curing. Rushing this stage is the most common reason DIY jobs fail.
Doing It on a Budget Without Cutting Corners
Affordable Spray Paint Options That Still Work
Look for a two-part epoxy spray specifically labeled for bathtub refinishing, not general-purpose aerosol. Cheaper craft or automotive cans lack the chemical resistance a wet, soapy surface demands. Expect roughly $50 to $150 per kit, depending on coverage and brand.
DIY vs. Professional Reglazing: Hidden Costs
Professional reglazing typically runs $300 to $600 installed, while a DIY epoxy spray kit lands around $50 to $150 in materials. Your savings shrink once you add sanding supplies, respirator cartridges, and a failed first attempt. Factor in your time, often 6 to 10 hours across prep and curing.
Where to Save and Where to Splurge
Save on sandpaper and masking film, but never skimp on epoxy, primer, or your respirator. Proper ventilation and adhesion products determine durability, so buy the manufacturer’s recommended primer. One careful, well-prepped coat beats three rushed ones every time.
How to Spray Paint a Bathtub: Step-by-Step
Remove Old Paint or Reglazing
Strip the old finish first, or your new coat will lift within weeks. Apply a chemical stripper rated for tubs, scrape with a plastic putty knife, then sand with 220-grit and wipe with degreaser.
Apply Primer and Spray Paint Evenly
Thin, overlapping passes beat one heavy coat every time. Hold the can 8 to 10 inches away, build 3 light coats, and let each flash 15 to 20 minutes before checking coverage.
Troubleshooting Adhesion Issues
Beading or peeling means the surface wasn’t clean or scuffed enough. Sand back to bare surface, re-clean, and switch to an epoxy primer, since standard spray paint struggles on slick porcelain.
Follow these steps in order, and don't skip the prep, because adhesion problems almost always start before the first coat.
Common Mistakes to Avoid When Spray Painting a Bathtub
Skipping Surface Prep
Prep decides whether the coating stays put. Sand the entire surface to dull it, then scrub away soap scum, oils, and old caulk. Wipe with a damp cloth and let it dry fully before you spray.
Using the Wrong Type of Spray Paint
Standard decorative cans will not survive a wet tub. Choose an epoxy or acrylic bathtub refinishing spray rated for wet areas, and pair it with a bonding primer for adhesion.
Ignoring Safety and Ventilation
Fumes build fast in a bathroom. Wear a respirator, open windows, and run a fan during application and curing. Follow the manufacturer’s recoat and cure times exactly.
- Rushing prep: skipping sanding and cleaning causes peeling within months.
- Wrong product: regular spray paint fails under water and foot traffic.
- No primer: epoxy needs a bonding primer to grip a glossy tub.
- Thin coats: heavy passes cause runs and uneven durability.
- Weak ventilation: poor airflow traps fumes and slows curing.
- Early water use: waiting the full cure window protects the finish.
When to Call a Pro for Bathtub Refinishing
Warning Signs You Shouldn’t DIY
Stop and hire a pro if your bathtub has cracks, soft spots, or peeling layers deeper than the glaze. Those point to structural problems that spray paint cannot fix, and covering them up wastes money.
- Call a professional if the tub flexes or feels spongy underfoot.
- Hire a pro when rust has eaten through the enamel into the cast iron or steel.
- Walk away from DIY if mold or water damage reaches the subfloor around the tub.
Safety Hazards: Fumes and Structural Issues
Spray paint fumes in a small bathroom demand serious ventilation and a fitted respirator rated for organic vapors, per OSHA guidance. Skip that, and you risk dizziness or worse in a confined space.
Structural issues are the bigger red flag. A tub that moves or leaks needs reglazing by a pro, not a cosmetic coat that will crack within months.
Long-Term Value of Professional Reglazing
Professional reglazing typically runs $300 to $600 and holds up far longer than aerosol coatings. That upfront cost usually beats repainting every year or two.
Choose a pro when durability and safety matter more than saving a few hundred dollars.
Safety means the precautions that protect you from fumes, fire, and skin contact while spray painting a bathtub.
Can You Paint a Bathtub with Can Spray Paint: Frequently Asked Questions
?Can You Paint a Bathtub with Can Spray Paint and Actually Get a Finish That Lasts?
Yes, but only with the right product and process. Standard decorative spray paint won't hold up in a wet, high-traffic tub. You need a bathtub-specific epoxy or refinishing spray paint, thorough sanding, a bonding primer, and full curing time. Skip any step and the finish will peel, blister, or wear through within months. Do it right once or don't do it.
?How Much Spray Paint Does It Take to Paint a Bathtub?
Plan on two to three cans of bathtub-grade spray paint for a standard tub, plus primer. Coverage depends on surface porosity and how many thin coats you apply. Buy extra in the same batch so you don't run out mid-project and risk a mismatched finish. Thin, even coats beat one heavy coat every time for adhesion and durability.
?Why Does Spray Paint Peel off a Bathtub so Often?
Poor adhesion, almost always. Peeling comes from skipping sanding, leaving soap scum or residue behind, painting over a slick or previously reglazed surface, or using general-purpose spray paint instead of an epoxy-based bathtub product. Moisture trapped under the film makes it worse. Cleaning, sanding, and priming are not optional steps if you want the coating to bond.
?Can You Paint a Bathtub with Can Spray Paint in a Bathroom Without Proper Ventilation?
No. Aerosol bathtub coatings release strong solvents and fumes in a small, often windowless space. You need cross-ventilation, a fitted respirator rated for organic vapors, eye protection, and no open flames or pilot lights. If you can't ventilate the room properly, don't spray in it. Move to a professional reglazing option or a brush-on epoxy with better control.
?What Should the Surface Look Like Before You Spray Paint a Bathtub?
It should be clean, dull, and dry. That means removing all soap scum, hard water film, and caulk residue, then sanding the surface to give the primer something to grip. Repair chips and cracks first. Wipe everything down and let it dry completely. Any gloss, grease, or moisture left behind is where adhesion fails first.
?When Can You Paint a Bathtub with Can Spray Paint Versus Calling a Pro?
DIY spray painting makes sense for a sound tub with cosmetic wear and a careful planner ready to do full preparation and curing. Call a pro for cracks, rust-through, structural damage, or a previously failed coating. Professional reglazing uses tougher materials and proper equipment. If your tub is failing structurally, spray paint just hides the problem until it gets worse.
?is Spray Paint for a Bathtub Safe Once it's Fully Cured?
Yes, cured bathtub epoxy spray paint is safe for normal use. The key word is cured. Follow the manufacturer's cure window, which is often several days, before exposing the surface to water or heavy use. Rushing curing is a common mistake that ruins durability and adhesion. Ventilate well during application and keep the bathroom off-limits until the coating is fully set.
Our Thoughts
So yes, you can spray paint a bathtub with an aerosol can, provided you choose an epoxy-based product and do the prep work properly. Skip either step and ordinary spray paint will peel, blister, and wear through fast under water and foot traffic. Treat this as a refinishing job, not a quick cosmetic touch-up.
Your most useful next step is to confirm your product is a true two-part epoxy kit labeled for tub refinishing, then plan your safety setup before you open it. Work with a respirator rated for the fumes, keep ventilation strong, and respect the full curing window before water touches the surface. Proper preparation, cleaning, and sanding decide adhesion and durability, so budget the time to do them right once.