
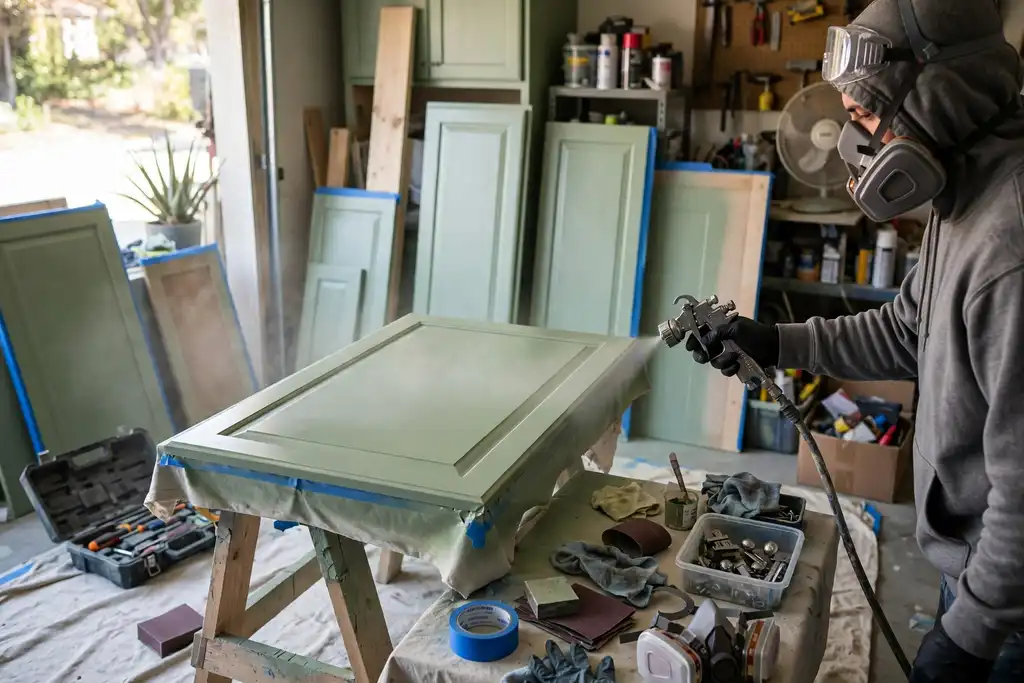
Spray painting cabinets gives a smooth factory finish only if you prep with degreaser and sandpaper, then apply thin coats of primer and paint with a respirator on.
Thinking you can just point and spray is the fastest way to ruin a set of cabinet doors. The truth is that how to spray paint cabinets is mostly about what happens before the first coat: thorough cleaning, sanding, and priming create the bond that spray paint alone never will.
What follows is a straight-talking plan for careful DIYers who want to do it right once. You will get the exact order of operations, the safety gear that is not optional, and the mistakes that cause runs, peeling, and a garage full of fumes. Expect to spend more time prepping than spraying, and plan for proper cure time before you hang anything back up.
- Degrease and sand all surfaces before any primer or paint.
- Use a respirator and ventilate the space; solvent fumes are harmful.
- Apply thin coats of primer and paint, sanding between coats lightly.
- An HVLP sprayer gives a finer finish than aerosol cans on large jobs.
- Let each coat cure fully; rushed cure time causes peeling and tackiness.
How to Spray Paint Cabinets: the Quick Decision Before You Start
Decide your spray method before you touch a single cabinet door, because that choice drives your budget, your safety gear, and your finish quality.
| Your situation | What to do | Why |
|---|---|---|
| One or two cabinets, small batch | Aerosol cans | Lowest upfront cost, no cleanup |
| Full kitchen, 15 or more doors | HVLP sprayer | Faster coverage, smoother finish |
| Budget under a few hundred dollars | Aerosol cans | Cheaper entry, more cans needed |
| Want a factory-flat finish | HVLP sprayer | Adjustable pattern and flow |
| No garage or ventilated space | Aerosol cans outdoors | Less overspray equipment to manage |
| Compare to pro refinishing | DIY spray saves roughly half to two thirds | Pro jobs run into the thousands |
Recommended for this job

Rust-Oleum Painter's Touch 2X Ultra Cover
Provides smooth gloss white coverage in one spray for cabinet doors and frames.
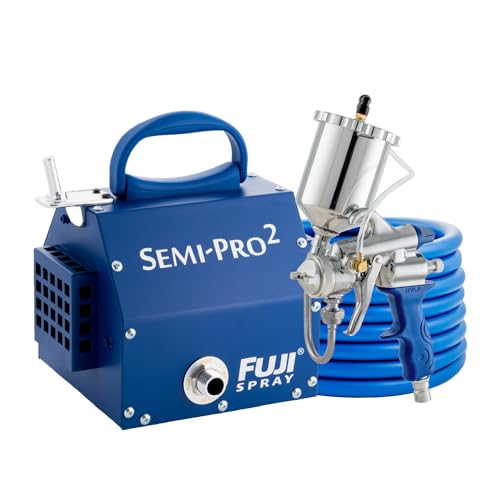
Fuji Spray 2203G Semi-PRO 2
Delivers adjustable HVLP fan pattern for even paint coats on cabinet surfaces.

Simple Green Industrial Cleaner and Degreaser
Degreases and cleans cabinet surfaces before spraying to improve paint adhesion.
Aerosol Cans or HVLP Sprayer? Use This Rule of Thumb
Spray cans work for 4 to 6 cabinet doors; a full kitchen needs an HVLP sprayer (a gun that atomizes paint with high-volume, low-pressure air). Cans run $8 to $15 each and spray unevenly on large flats. Budget 30 to 60 minutes of masking and cleanup per sprayer session.
What Results Can You Realistically Expect?
A smooth, even coat comes from 2 to 3 thin coats with 220 to 320 grit sandpaper between coats. Plan 7 to 14 days of cure time before rehanging cabinet doors. Wear a respirator (a mask that filters airborne particles and vapors) rated for organic vapors, and lay a drop cloth over cabinet boxes.
Cabinet boxes are the fixed frames and shelves that hold the doors and drawers in your kitchen.
The 5-Minute Cabinet Check: What to Inspect Before Any Spraying
Is Your Cabinet Surface a Good Candidate for Paint?
Press a fingernail into a hidden spot on each cabinet door. If the finish lifts or flakes, sand with 120-grit sandpaper, then 220-grit, and apply a bonding primer, a preparatory coating that helps paint stick. Sound laminate usually needs only a scuff sand.
Are There Hidden Damages or Grease Traps?
Wipe every surface with a degreaser, then check cabinet boxes and door backs for swelling, mold, and loose veneer. Grease near the range hood is the usual culprit, so scrub that zone twice before sanding anything.
What’s Your Ventilation Situation?
Overspray travels 10 to 15 feet, so your space decides the setup. A garage with an open door and a box fan beats a closed kitchen, and an organic-vapor respirator is non-negotiable indoors. Lay drop cloths over a 12-foot radius.
Run these five checks before you touch a can of paint, so you catch problems while they are still cheap to fix.
How Spray Painting Cabinets Works (and Why It's Different from Brushing)
The Science of Adhesion: Primer, Paint, and Cure
Adhesion comes down to three layers working together. Primer, a preparatory coating applied before paint, grips the sanded surface and gives the topcoat something to bond to. Skip it and your finish can peel in sheets.
Choose the right primer for the substrate. Shellac-based primer blocks tannins and stains on wood; bonding primer sticks to slick laminate. Match the primer to your cabinet material, not to the color you want.
After the topcoat, cure time matters. Full hardness typically takes 7 to 14 days depending on humidity and product. Wait it out before hanging cabinet doors.
Why Thin Coats Beat Thick Ones
Thin coats dry evenly and resist runs, sags, and drips. A thick pass traps solvent underneath, which causes wrinkling and slow curing. Build coverage over several light passes instead.
Apply thin topcoats with steady, overlapping strokes, then let each coat flash off per the label. Sanding between coats with fine sandpaper knocks down nibs and gives the next layer a mechanical bite. Two to three thin coats usually beat one heavy one.
Before You Start: Tools, Materials, and Safety You Actually Need
The Must-Have Materials and Tools You Need
- Cleaning and prep: degreaser, 120 and 220 grit sandpaper, tack cloth.
- Coating: bonding primer, spray paint, painter’s tape.
- Spray gear: HVLP sprayer or aerosol cans for small jobs.
- Protection: respirator rated for organic vapors, nitrile gloves, safety glasses.
- Setup: drop cloths, plastic sheeting, screwdriver for hardware removal.
Safety First: Respirators, Gloves, and Fire Prevention
Solvent-based spray paint releases fine particles and flammable vapor. Wear a fitted respirator, not a dust mask. Eliminate flames, pilot lights, and sparks, and ventilate hard.
How to Set up a Safe Spray Zone
- Lay drop cloths over floors and immovable items.
- Hang plastic sheeting to catch overspray.
- Set a fan to push air out, never toward your face.
- Keep a fire extinguisher within reach.
- Remove hardware and tape off cabinet boxes.
- Cleaning and prep: a degreaser cuts kitchen grease, then 120 and 220 grit sandpaper scuff the surface and a tack cloth removes dust.
- Coating: a bonding primer is a preparatory coating that helps paint stick, and painter's tape is removable pressure-sensitive tape for clean edges.
- Spray gear: an HVLP sprayer is a low-pressure gun that lays a fine, even coat, while aerosol cans suit small jobs.
- Protection: a respirator is a mask that filters airborne particles and vapors, plus nitrile gloves and safety glasses.
- Setup: drop cloths are protective sheets for floors and surfaces, and a screwdriver handles hardware removal.
- Ventilation: set a fan to push vapor out of the space, never toward your face, and keep a fire extinguisher nearby.
- Ignition control: keep flames, pilot lights, and sparks far from the spray zone since solvent paint vapor is flammable.
Step-by-Step
Work in this order and you avoid the two biggest failures: peeling paint and visible drips.
- Strip and label. Remove cabinet doors and all hardware, then mark each door and its screws with painter’s tape (a removable pressure-sensitive tape) so everything goes back in the right spot.
- Degrease everything. Scrub every surface with a degreaser to cut kitchen grease, rinse, and let it dry fully before touching it.
- Set up for safety. Ventilate the space, wear a respirator (a mask that filters what you breathe), and lay cloths over floors and counters, because overspray travels farther than you expect.
- Scuff the surface. Sand with 120-grit paper and wipe off the dust so the primer can bite.
- Prime first. Apply a stain-blocking primer in thin coats, then sand lightly between coats.
- Spray in thin coats. Hold the can or HVLP spray gun about 8 to 10 inches away and keep the arm moving to prevent runs.
- Respect cure time. Sand between coats, then wait the full cure time before hanging doors and hardware.
Follow these steps in order and your finish will hold up to daily use.
Spraying Cabinet Boxes vs. Doors: a Second Path for a Flawless Finish
How to Spray Cabinet Boxes Without Overspray
Mask the cabinet boxes with painter’s tape and plastic sheeting so only the face frames show. Keep your HVLP sprayer 6 to 8 inches away and use thin coats, because heavy passes cause runs and overspray drift onto walls.
Doors and Drawers: Flat vs. Raised Panel Techniques
Flat doors take face-on passes; raised panel doors need the grooves sprayed first at an angle. Sand between coats with 320-grit sandpaper, then flip and coat the backs after the cure time.
Reassembling and Rehanging Doors
Wait 7 to 14 days for full cure time before touching anything. Reattach hardware removal items by hand, then rehang doors with a helper so hinges line up before the final screw.
Hardware removal means taking off handles, hinges, and knobs so paint covers only the cabinet surface.
Follow these steps to spray the boxes and doors cleanly, then get everything back on its hinges without chipping the fresh finish.
Care and Maintenance: Keeping Your Sprayed Cabinets Looking New
How to Clean Sprayed Cabinets Without Damaging the Finish
Wipe with a damp cloth and mild dish soap, then dry immediately. Avoid abrasive pads, bleach, and ammonia; use a soft microfiber cloth. For greasy spots, apply a little degreaser to the cloth, not the surface, then rinse with a clean damp cloth. Weekly light cleaning beats occasional scrubbing.
Touch-Up Tricks for Chips and Wear
Keep leftover original paint for small chips. Clean the spot, apply thin layers with a small artist’s brush, letting each dry. Feather edges to blend; use primer first for deep chips.
When to Recoat (and How)
Recoat when the finish looks chalky or worn through, usually after years of heavy use. Lightly scuff with fine sandpaper, wipe off dust, and apply thin coats with an HVLP sprayer or rattle can. Respect the manufacturer’s cure time.
Real-Life Scenario: Spray Painting a 10-Door Kitchen on a Budget
Day 1: Prep and Priming
Gather degreaser, 120 and 220 grit sandpaper, primer, painter’s tape, drop cloth, and a respirator. Remove doors, drawers, and hardware; bag screws by location. Clean with degreaser, kitchen grease kills adhesion. Scuff with 120 grit, repair dings, wipe dust. Set up a ventilated spray area. For laminate, use a bonding primer; spray two thin coats and dry overnight.
Day 2: Topcoats and Drying
Apply thin coats, not heavy ones, thick passes sag and stay soft. Build color in two to three light layers, lightly sanding between coats with 220 grit once dry to the touch. Keep the HVLP sprayer moving at a steady distance, overlapping each pass halfway. Follow cure time, typically 7 to 14 days.
Day 3: Reassembly and the Final Reveal
Wait for full hardness, then reinstall hardware and hang doors. Check edges for thin spots. Most budget kitchens cost $150 to $400 in materials and three days of work, with factory-smooth results if dry times are respected.
Troubleshooting: Fixing Drips, Orange Peel, and Other Spray Paint Problems
Most spray finish flaws trace back to technique, not the product, so diagnose before you strip and start over. A few targeted fixes save a full recoat.
| Problem | Likely cause | Fix |
|---|---|---|
| Drips and runs | Heavy pass or slow sweep | Sand flat, then apply thin coats |
| Orange peel texture | Paint too thick or air too low | Thin product, adjust HVLP sprayer |
| Blushing (milky haze) | High humidity during spraying | Wait for drier conditions, recoat |
| Fisheyes (small craters) | Oil or silicone contamination | Degreaser, sandpaper, fresh primer |
| Uneven sheen | Inconsistent overlap or distance | Keep steady distance and overlap |
| Gritty finish | Dust or poor sanding between coats | Tack off, sand lightly, respray |
| Soft, tacky film | Coats too thick, short cure time | Extend cure time before next coat |
Why Drips Happen and How to Fix Them
Drips come from laying paint on too heavy or sweeping too slowly. Once dry, sand the run flat with fine sandpaper, then recoat in thin coats.
Orange Peel: Causes and Cures
That bumpy texture means paint was too thick or your HVLP sprayer air was too low. Thin the product per the label, raise air pressure, and keep your distance steady.
Other Common Issues: Blushing, Fisheyes, and Uneven Sheen
Blushing is moisture trapped in the film, so spray only in drier conditions. Fisheyes signal oil or silicone, so clean with degreaser, scuff with sandpaper, and reseal with primer. Uneven sheen usually means inconsistent overlap.
Cost: DIY Spray Painting vs. Professional Refinishing
Spraying cabinets yourself usually runs $150 to $400 in materials, while professional refinishing typically costs $1,200 to $3,500 or more, depending on cabinet count and condition.
| Option | Upfront cost | Ongoing cost | Notes |
|---|---|---|---|
| DIY spray paint (aerosol) | $150 to $300 | Minimal | Small kitchens; high labor |
| DIY HVLP sprayer setup | $250 to $500 | Electricity, filters | Includes sprayer and paint |
| Pro refinishing (basic) | $1,200 to $2,500 | None | Sprayed lacquer or enamel |
| Pro refinishing (premium) | $2,500 to $3,500+ | None | Includes door removal, prep |
| DIY with cabinet doors removed | $200 to $350 | Minimal | Better finish, more time |
| Pro touch-up (partial) | $500 to $1,000 | None | Few cabinets or boxes only |
Assumes a typical 10 to 15 door kitchen, standard wood or laminate cabinet boxes, and US pricing for mid-grade materials. Pro ranges include labor and prep; DIY excludes your time and any tool purchases beyond a basic sprayer.
Typical DIY Cost Breakdown (with Assumptions)
For 10 to 15 cabinet doors, expect $150 to $400 total. That covers degreaser, sandpaper, primer, spray paint, painter’s tape, drop cloth, and a respirator. An HVLP sprayer adds $100 to $250 if you don’t own one.
Professional Refinishing: What You Pay for
Pros charge $1,200 to $3,500 for the same kitchen. You’re paying for thorough prep, cabinet doors removed and sprayed off-site, controlled cure time, and a warranty. That price also includes liability and disposal.
When DIY Saves Money (and When It Doesn’t)
DIY wins on simple layouts with flat doors and a dedicated workspace. It stops saving money if you lack ventilation, skip sanding between coats, or rush cure time, because rework costs more than the original job.
Common Mistakes That Ruin a Sprayed Cabinet Finish (and How to Avoid Them)
Overcoating: the Fast Track to Drips and Sags
Apply thin coats, not heavy ones. Thick spray passes run before flashing off, requiring sanding back to bare wood. Keep the can or HVLP sprayer moving and overlap each pass by half.
Poor Prep: Why Skipping Degreasing or Sanding Backfires
Kitchen grease kills adhesion, so clean every surface with a degreaser before sanding. Scuff doors and boxes, fill dings, and sand flush. Defects under gloss show twice as bad.
Wrong Primer: the Hidden Cause of Peeling and Yellowing
Primer bonds topcoat and blocks stains. Match it to the substrate: shellac or stain-blocking primer over knots and tannins, bonding primer on laminate. Cheap primer on greasy wood peels within a season.
- Thin coats: two or three light passes beat one wet pass; sand between coats.
- Degrease first: wash, rinse, dry fully before sanding.
- Fix flaws early: fill, sand, check with raking light.
- Right primer: shellac for stains, bonding primer for laminate.
- Cure time: most finishes need 7 to 14 days to harden.
- Protect yourself: wear an organic-vapor respirator and tape off the room.
- Thin coats only: two or three light passes beat one wet pass, and sanding between coats knocks down nibs.
- Degrease first: wash with a degreaser, rinse, and let it dry fully before sanding.
- Fix flaws early: fill, sand, and re-check with a raking light before primer.
- Right primer: shellac for stains, bonding primer for slick laminate.
- Respect cure time: most finishes need 7 days to harden, so wait before hanging doors.
- Protect yourself: wear a respirator rated for organic vapors and tape off the room with a drop cloth and painter's tape.
When to Call a Pro: Real Warning Signs You Shouldn't Ignore
Health and Safety Red Flags (Fumes, Fire Risk, Inadequate Ventilation)
Stop if you can’t ventilate properly. Solvent fumes build fast in a closed garage; a cartridge respirator is mandatory indoors, not optional. Fire risk is real, pilot lights, water heaters, and sparks can ignite aerosol vapors, so shut them off or spray elsewhere.
Surface Conditions That Demand Professional Help
Call a pro for water damage, mold, failing laminate, loose veneer, deep gouges, or paint peeling in sheets. These mean the substrate is failing and will worsen under paint; a pro can stabilize or replace it first.
Time and Skill Constraints: When DIY Costs More
Hire out if you can’t absorb days of dry time, sanding between coats and curing add up, and rushing causes runs and tacky finishes. Lacking a spray area or HVLP experience also counts; two failed coats cost more than one professional job.
Stop and call a professional if:
- You cannot ventilate the spray area or control ignition sources near the work zone.
- You find water damage, mold, or failing laminate on the cabinet boxes.
- Loose veneer, deep gouges, or paint that peels in sheets covers the cabinet doors.
- Your schedule cannot absorb several days of dry time and sanding between coats.
- You lack a proper spray area or hands-on experience with an HVLP sprayer.
How to Spray Paint Cabinets: Frequently Asked Questions
?Can I Use How to Spray Paint Cabinets to Paint Without Removing the Doors?
Yes, but it is a compromise. You can spray paint cabinets in place if you tape off the openings and work carefully, but overspray lands everywhere and edges get missed. Removing the doors and hardware first gives you a flat surface, cleaner edges, and a faster, more even coat. If you want a factory-like finish done right once, take them off.
?How to Spray Paint Cabinets Without Getting Drips and Runs?
Spray in thin coats and keep the gun moving. Drips come from heavy passes, holding the nozzle too close, or trying to cover in one shot. Hold the spray paint can or HVLP sprayer about 8 to 10 inches away, overlap each pass by half, and let each thin coat flash off before the next. Two or three thin coats beat one wet coat every time.
?Why Does Prep Matter so Much When You Spray Paint Cabinets?
Prep determines whether the finish lasts because spray paint reveals every flaw. Grease and grime cause fisheyes and peeling, so scrub with a degreaser first, then scuff with sandpaper so the primer can bite. Skip prep and the finish fails within months. A careful planner should budget most of the project time for cleaning, sanding, and masking.
?What Safety Gear Do I Need to Spray Paint Cabinets Indoors?
You need a respirator rated for paint vapors, not a dust mask. The term respirator can mean a medical ventilation device, but here it's the mask that filters what you breathe. Add eye protection, gloves, and ventilation by opening windows and running fans. Lay a drop cloth (a protective sheet for floors and surfaces) and use painter's tape (removable pressure-sensitive tape) to mask off the room.
?How Long Should I Wait Before Sanding Between Coats of Spray Paint on Cabinets?
Wait until the coat is dry to the touch, usually a few hours, then sand lightly with fine sandpaper. Sanding between coats knocks down nibs and orange peel so the next layer lays flat. Don't rush it, and don't sand a tacky coat or you'll gum up the paper and tear the finish. Follow the can's recoat window.
?When Can I Reinstall Cabinet Doors and Hardware After Spray Painting Cabinets?
Only after the cure time, not just dry time. Dry to the touch happens in hours, but full cure takes days to a week depending on the product, humidity, and temperature. Reinstall cabinet doors and hardware after that window, or you'll get fingerprints, sticking edges, and chipped corners. Read the label and add a buffer day.
?is an HVLP Sprayer Better Than Spray Paint Cans for Cabinets?
Yes, for larger jobs. An HVLP sprayer (a sprayer that uses high volume, low pressure air) gives you adjustable patterns, less overspray, and a smoother finish across many cabinet boxes and doors. Aerosol spray paint cans work fine for small jobs or touch-ups but cost more per square foot and tire your finger. Match the tool to the scope.
Conclusion
Getting a factory-smooth finish comes down to patience, not talent. Skip the degreaser or rush the primer, and even the best spray paint will peel or show grit. Thin coats, sanding between coats, and full cure time protect the work you put into those cabinet doors.
Before you spray the first cabinet box, set up your ventilation and put on a respirator, a device that filters the air you breathe. Then test your HVLP sprayer or can on scrap wood to dial in the pattern before touching a single door.