
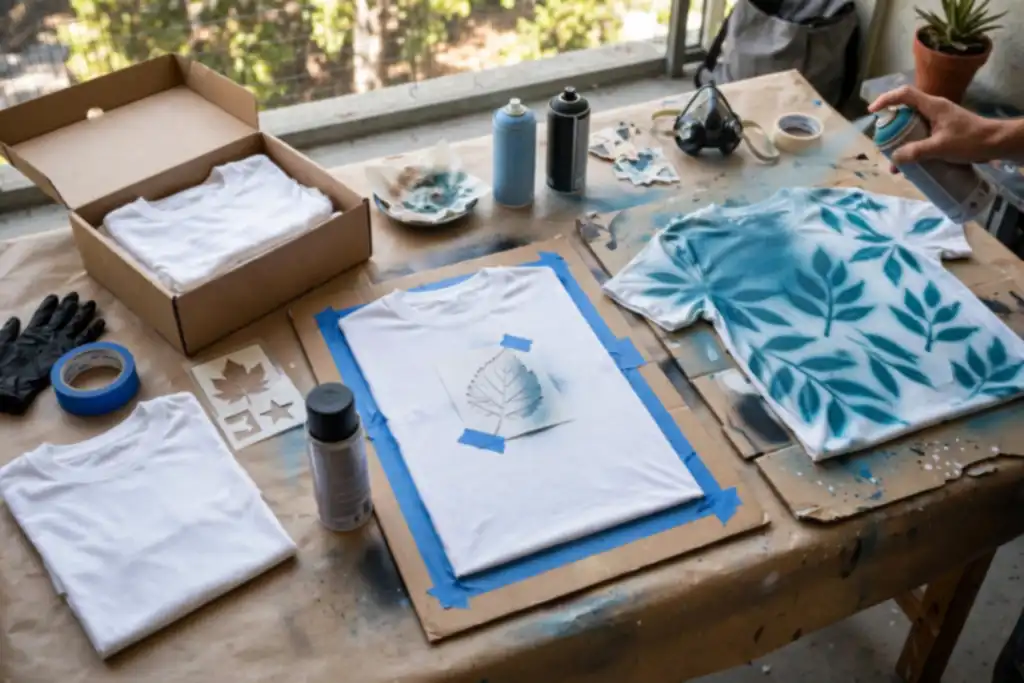

Spray painting a t-shirt works well if you use fabric paint, not hardware-store aerosol, and build thin layers over a secured stencil. Skip either condition and you get stiff, cracking, or bleeding results that wash out fast.
The biggest mistake is grabbing a can of general-purpose spray paint from the garage shelf and expecting it to bond to cotton like fabric paint does. Learning how to spray paint t shirts correctly starts with reading the label: you need a product formulated for textiles, plus a cardboard insert, masking tape, and a stencil to keep the design crisp.
You will get the exact order of operations here: surface prep, stencil placement, thin layering, drying time, heat setting, and the first wash. Safety comes first too, because aerosol overspray in a closed room is a real health hazard. Follow these steps once and your shirt comes out soft, washable, and sharp instead of crusty and faded.
- Use fabric spray paint, not general-purpose aerosol, for soft washable results.
- Slide a cardboard insert inside the shirt to stop bleed-through.
- Spray thin layers from 8 to 10 inches away; heavy coats crack.
- Work outside or with strong ventilation and wear a respirator.
- Heat set the design before the first wash to lock in color.
How to Spray Paint T Shirts: the Quick Decision Before You Start
Before you shake a single can, decide whether you need fabric-specific spray paint or a fabric medium. That choice, plus basic ventilation and masking, prevents the most common failures: cracking, fading, and a stiff, unwearable shirt.
| Your situation | What to do | Why |
|---|---|---|
| Custom apparel, washable | Use fabric spray paint | Flexible and wash-fast |
| Using acrylic spray paint | Mix with fabric medium | Keeps fabric soft |
| Small garage or room | Spray outdoors or fan | Avoids fume buildup |
| First time spraying fabric | Test on scrap cotton | Catches bleed and stiffness |
| Design with sharp edges | Mask with tape, stencil | Clean lines, no overspray |
| Shirt sticking to itself | Insert cardboard inside | Blocks bleed-through |
| Want soft, thin color | Build thin layers | Prevents cracking and stiffness |
| After paint feels dry | Heat set per label | Improves wash durability |
Recommended for this job

Tulip ColorShot Fabric Spray Paint
Fabric-specific spray paint bonds to cloth for washable, flexible designs on t-shirts.

AirGearPro G-500 Reusable Respirator Mask
Reusable respirator filters vapors and dust so you can spray paint t-shirts safely.

7mil Blank Mylar Stencil Sheets
Blank Mylar sheets let you cut custom stencils for crisp spray-painted t-shirt designs.
Choose fabric spray paint for cotton or polyester blends, or mix fabric medium into acrylic spray paint at a 1:1 ratio. Unmodified acrylic dries stiff and cracks at the folds after 5 to 10 washes. Check the can label before buying; if it says fabric, you can skip the medium.
Fabric Spray Paint vs. Regular Spray Paint + Fabric Medium: Which One?
Fabric spray paint needs no mixing and stays flexible on knits. Acrylic plus medium costs less per ounce if you already own the color. Skip the medium and the design turns crusty within a few wash cycles.
Is Spray Painting T-Shirts Safe for Beginners?
Spray outdoors or in a garage with cross-ventilation and wear a respirator rated for organic vapors, per OSHA guidance. A dust mask won’t block aerosol solvents. Keep kids and pets clear until the shirt is dry, typically 30 to 60 minutes.
Ventilation means moving fresh air through your workspace so aerosol fumes do not build up around you.
What Results Can You Expect from Spray Painting T-Shirts?
Hold the can 6 to 8 inches away and build 2 to 3 thin coats for the softest hand. Heat set with an iron on medium for 3 to 5 minutes, then wait 24 hours before washing. Heavy coats feel like plastic and crack at the seams.
5-Minute Diagnostic: Check Your Shirt, Paint, and Workspace
Run this five-minute check before you shake a can. Wet fabric, the wrong paint, or a dusty workspace causes most spray paint failures on a t-shirt.
A t-shirt is a soft cotton or blend knit top that stretches, so spray paint must stay flexible on it.
Is Your T-Shirt Pre-Washed and Dry?
Wash the shirt once without fabric softener and tumble dry on low until fully dry, about 40 to 60 minutes. Factory sizing and skin oils block adhesion, so test a scrap of the same cotton first.
Do You Have the Right Spray Paint for Fabric?
Check the label for fabric bonding; standard hardware enamel cracks and flakes after 3 to 5 washes. If the can lists only wood and metal, switch to fabric paint or a fabric medium additive.
Is Your Workspace Ventilated and Protected?
Set up outdoors or in a garage with cross-breeze and cover the floor with cardboard. Wear nitrile gloves, eye protection, and a respirator rated for aerosols, per OSHA guidance.
Are Your Stencils and Masks Ready?
Slide a cardboard insert inside the shirt and tape every stencil edge with masking tape. Mist light coats from 8 to 10 inches, letting each layer dry 10 to 15 minutes before the next.
Run this five-minute check before you touch a can, because most spray paint t-shirt failures start with a wet shirt, the wrong paint, or a bad workspace.
How Spray Painting T-Shirts Works: Paint, Fabric, and Heat
How Spray Paint Adheres to Fabric Fibers
Paint sticks to a t-shirt when its binder wraps around individual fibers and cures into a flexible film. On cotton, that bond is mechanical, so a light first coat grabs better than one heavy pass. Pick a spray formulated for fabric or use a fabric medium; general-purpose enamel cracks when the shirt stretches.
Why Heat Setting Makes the Paint Permanent
Heat setting drives the binder into the fibers and locks the design against washing. Let the paint dry fully, typically 24 hours, then press with an iron on the reverse side for 3 to 5 minutes on a medium setting with no steam. Follow the manufacturer’s temperature guidance, and test a hidden area first.
The Role of Fabric Medium in Acrylic Spray Paint
Fabric medium softens acrylic so it bends with the cloth instead of flaking off. Mix it into acrylic spray paint according to the label, usually a 1-to-1 ratio, and apply thin layers. Without it, cured acrylic feels stiff and can crack at the seams after a few wash cycles.
Before You Start: Tools, Materials, and Safety Gear
What Tools and Materials Do You Need to Spray Paint T-Shirts?
Use fabric spray paint or acrylic mixed with fabric medium, plus a stencil, masking tape, and a firm cardboard insert (not paper towels) to keep the shirt flat. Test color and layering on a spare shirt first. Allow 30-60 minutes drying between coats, longer in humidity.
Layering means applying several thin coats of spray paint, letting each dry, instead of one heavy coat.
Which Safety Precautions Are Non-Negotiable?
Always wear a respirator rated for organic vapors, nitrile gloves, and eye protection; dust masks won’t stop aerosol solvents.
- Check the respirator seal before spraying and replace cartridges per schedule.
- Nitrile gloves and sleeves prevent skin contact and transfer.
- Spray outdoors or in a garage with a fan pulling air away.
How to Set up a Ventilated Workspace for Spray Painting
Choose a spot with cross airflow, outdoors or a garage with both ends open, and position a box fan to pull fumes away from you. Lay a drop cloth and tape the shirt flat over a cardboard insert to prevent bleed-through and give a firm stencil surface.
- Fabric spray paint: use paint labeled for fabric or mix acrylic with a fabric medium so the design survives washing.
- Cardboard insert: slide a board inside the t-shirt to block bleed-through and keep the front panel flat.
- Stencil and masking tape: tape the stencil down firmly so edges stay sharp and overspray stays off the rest of the shirt.
- Respirator: wear one rated for organic vapors, not a dust mask, since aerosol solvents pass straight through paper filters.
- Gloves and eye protection: nitrile gloves and safety glasses keep paint off skin and out of your eyes.
- Ventilated workspace: spray outdoors or in a garage with cross airflow and a fan pulling fumes away from you.
- Drying setup: allow 30 to 60 minutes between coats and keep the shirt flat until fully dry.
Step-by-Step: How to Spray Paint T-Shirts
Follow these steps to avoid common mistakes that ruin a t-shirt.
Wash and Dry the T-Shirt
Wash without fabric softener and tumble dry on low to remove sizing and dirt so paint bonds properly.
Insert Cardboard Inside the Shirt
Slide cardboard inside to create a flat, rigid surface, preventing bleed-through and keeping fabric taut.
Set up Your Stencil or Mask
Position stencil or masking tape and press edges firmly; use light spray adhesive if it shifts.
Shake the Spray Paint and Test on Scrap Fabric
Shake at least one minute and test on scrap fabric to check spray pattern and color.
Spray in Light Passes at the Right Distance
Hold 6 to 8 inches away and spray light, overlapping passes, keeping the can moving; let each layer dry 10 to 15 minutes before adding another color.
Heat Set the Paint for Durability
After the final layer dries 24 hours, heat set with an iron on the reverse side for 3 to 5 minutes to make it wash-resistant.
Follow these steps in order to avoid the most common mistakes that ruin a t-shirt.
Follow-Up Care: Washing, Drying, and Maintaining Your Spray-Painted Shirt
Once your design is cured and set, a few careful habits keep the color from cracking, fading, or bleeding in the laundry. Wash it inside out, in cold water, and skip the dryer.
How Soon Can You Wash a Spray-Painted Shirt?
Wait at least 24 hours after heat setting before the first wash. If the paint still feels tacky, give it another day or two.
A full cure typically takes 3 to 7 days depending on humidity and how many layers you applied.
Hand Wash vs. Machine Wash: Which is Safer?
Hand washing in cold water is the safest option for a spray-painted t-shirt. If you machine wash, use a gentle cycle and turn the shirt inside out first.
- Use cold water and a mild detergent.
- Skip fabric softener and bleach.
- Wash separately for the first few cycles.
How to Dry and Store Spray-Painted Shirts
Air dry the t-shirt flat or on a line, never in a hot dryer. Heat and tumbling cause paint to crack.
Store it folded with the painted side facing out. Avoid stacking heavy items on top of the design.
Once your design is cured and set, a few careful habits keep the color from cracking, fading, or bleeding in the laundry.
Cost Breakdown: DIY Spray Paint vs. Custom Shirts vs. Fabric Markers
Spray paint is the cheapest upfront option, but only if you already own the safety gear and don't count your time.
| Option | Upfront cost | Ongoing cost | Notes |
|---|---|---|---|
| Spray paint (1 color, 1 shirt) | $5 to $15 | $2 to $5 per shirt | Aerosol can covers 1 to 3 shirts; add $10 to $30 for stencil and tape if new |
| Fabric paint (set of 6 colors) | $15 to $30 | $3 to $8 per shirt | Brush-on, no overspray; bottles last many shirts |
| Fabric markers (set of 8) | $10 to $20 | $1 to $3 per shirt | Best for small designs; ink fades faster than paint |
| Custom printed shirt (online, 1 off) | $20 to $35 | $20 to $35 per shirt | No gear or cleanup; price drops to $10 to $18 at 10+ shirts |
| Custom printed shirt (local shop, 1 off) | $25 to $45 | $25 to $45 per shirt | Setup fee often waived on bulk orders |
| Screen printing kit (DIY starter) | $60 to $120 | $2 to $4 per shirt | Pays off after roughly 20 to 30 shirts |
| Heat transfer paper (inkjet) | $8 to $15 | $1 to $2 per shirt | Needs a printer and iron; designs crack over time |
Typical US retail prices for one adult cotton t-shirt, excluding the blank shirt ($3 to $8) and your labor. Ranges assume you already own basics like cardboard and tape; add $15 to $40 for a respirator and eye protection if you don't.
How Much Does It Cost to Spray Paint a T-Shirt?
Expect $5 to $15 for a can of spray paint that covers 1 to 3 shirts, plus $10 to $30 for a stencil and masking tape if you’re starting fresh. A respirator and eye protection add $15 to $40 once, and they are not optional indoors.
Fabric paint runs $15 to $30 for a multi-color set and costs $3 to $8 per shirt, with no overspray and no fumes. Spray paint wins on speed, not always on total cost.
When is It Cheaper to Buy Custom Shirts?
One-off custom prints cost $20 to $45 per shirt, which beats buying gear for a single design. At 10 or more shirts, online printers often drop to $10 to $18 each, undercutting DIY once you count materials and time.
Are Fabric Markers More Cost-Effective?
Yes, for small designs: a $10 to $20 set handles several shirts at $1 to $3 each. Markers suit lettering and detail work, but they fade faster than paint after repeated washing.
Real-Life Scenario: from Plain Tee to Custom Design in an Afternoon
Gathering Supplies and Preparing the Workspace
Wash and fully dry the t-shirt; sizing or oils prevent paint bonding. Work outside or in a garage with the door open, wearing an organic-vapor respirator, gloves, and eye protection. Lay cardboard on the ground, insert cardboard inside the shirt to prevent bleed-through, smooth the fabric, and tape the stencil with masking tape. Test spray distance on a scrap shirt first.
Spray Painting a Two-Color Stencil Design
Hold the can 6 to 8 inches away and spray short, even passes in bursts, keeping the can moving. Two light coats beat one heavy coat. Let the first color dry 15 to 30 minutes, then reposition the stencil for the second color, overlapping edges slightly. Press down any lifted stencil before spraying.
Heat Setting and First Wash
Once paint is fully dry (about 24 hours), heat set by ironing the shirt inside out on medium for 3 to 5 minutes, or tumble dry on high for 30 minutes. Wash inside out in cold water, skip fabric softener for the first few cycles, and air dry when possible.
Myths vs. Facts: Spray Painting T-Shirts
Myth: Any Spray Paint Works on Fabric
Hardware-store spray paint dries hard and stiff, flaking at the edges. Use paint labeled for fabric so pigment bonds with fibers and stays flexible. Check the can first; fabric spray paint costs about $8, $15 and covers a t-shirt front in one to two light coats.
Myth: Spray-Painted Shirts Crack After One Wash
Cracking comes from heavy coats and skipped heat setting, not the method. Thin layers with drying time between passes keep the film flexible; heat set with an iron once dry. Wash inside out, cold, gentle; skip fabric softener and high dryer heat.
Myth: You Don’t Need Ventilation If You Spray Outside
Drifting mist still reaches your face and lungs, and breeze carries overspray onto cars or laundry. Work upwind, keep cardboard inside the shirt, and wear an organic-vapor respirator, gloves, and eye protection. OSHA treats aerosol solvents as a real exposure concern.
Troubleshooting: Fixing Cracking, Fading, and Bleed-Through
Most spray paint failures on fabric trace back to technique, prep, or cure time, and each has a straightforward fix.
| Problem | Likely cause | Fix |
|---|---|---|
| Cracking or flaking | Coats sprayed too heavy or too close | Apply thin passes from 8 to 12 inches |
| Fading after washing | No heat setting before the first wash | Heat set, then wash inside out cold |
| Bleed under stencil | No cardboard insert or weak tape seal | Insert cardboard, press masking tape edges |
| Uneven coverage | Stopping mid-pass or arcing the can | Overlap passes by about half, keep steady |
| Sticky finish | Layers applied before the prior coat dried | Let each coat dry 15 to 30 minutes |
| Splotchy color | Can held too far from the fabric | Move closer, keep the can moving |
| Stencil edges blurred | Paint seeped under a loose stencil | Repress edges, spray lighter coats |
Why is My Spray Paint Cracking?
Cracking means your coats went on too thick or too close. Spray thin passes from 6 to 8 inches and let each one dry before the next.
How to Prevent Fading After Washing
Heat setting is what locks color into the fibers. Iron the design through a cloth or tumble dry low, then wash inside out in cold water.
What Causes Bleed-Through Under Stencils?
A missing cardboard insert lets paint soak straight through to the back. Slide cardboard between the layers and press masking tape firmly along every stencil edge.
How to Fix Uneven Spray Coverage
Uneven patches come from arcing the can or pausing mid-pass. Keep the can parallel to the fabric, overlap each pass by about half, and build color in light layers.
Common Mistakes When Spray Painting T-Shirts (and How to Avoid Them)
Skipping Fabric Medium with Acrylic Spray Paint
Acrylic spray paint alone cures stiff and cracks after a few washes. Mix in a fabric medium per the manufacturer’s ratio before you load the nozzle, or switch to fabric paint made for cloth.
Spraying Too Close or Too Far
Hold the can 8 to 12 inches from the t-shirt and move in steady overlapping passes. Closer floods the fabric; farther wastes paint and leaves a gritty, uneven coat.
Not Heat Setting the Paint
Heat setting locks the color so it survives the wash cycle. Let the design cure 24 hours, then press it with an iron on the reverse side for 3 to 5 minutes on a cotton setting, no steam.
Using Too Much Paint in One Coat
Thin coats beat thick ones every time. Apply two or three light layers, letting each dry 15 to 30 minutes, so color builds without soaking through or bleeding under the stencil.
- Skipping fabric medium with acrylic spray paint: Mix fabric medium into acrylic spray paint per the label ratio, or the design dries stiff and cracks.
- Spraying too close or too far: Keep the can 8 to 12 inches away and use steady overlapping passes for even coverage.
- Not heat setting the paint: Cure the design 24 hours, then iron the reverse side for 3 to 5 minutes with no steam.
- Using too much paint in one coat: Apply two or three light coats, drying 15 to 30 minutes between each, instead of one heavy pass.
- Skipping ventilation and protective gear: Spray outdoors or in a well-ventilated space and wear a respirator rated for organic vapors.
- Forgetting the cardboard insert: Slide cardboard inside the t-shirt so paint does not bleed through to the back.
- Rushing the masking tape removal: Pull tape while the paint is still slightly tacky to avoid peeling cured edges.
When to Call a Pro: Safety and Quality Concerns
You Need a Respirator but Don’t Have One
Stop if you can’t wear a proper respirator. A dust mask won’t filter aerosol solvents, and OSHA treats those fumes as a real hazard indoors. Skip the job until you have a respirator rated for organic vapors, gloves, and eye protection.
You’re Spray Painting Large Batches Without Proper Ventilation
Doing more than one or two shirts in a closed garage is a no-go. Move to open air or a booth with strong cross-ventilation. If you can’t get airflow, don’t start; solvent buildup is the mistake that sends people to the ER.
You Want Professional-Grade Durability and Colorfastness
Call a pro if the shirt must survive heavy washing without fading. Home jobs need heat setting and careful drying time to hold up. A screen printer or fabric paint specialist delivers color and design consistency that aerosol cans can’t match.
- Stop if you feel dizzy, get a headache, or your eyes water while spraying.
- Stop if the shirt must hold up to daily wear and repeated washing.
- Stop if you lack a respirator, gloves, or a ventilated workspace.
- Stop if the design needs crisp, multi-color registration a stencil can’t handle.
How to Spray Paint T Shirts: Frequently Asked Questions
?How to Spray Paint T Shirts so They Survive the Wash?
Heat set the paint and wash inside out in cold water. Spray paint bonds to fabric fibers once cured, but it needs heat setting with an iron or dryer to lock it in. Skip that step and your design will crack and fade fast. Wash separately the first few times to avoid transfer.
?How to Spray Paint T Shirts Without the Paint Bleeding Under the Stencil?
Press the stencil down hard and seal the edges with masking tape. Light coats are the key: hold the can 8 to 10 inches away and mist, don't soak. Heavy wet coats wick under stencil edges and ruin clean lines. Let each layer flash off before adding the next one.
?What Ventilation and Protective Gear Do You Need When You Spray Paint T-Shirts?
Work outdoors or in a garage with the door open and a fan pulling air away from you. Aerosol paint puts fine particles and solvent vapor in the air, so wear a respirator rated for organic vapor, not just a dust mask. Add nitrile gloves and eye protection, and keep a cardboard insert inside the shirt.
?How to Spray Paint T Shirts so the Design doesn't Crack When You Wear It?
Use thin, layered coats and keep the paint film flexible. Thick single coats dry brittle and crack along fold lines. Heat setting after full drying time helps the paint fuse with the fabric. Stretch the shirt slightly while spraying so the design moves with the fabric instead of fighting it.
?Does Regular Spray Paint Work on T-Shirts, or Do You Need Fabric Paint?
Regular spray paint works, but fabric paint is formulated to stay softer and more wash-durable. Standard aerosol paint leaves a stiffer hand and can feel scratchy on skin. If you use regular spray paint, keep layers thin, heat set it, and accept a firmer print. For shirts worn often, fabric paint wins.
?Why Does Spray Paint Flake off T-Shirts After a Few Washes?
It flakes because the paint never properly bonded, usually from no heat setting or spraying over fabric softener residue. Wash new shirts before painting to remove sizing and oils. After the paint cures for 24 hours, heat set it, then wait a few days before the first wash. Cold water and air drying extend the life of the design.
?When Should You Skip Spray Paint and Use a Different Method on T-Shirts?
Skip spray paint when you need a soft, skin-friendly print or a design with fine detail. Aerosol gives you bold graphics and solid color blocks, not delicate linework. For detailed art, use fabric paint, markers, or a stencil with fabric medium. Also skip it indoors without ventilation, no exceptions.
Conclusion
Getting a clean, durable result comes down to thin coats, a secure stencil, and proper ventilation. Skip the fabric medium or heat setting and your design will fade or crack after a few washes. Take the extra steps now and the shirt holds up.
Before you start, lay out your protective gear, masking tape, and cardboard insert, then test your spray paint on scrap fabric. That five-minute check catches nozzle spitting and color surprises before they hit the t-shirt.