
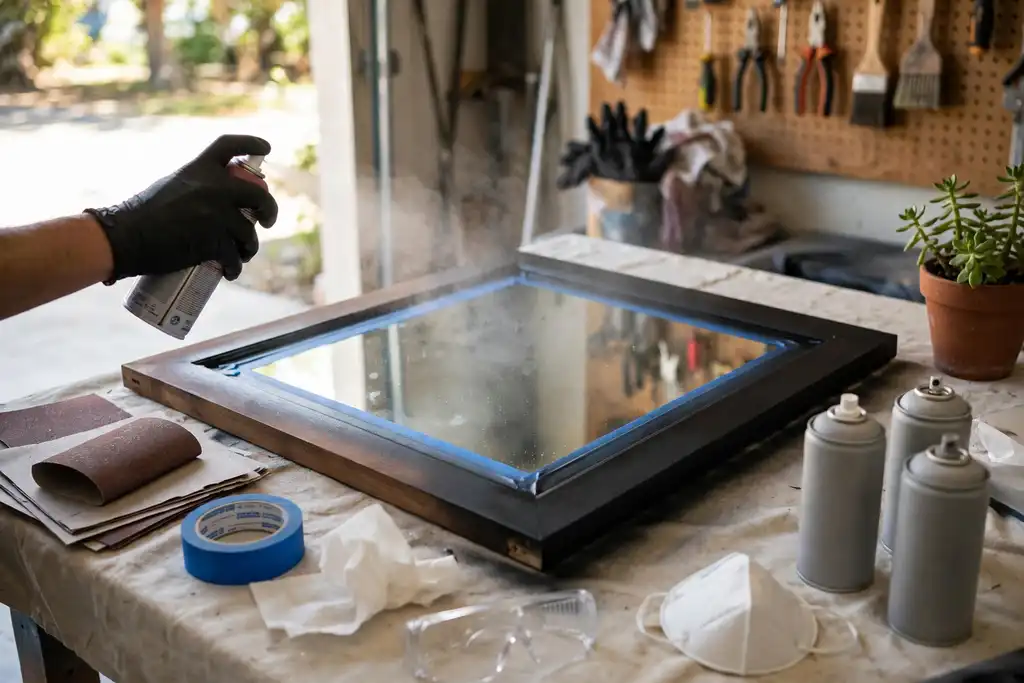
To paint a mirror frame with spray paint safely and avoid peeling, you must remove the glass or mask it completely, then sand, prime, and apply thin coats with proper ventilation and a respirator mask.
You want a factory-smooth, durable finish on that old mirror frame, and the only way to get it right the first time is to treat how to paint a mirror frame with spray paint as a prep-first job, not a spray-first one. The steps are straightforward: remove or fully mask the glass, sand the frame material, apply a bonding primer, then build thin coats of spray paint with adequate drying time between passes.
Safety and adhesion are the two things that separate a lasting finish from a peeling mess. You will need a respirator mask, safety glasses, painter’s tape, a drop cloth, and strong ventilation. Skip any of those and you risk overspray damage, fumes, or paint that lifts within weeks. This article gives you the exact order of operations and the mistakes that ruin mirror frame spray painting.
- Remove glass or mask it fully with painter's tape and a drop cloth.
- Sand the frame material and apply a bonding primer first.
- Spray multiple thin coats, not one heavy pass, for adhesion.
- Wear a respirator mask and safety glasses, and ventilate the area.
- Respect drying time between coats and full curing time before reassembly.
How to Paint a Mirror Frame with Spray Paint: the Quick Decision Before You Start
Decide now whether your mirror frame is a spray paint job or a brush job, because the wrong call wastes paint and time. Spray paint wins on ornate profiles and small frames; brush-on wins on flat, large surfaces and indoor-only work.
| Your situation | What to do | Why |
|---|---|---|
| Ornate or carved frame | Spray paint | Aerosol reaches recesses a brush misses |
| Flat, wide frame | Brush-on paint | Spray risks uneven build on big flats |
| Metal or plastic frame | Spray paint with primer | Primer builds the adhesion bond |
| Frame still on the mirror | Painter's tape and drop cloth | Overspray travels farther than you think |
| Working indoors | Brush-on or spray outside | Ventilation matters more than convenience |
| Chipped or glossy finish | Sanding before primer | Sanding creates a surface paint can grip |
| Tight budget, one color | Spray paint | One can covers a small frame in thin coats |
Recommended for this job

Rust-Oleum Painter's Touch 2X Ultra Cover
Gloss black topcoat gives mirror frames a durable, fast-drying, spray-any-angle finish.

Rust-Oleum Painter's Touch 2X Ultra Cover
Flat black topcoat offers a matte finish for mirror frames with fast drying.

Rust-Oleum Painter's Touch 2X Ultra Cover
Flat white primer prepares mirror frame surfaces for better paint adhesion.
Is Spray Paint the Right Call for Your Frame?
Spray paint works best on frames under about 3 feet wide with curves, carving, or thin profiles. On large flat frames, aerosol output is hard to keep even, so brush-on paint usually gives a cleaner finish.
Spray Paint vs. Brush-On Paint at a Glance
A spray can lays a coat in 10 to 15 minutes and reaches tight corners a brush misses. Brush-on paint runs slower but stays indoors with no overspray, which matters on a 4-foot flat frame.
What Finish and Material You’re Working with
Match the can to your frame material: check the label for plastic or metal compatibility before buying. A primer, a preparatory coating that helps paint stick, plus 220-grit sanding gives reliable adhesion on glossy surfaces.
- Apply thin coats, 2 to 3 passes rather than one wet layer.
- Wait the labeled drying time between coats and 24 to 48 hours curing time before hanging.
- Wear a respirator mask and safety glasses, tape the glass with painter’s tape, lay a drop cloth, and spray in a garage or outdoors with real ventilation.
The 5-Minute Frame Check: What to Look at Before You Spray
Is the Frame Wood, Metal, or Plastic?
Wood, metal, and plastic each need different prep and paint. Test with a magnet: steel or aluminum frames need a scuff pad and a metal-specific primer, while wood takes 220-grit sanding. Plastic frames often need a bonding primer or the spray paint will flake within weeks.
How Much Detail and Carving is on It?
Deep carving and grooves hold extra paint and show drips first. Plan on three to four thin coats instead of two, and keep the can 8 to 10 inches away. Slow, even passes beat one heavy coat every time.
Is the Glass Removable or Sealed in?
Pull the glass if it lifts out, or mask it fully with painter’s tape and a drop cloth. Press the tape flat at the seam so overspray can’t creep under the edge. Sealed glass stays put and gets taped edge to edge.
A drop cloth is a protective sheet laid under the frame to catch overspray, drips, and paint dust.
Any Cracks, Peeling, or Rust Spots?
Fix cracks, scrape peeling paint, and sand rust to bare metal before you spray. Skipping this step means the new finish fails with the old one.
- Sand the frame for better adhesion, using 220 grit on wood and a scuff pad on metal or plastic.
- Wipe the frame with a degreaser, then let it dry 30 minutes before primer.
- Spray in a garage or outdoors with ventilation and a respirator mask plus safety glasses.
Run this five-minute check before you touch a can, because each answer changes your prep, your paint, and your masking plan.
How Spray Paint Actually Bonds to a Frame
Why Adhesion Depends on Prep, Not the Can
Mechanical grip is what makes spray paint stick. Adhesion only happens when the surface is clean, dull, and free of oils or old finish. Skip sanding and the paint will peel within months.
Wipe the frame with a degreaser, then scuff it with 220-grit paper until slightly rough. Mask the glass with painter’s tape and lay a drop cloth underneath.
What Thin Coats Do That Thick Coats Can’t
Thin coats, applied 8 to 12 inches away in steady passes, let solvents flash off evenly and prevent runs, pooling, and a gummy finish. Thick coats trap solvent under a dry skin, causing wrinkling and weak adhesion.
Apply two to three light passes per coat, overlapping each stroke by half. Wait the label’s recoat window, typically 10 to 30 minutes, before the next pass.
When Primer Earns Its Place
Primer is worth the extra step on bare wood, metal, or glossy surfaces where paint struggles to grip. It also blocks stains and gives dark frames a fair start under light colors.
Follow the primer’s drying time before topcoating, and let the finished frame cure 24 to 48 hours. Work outside or with strong ventilation and wear a respirator mask and safety glasses.
Before You Start: Materials, Ventilation, and Safety Gear
Gather Materials and Tools
Line up spray paint made for the frame material, a bonding primer, fine-grit sanding pads, painter’s tape, a drop cloth, a respirator mask, safety glasses, and a tack cloth.
Set up a Well-Ventilated Work Area
Work outdoors or in a garage with the door open and a fan moving air; keep cross-ventilation going the whole time.
Safety Precautions: Mask, Goggles, Ventilation
Wear an organic-vapor respirator and safety glasses every session. Follow label and OSHA guidance, and keep kids and pets clear until dry.
Avoiding Overspray on Walls and Floors
Lay a drop cloth wider than the frame, tape off nearby surfaces, and mask the glass with painter’s tape.
- Confirm paint and primer match the frame material.
- Set up where fumes can escape, never in a sealed room.
- Tape mirror edges before any coat.
- Use a drop cloth for overspray and drips.
- Wear respirator and safety glasses before spraying.
Step-by-Step: Painting the Frame with the Glass Removed
Remove the Mirror Glass or Tape It off
Pull out the glass if possible, paint on mirrors is nearly impossible to scrape off cleanly. If fixed, press painter’s tape under the frame lip.
Clean the Frame Thoroughly
Wipe with degreaser or denatured alcohol and let flash off 10-15 minutes. Otherwise oil, dust, or polish residue will kill adhesion in patches.
Sand the Frame for Better Adhesion
Scuff with 220-grit until dull and slightly rough, then wipe dust with a tack cloth. Glossy factory finishes need the most work.
Apply Primer If the Material Needs It
Bare wood, chipped paint, and slick metal benefit from one primer coat. Dry per the can, usually 30-60 minutes.
Choose the Right Spray Paint for Metal or Wood
Use enamel or bonding formula for metal, wood-safe enamel for timber. Confirm the label bonds to your substrate; mismatches cause peeling.
Apply Thin, Even Coats
Work ventilated with respirator and safety glasses, holding the can 8-10 inches away. Apply three or four thin coats minutes apart, then cure 24 to 48 hours before hanging.
Work through these steps in order and your frame will take paint cleanly the first time, with no peeling or bleed-through.
How to Paint a Mirror Frame Without Removing the Glass
Leaving the glass in place works fine if you seal the edges properly and spray at the right angle. Skip that and you get bleed lines and overspray on the mirror itself.
Tape off the Glass with Painter’s Tape and Paper
Run painter’s tape, a removable pressure-sensitive tape, along the seam where frame meets glass, overlapping strips by about half an inch. Cover the rest of the mirror with paper taped to the frame edge.
Press the Tape Edge Down Tight to Stop Bleed
Burnish the tape edge with a fingernail or plastic card so wet paint can’t creep underneath. Good adhesion here is what keeps your lines crisp.
Spray at an Angle Away from the Glass
Set a drop cloth below the work and tape off nearby walls. Hold the can 8 to 10 inches out and spray at a shallow angle away from the glass, using several thin coats with the label’s drying time between passes.
Score and Peel Tape Before the Paint Fully Cures
Slice the tape line with a utility knife, then peel while the paint is still soft. Reattach hardware after the full curing time, often 24 to 48 hours.
Leaving the glass in place works fine if you seal the edges properly and spray at the right angle.
Cost: Spray Paint vs. Brush-On vs. Buying New
Budget the whole job, not just the can. A realistic spray paint cost for one mirror frame usually lands between $25 and $60 once you add primer, tape, and a respirator mask.
| Option | Upfront cost | Ongoing cost | Notes |
|---|---|---|---|
| Spray paint (2 cans) | $12 to $25 | None | Buy one extra can for touch-ups |
| Primer (1 can) | $6 to $12 | None | Bonds to metal or wood frames |
| Painter's tape and drop cloth | $8 to $15 | None | Reusable cloth saves next time |
| Respirator mask and safety glasses | $15 to $35 | Replacement filters | One-time safety gear purchase |
| Brush-on paint and supplies | $20 to $45 | Brushes wear out | Slower, more visible brush marks |
| Pro repaint of existing frame | $75 to $200 | None | Labor driven, finish quality varies |
| New stock frame | $30 to $150 | None | Cheap options often thinner material |
Ranges assume one average-size mirror frame (about 2 to 4 feet), US retail prices for mid-grade products, and DIY labor at no charge. Pro pricing varies by region and frame size.
Spray Paint Cost Breakdown (Paint, Primer, Tape, Mask)
Expect $25 to $60 total for one frame. Two cans of spray paint cover most frames, and primer is a preparatory coating that helps paint stick. Add painter’s tape, a drop cloth, and a respirator mask for ventilation safety.
Skip the mask and you risk inhaling fumes indoors; OSHA recommends proper respiratory protection. Quality brands for metal and wood frames include Rust-Oleum and Krylon.
Brush-On Paint Cost Comparison
Brush-on runs $20 to $45, similar money but more time. You trade cans for a brush and tray, and adhesion on slick metal frames is harder without sanding.
What a New Frame or a Pro Repaint Runs
A pro repaint costs $75 to $200; a new frame runs $30 to $150. Neither beats spray paint on price if your existing frame is solid.
Troubleshooting Drips, Uneven Finish, and Sticky Paint
Most spray paint failures on a mirror frame trace back to prep and patience, not the can. Match the symptom to the cause, fix it, and let the frame cure fully before you hang it.
| Problem | Likely cause | Fix |
|---|---|---|
| Drips and runs | Heavy coats sprayed too close | Sand smooth, then apply thin coats |
| Patchy, uneven color | No primer or skipped sanding | Sand, prime, recoat lightly |
| Tacky paint days later | Coats too thick, poor ventilation | Extend drying time, improve airflow |
| Cracking or lifting at edges | Poor adhesion on slick or dirty frame material | Strip, sand, reapply primer |
| Tape pulled paint off | Removed while paint was wet or fully cured | Score the edge, pull slowly |
| Bubbles or pinholes | Trapped moisture or solvent | Sand back, let dry, recoat |
| Overspray haze on glass | Insufficient painter's tape coverage | Clean glass with a razor blade |
Why You Got Drips and How to Sand Them Back
Drips mean you laid coats on too heavy or held the can too close. Once dry, sand the runs flat with fine grit, wipe the dust, and recoat in thin coats.
Fixing a Patchy or Uneven Finish
Patchiness usually signals missing primer or skipped sanding, which weakens adhesion. Sand the dull spots, apply primer, and build color in light passes.
Paint That Stays Tacky: Curing vs. Drying
Drying is touch-dry in hours; curing is full hardness over days to weeks. Thick coats and poor ventilation slow both, so add airflow and give the frame extra drying time before handling.
Spray Paint Cracking or Lifting at the Edges
Cracking and lifting come from poor adhesion on slick or dirty frame material. Strip the loose paint, sand the surface, and reapply primer before color.
How Weather and Climate Change Your Spray Paint Results
Best Temperature and Humidity for Spraying
With humidity under 60 percent, spray between 50 and 90°F; outside that, evaporation and adhesion suffer. Check the can label for the manufacturer’s range.
Why Cold Garages Cause Cloudy Finishes
A cold garage chills the aerosol and frame, so paint skins over before solvents flash off, trapping moisture that reads as a milky film you cannot buff out. Move somewhere heated or wait for a warmer day.
Drying and Curing Times for Different Spray Paints
Most aerosols feel dry in 30 to 60 minutes, but full curing takes 24 to 48 hours depending on formula. Lacquers and enamels vary, so read the label and let the frame cure fully before hanging.
Working Outdoors vs. a Ventilated Garage
Outdoors wins on fumes but wind drops debris into wet paint. A garage with fans and open doors works if well ventilated; wear a respirator and safety glasses, lay a drop cloth, and keep the space dust-free.
Doing It on a Budget Without Cutting Corners
Where to Save: Tape, Primer, and Brand Choices
Save on painter’s tape, a removable pressure-sensitive tape, by buying a store brand with a sharp edge, and use a basic oil or water-based primer rather than a specialty bonding product. Mid-priced spray paint from a hardware store covers fine for indoor frames.
Where Not to Save: Respirator and Ventilation
Do not skip a respirator mask or safety glasses, and never spray in a closed garage. Aerosol fumes build fast, so work outdoors or with strong cross-ventilation, per OSHA guidance on solvent exposure.
Upcycling Ideas and Color Choices
Match color to frame material and room light: satin black or brushed nickel for metal, warm white or sage for wood. Two-tone schemes work if you tape off inner bevels, and a light sanding between thin coats improves adhesion.
Best Spray Paint Brands for Metal and Wood Frames
Look for enamel or all-surface formulas labeled for metal and wood; Rust-Oleum and Krylon are common, reliable picks. Check the can for recoat windows and full curing time, often 24 hours to a week, before hanging.
Common Mistakes That Ruin a Spray-Painted Frame
Skipping the Clean and Sand Step
Dirt and gloss cause paint to flake. Wipe the frame with degreaser, then scuff lightly. Sanding gives the surface tooth for adhesion, the grip that keeps paint stuck.
Spraying Too Close or Too Thick
Heavy passes cause runs, drips, and a gummy finish. Hold the can 8 to 12 inches away and build thin coats. Two or three light passes with proper drying time beat one soaked layer.
Painting Over Rust or Peeling Finish
Paint only sticks to sound surfaces. Sand rust to bare metal and strip loose finish. Spot-prime bare or rusty spots with a rust-inhibiting primer so corrosion doesn’t creep back.
Handling the Frame Before It Cures
Dry is not cured. Aerosols feel dry in 30 to 60 minutes but need 24 to 48 hours of curing time to harden fully. Moving it too soon leaves fingerprints in soft paint.
Forgetting to Tape the Glass Edge
Overspray drifts onto glass and is hard to remove. Run painter’s tape along the glass edge before spraying. Press firmly, and peel while paint is still slightly soft.
- Clean the frame thoroughly: wipe away dust, grease, and grime with a degreaser so paint can bond.
- Sand the frame for better adhesion: a light scuff gives the spray paint something to grip.
- Apply thin, even coats: hold the can 8 to 12 inches back and build color in passes, not one heavy layer.
- Let the frame cure completely: wait 24 to 48 hours before handling or hanging, since dry is not cured.
- Tape the glass edge: protect the mirror surface with painter's tape before you start spraying.
- Fix rust and peeling finish first: sand to sound material and spot-prime bare spots before painting.
- Maintaining and cleaning a spray-painted mirror frame: dust gently with a soft cloth and avoid harsh solvents that soften the finish.
When to Call a Pro (or Skip Spray Paint Entirely)
Antique or Carved Frames with Fragile Finish
Stop if the finish is flaking, gilded, or historically valuable. Spray paint can’t recreate delicate carving or gold leaf, and aggressive sanding may destroy the piece’s worth. Consult a conservator before touching it.
Sealed-In Glass You Can’t Safely Tape
Skip spray paint if the glass sits flush and painter’s tape can’t seal every edge. Overspray bonds to glass and is hard to remove without scraping. If you can’t mask it cleanly, remove the mirror professionally or don’t spray.
Structural Cracks or Loose Joints
Call a pro when the frame is cracked, warped, or has joints that move. Paint hides nothing and adhesion fails on unstable wood or metal. Repair or replace the frame first.
Health Concerns Around Solvent Fumes
Get professional help if you lack ventilation, have asthma, or spray indoors. A respirator mask and safety glasses only go so far; OSHA and the EPA tie aerosol solvents to real health risks. Spray outside or in a garage with the door open.
How to Paint a Mirror Frame with Spray Paint: Frequently Asked Questions
?How to Paint a Mirror Frame with Spray Paint Without Sanding It First?
Yes, you can paint a mirror frame with spray paint without sanding, but only if the frame is already clean and sound. Sanding scuffs the surface with an abrasive so the paint has something to grip; skip it on a glossy or factory-finished frame and adhesion suffers. A quick pass with fine grit, then wipe the dust off, is cheap insurance against peeling.
?How to Paint a Mirror Frame with Spray Paint and Keep the Glass Clean?
Mask the glass completely before you paint a mirror frame with spray paint. Press painter's tape, a removable pressure-sensitive tape, tight against the frame edge, then tape a drop cloth or paper over the rest of the glass. Overlap the tape onto the frame slightly so paint doesn't creep under the edge, and pull the tape while the paint is still soft.
?What is the Biggest Safety Mistake When You Paint a Mirror Frame with Spray Paint?
Spraying indoors without ventilation is the biggest safety mistake when you paint a mirror frame with spray paint. Aerosol paint puts out fumes and fine particles you should not breathe, so work outside or in a garage with the door open. Wear a respirator mask and safety glasses, keep the can away from flames and pilot lights, and let the frame off-gas before you bring it inside.
?Does the Frame Material Change How You Paint a Mirror Frame with Spray Paint?
Yes, it changes your prep and your primer choice. Wood and MDF take primer and paint readily; metal and plastic need a bonding primer or a paint formulated for those surfaces. Sanding still matters on every material, and bare spots always get primer, a preparatory coating that helps paint stick and last.
?Why Does Spray Paint Crack or Peel on a Mirror Frame?
Usually too little prep or too much paint at once. Skipping sanding and primer kills adhesion, the way dissimilar surfaces stick together, and heavy wet coats trap solvent that later lifts. Fix it by sanding back the failure, priming bare spots, then building thin coats with the recommended drying time between them.
?How to Paint a Mirror Frame with Spray Paint: When Can I Handle the Frame After the Last Coat?
Wait until the paint is dry to the touch, then add a buffer before handling. Drying time is when the paint stops being wet; curing time is when it fully hardens, often days. Handle the frame lightly after a few hours, but don't hang it or press on the edges until the full cure time on the can.
?is Spray Paint the Right Choice for Every Mirror Frame?
No. It's fast and gives a smooth finish on simple shapes, but heavily carved frames, tight crevices, and frames with failing joints are easier to brush or better replaced. If the frame is unstable or the mirror is valuable, stop and consider a pro before you paint a mirror frame with spray paint.
Conclusion
Getting a clean, durable finish comes down to patience at every stage: thorough cleaning and sanding for adhesion, a bonding primer suited to your frame material, and several thin coats instead of one heavy pass. Mask the glass with painter’s tape, lay a drop cloth, and spray in a well-ventilated space while wearing a respirator mask and safety glasses. Respect the full curing time before hanging, since early handling ruins more finishes than bad paint does.
Your best next step: test your chosen spray paint and primer on a scrap piece of the same material first. It takes minutes, confirms compatibility, and saves you from redoing the whole mirror frame.
Sources and further reading: guidance from EPA, OSHA.