
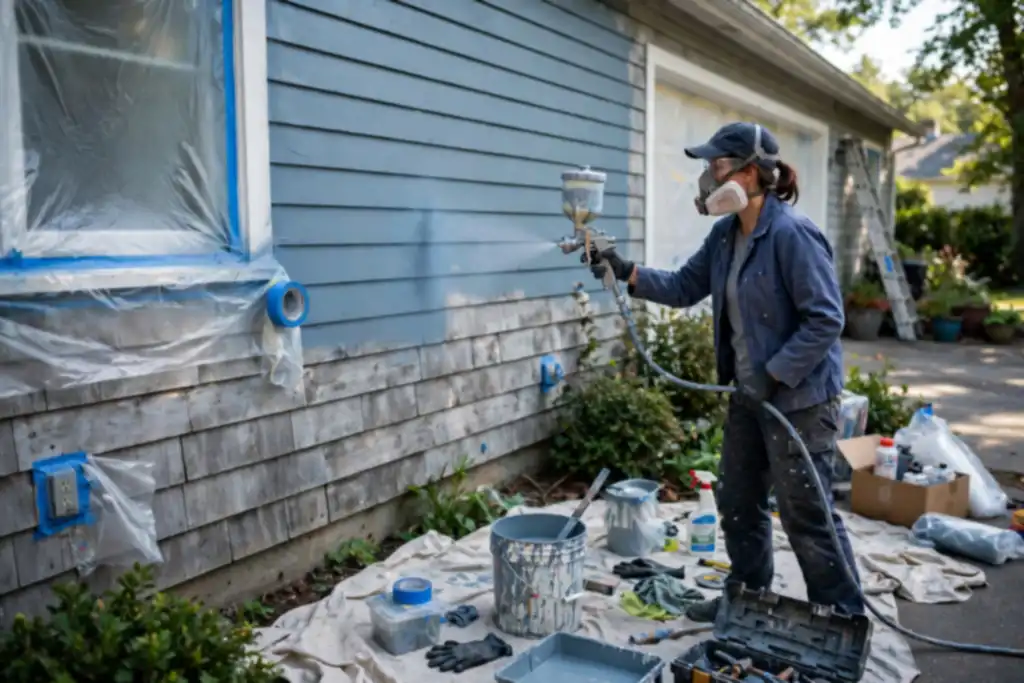
To paint a house with a paint sprayer, you must thin the paint to the right viscosity, match the tip to the material, and mask every surface you do not want coated. Skip those steps and you will get clogged nozzles, runs, and overspray damage.
The most common mistake is skipping masking and jumping straight to spraying. If you want to learn how to paint a house with a paint sprayer without wrecking siding, windows, or your lungs, start with protection and prep, not the nozzle.
You will get the exact sequence pros use: which sprayer fits exterior versus interior work, how to thin and prime correctly, how to set pressure and spray pattern, and how to clean up so the equipment lasts. Every step assumes you want it done right once, with no overspray disasters or clogged tips.
- Thin paint to the manufacturer's spec and test spray on scrap first.
- Match tip size to material: smaller for primer, larger for thick paint.
- Mask windows, trim, and outlets; use drop cloths and plastic sheeting.
- Wear a respirator rated for vapors and ventilate the spray area.
- Flush and clean the sprayer immediately after every session.
How to Paint a House with a Paint Sprayer: the Quick Decision Before You Start
Before you buy or rent, match the machine to the job. Get this wrong and you will fight overspray, clogged tips, and a finish that looks worse than a roller job.
| Your situation | What to do | Why |
|---|---|---|
| Full exterior, siding and trim | Rent or buy an airless sprayer | Covers large areas fast, handles thick exterior paint |
| Single room or furniture | Use an HVLP sprayer | Less overspray, easier control in tight spaces |
| Detailed trim and doors | HVLP or compressed air with small nozzle | Finer spray pattern, less masking |
| House with heavy peeling or bare wood | Brush and roll primer first | Sprayer does not fix surface prep |
| Small repair or one wall | Roller and brush | Setup and cleaning time outweighs savings |
| Windy outdoor day | Wait or switch to brush and roller | Wind carries overspray onto cars and neighbors |
| Lead paint on an older house | Do not dry scrape or dry sand, check EPA rules | Safety and legal requirements come first |
Recommended for this job
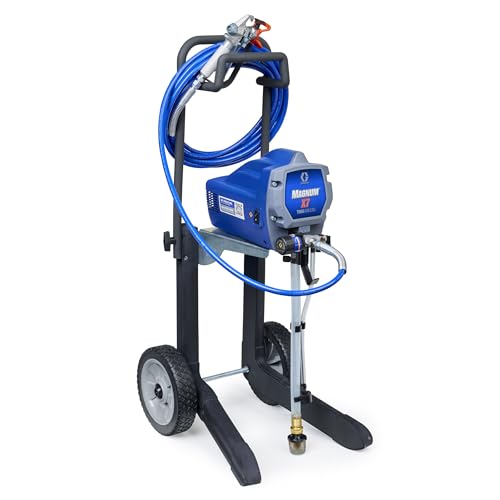
Graco Magnum X7 Cart Airless Paint
Cart airless sprayer delivers adjustable 3000 PSI for full interior and exterior house painting.

ENDOZER Professional HVLP Spray Gun Set
HVLP gun with multiple nozzles suits primer and trim work, not latex wall paint.

Airless Paint Sprayer Tips Set
Reversible nozzle tips let you switch spray patterns and clear clogs during house painting.
Avoid a weekend lost to the wrong machine: airless sprayers handle exterior siding with 0.017 to 0.021 inch tips, while HVLP sprayers suit interior walls and trim with 1.0 to 1.5 mm nozzles. Compressed air works for small touch-ups but demands a clean nozzle and steady 30 to 50 psi.
The nozzle is the small opening at the sprayer's front that shapes paint into a fan pattern for even coverage.
Airless, HVLP, or Compressed Air: Which One Fits Your House?
Use an airless sprayer for thick exterior paint on large siding runs, typically 2,000 to 3,000 sq ft. Choose an HVLP sprayer for interior walls and cabinets where overspray must stay under 12 inches. Compressed air fits trim jobs under 100 sq ft but clogs if you skip thinning.
When Spraying Beats Brushing and Rolling (and When It Doesn’t)
Spraying saves hours on flat siding over 500 sq ft, but brushing wins on repairs under 10 sq ft and windy days above 10 mph. Masking, drop cloths, and a fitted respirator add 2 to 4 hours per exterior wall; on one interior room, that overhead cancels the speed gain.
The One Rule That Decides Everything: Airless for Big Exteriors, HVLP for Interior Detail
Pick an airless sprayer for exterior siding and an HVLP sprayer indoors for control. That single choice prevents most overspray and uneven coat mistakes.
- Thin paint only per the manufacturer’s label, usually 10 percent max.
- Test the spray pattern on scrap cardboard at your target distance.
- Keep the tip 10 to 12 inches away and moving at a steady pace.
The 5-Minute Diagnostic: Five Checks Before You Spray a Single Drop
Run these five checks in five minutes to catch mistakes before they cost you a weekend.
Is Your Surface Sound, Clean, and Dry?
Peeling paint, chalky residue, and trapped moisture cause most spray failures. Scrape loose paint, wash siding, and confirm moisture is under 15 percent.
Do You Have Power, Ventilation, and the Right Tip Size?
Use a dedicated circuit, cross ventilation, and a rated respirator. Match the tip to the coating: a 515 tip handles most exterior latex; HVLP needs thinner material.
What’s the Weather Doing for the Next 24 Hours?
Rain, wind over 10 mph, or temperatures outside 50 to 85°F will wreck exterior finishes. Check for a full 24-hour dry window.
Is Your Paint Thin Enough to Spray?
Thick paint clogs tips. Thin per manufacturer spec, typically 10 percent max for latex, and stir before testing on scrap cardboard.
Can You Actually Mask Everything in Reach?
Spray drift travels farther than you think. Mask windows, doors, fixtures, and plants, and lay drop cloths over every reachable surface; overspray cleanup costs more than masking.
Run these five checks in five minutes and you'll catch the mistakes that ruin spray jobs before they cost you a weekend.
How a Paint Sprayer Actually Works (and Why That Changes Your Prep)
Atomization: Turning Paint into a Fine Mist
Your paint sprayer forces paint through a 0.013 to 0.021 inch nozzle at 2,000 to 3,000 PSI, breaking it into a mist of droplets. That mist lands as a thin, even coat instead of brush ridges. The catch: anything within 10 to 15 feet gets coated, so prep work matters more than spraying.
A paint sprayer is a machine that forces paint through a small opening to coat large house surfaces faster than brushes or rollers.
Airless vs HVLP: Pressure vs Air
An airless sprayer pushes paint at 2,000 to 3,000 PSI and suits large exterior siding jobs, while an HVLP sprayer uses 5 to 10 PSI for finer finishes and less bounce-back. For house exteriors, most DIYers rent an airless unit; HVLP shines on trim, doors, and cabinet work. Match the sprayer to the job before you buy or rent.
Overspray: the Invisible Cloud You Must Control
Overspray is airborne paint that drifts 20 to 30 feet and settles on cars, windows, plants, and finished siding. Wind carries it farther than you expect, so mask everything within range with 0.5 mil plastic and check the forecast for gusts under 10 mph. A NIOSH-approved respirator with P100 filters is not optional, and neither is covering the ground with canvas drop cloths.
Before You Start: Tools, Materials, and Safety Gear That Actually Matter
Gear up before you touch the trigger. Skip one item here and you will pay for it later.
- Respirator: A NIOSH-rated mask sized to your face, not a dust mask.
- Eye and skin cover: Goggles plus long sleeves, gloves, and a cap.
- Masking and drop cloths: Canvas or butyl for floors, plastic and tape for edges.
- Spare tips and filters: Match the nozzle to your paint and keep backups on hand.
- Solvent and rags: Clean the sprayer within minutes of finishing, not hours.
- Respiratory protection: Wear a NIOSH-rated respirator fitted to your face whenever you spray solvent-based paint or primer, and keep windows and doors open with fans pushing air out.
- Ventilation setup: Cross-ventilation beats a single fan. Position intake and exhaust so fumes exit the room instead of lingering near your work zone.
- Paint type: Choose 100 percent acrylic latex for most exterior siding; it sprays well, cleans up with water, and holds up to weather.
- Priming decision: Bare wood, patched drywall, and stained surfaces need primer. Previously painted walls in good shape usually do not.
- Paint quantity: Measure square footage, then buy roughly 10 to 20 percent extra when spraying, since overspray and cleanup eat product.
- Legal limits: Check local air quality rules and EPA guidance on volatile compounds before spraying oil-based products outdoors.
- Waste disposal: Collect leftover paint and solvent in sealed containers and drop them at a municipal household hazardous waste site, never a storm drain.
Step-by-Step: How to Paint a House with a Paint Sprayer from Bare Wall to Final Coat
Step 1: Mask and Protect Every Surface You’re Not Painting
Cover floors with drop cloths and tape off trim, windows, and outlets. Move cars and furniture well clear, overspray travels farther than you think. Masking a room takes 1-2 hours and is cheap insurance.
Step 2: Thin the Paint to the Sprayer’s Spec
Follow the manufacturer’s thinning ratio exactly. Add thinner gradually, stir, and test viscosity with a cup if specified. Over-thinned paint drips and sags, measure, don’t guess.
Step 3: Set Spray Pattern and Pressure on Scrap Material
Test on scrap board or cardboard first. Adjust nozzle and pressure until the pattern is even, with soft edges and no heavy center. Start low and raise pressure only until paint atomizes cleanly.
Step 4: Prime Bare or Patched Areas
Spot-prime bare wood, drywall patches, and filler with a matched primer to prevent flashing and uneven sheen. Let dry per label, typically 1-4 hours.
Step 5: Spray in Overlapping Passes at a Consistent Distance
Hold the gun 10-12 inches away, perpendicular through each pass. Overlap strokes about 50 percent at steady speed. Trigger off at each pass’s end and wear a respirator.
Work through these five steps in order and you will skip the mistakes that ruin most spray jobs.
Interior Walls, Storage, and Cleanup: the Follow-Up Path After the Last Pass
Spray Painting Interior Walls Without Fogging the Whole Room
Mask adjacent surfaces and open windows before you spray interior walls. Set the airless sprayer pressure just low enough to atomize the paint, then use a smaller nozzle and keep the gun 10 to 12 inches from the wall. Run a respirator and ventilate the room for 30 to 60 minutes after each pass.
Storing Paint and Sprayer Between Uses
Store leftover paint in labeled, sealed cans and keep the sprayer dry and indoors. Flush the gun and hose with the manufacturer’s solvent within 20 minutes of finishing so residue never hardens inside the tip.
Cleaning and Maintaining the Sprayer so It Lasts
Clean the nozzle, tip, and filter after every session, not just at the end of the job. Wipe the gun body, check the pressure setting, and store the unit with a light coat of oil on metal parts to prevent corrosion.
Post-Painting Cleanup and Inspection
Inspect walls under bright light for sags or thin spots and touch up with a brush. Pull masking and drop cloths while the paint is still slightly soft, then dispose of solvent-soaked rags per local rules.
Once the last coat is on, switch to the follow-up path: control the fog indoors, store your gear right, and clean the sprayer before paint sets.
A Real Walkthrough: Spraying a Two-Story Exterior in a Weekend
Friday: Masking, Tarping, and Testing the Sprayer
Windows, doors, trim, and outlets should be masked with painter’s tape and film, then lay drop cloths over walkways, shrubs, and anything you can’t move.
Run water or solvent through the sprayer and test your spray pattern on scrap cardboard. Adjust pressure and thinning until the fan is even and edges are soft. A five-minute test saves hours of fixing stripes.
Saturday: Priming and First Coat on Siding
Prime first, then spray the body coat in long, overlapping passes. Keep the nozzle 10 to 12 inches from the surface, move at a steady speed, and overlap each pass by roughly half. Trigger off at the end of every stroke to avoid heavy spots.
Work top to bottom, one wall at a time. An airless sprayer can cover a two-story exterior in a few hours versus days with a brush.
Sunday: Second Coat, Inspection, and Cleanup
Apply the second coat once the first is fully dry, then inspect in raking light for thin spots and drips. Touch up with the sprayer or a brush while paint is still workable.
Clean the sprayer immediately: flush the pump, tip, and hose with the recommended solvent, then store everything dry. Skipping this ruins seals and clogs the nozzle.
Cost: DIY Spraying vs Hiring a Pro (with Real Assumptions)
Spraying a house yourself usually costs a fraction of a pro bid, but only if you count the gear, the paint you waste, and your own hours honestly. Here are typical ranges with the assumptions stated.
| Option | Upfront cost | Ongoing cost | Notes |
|---|---|---|---|
| Rent an airless sprayer (weekend) | $100 to $300 | Paint, masking, drop cloths | Best for one exterior job |
| Buy a low-end airless sprayer | $250 to $500 | Tips, filters, cleaning supplies | Pays off after 2 to 3 jobs |
| Buy a mid-range airless sprayer | $600 to $1,200 | Tips, hoses, annual upkeep | Faster, fewer clogs |
| HVLP sprayer (buy) | $100 to $400 | Thinning, extra coats | Finer finish, slower on siding |
| Paint and primer (exterior, 2,000 sq ft) | $800 to $2,500 | Second coat adds 40 to 60% | Estimate 1 gallon per 300 to 400 sq ft |
| Masking, drop cloths, respirator | $80 to $250 | Tape and plastic each job | Buy good tape once |
| Hire a pro (exterior) | $0 upfront | $3,000 to $8,000+ | Includes labor, prep, cleanup |
Assumes a typical single-story US home of roughly 1,500 to 2,500 sq ft exterior wall area, two coats of quality exterior paint, and DIY labor valued at $0. Pro bids vary widely by region, access, siding condition, and prep work. Ranges are typical, not quotes.
Renting an airless sprayer for a weekend runs about $100 to $300 and suits a single exterior job. Buying a low-end unit at $250 to $500 pays off after two or three projects, while mid-range models at $600 to $1,200 clog less and spray faster.
Paint Waste and Cleanup Time: the Hidden Costs
Budget 10 to 20 percent extra paint for overspray and line flushing, plus 1 to 2 hours of cleaning per session. Cheap masking and thin drop cloths cost more in rework than they save.
Cleaning means flushing paint from the sprayer's nozzle, tip, and hose with solvent so residue never hardens inside.
Time and Labor Savings with Sprayers
An airless sprayer can cut application time by half versus brush and roller on large siding runs, though masking and cleanup eat much of that gain. On small or detailed areas, brush and roller still win.
Troubleshooting: When the Sprayer Spits, Clogs, or Blows a Pattern
Most sprayer problems trace back to one of three things: a worn or wrong-sized tip, paint that is too thick, or conditions you should not be spraying in. Match the symptom to the fix below before you touch the dials.
| Problem | Likely cause | Fix |
|---|---|---|
| Spitting or uneven fan | Worn tip or clogged nozzle | Swap the tip, flush the nozzle |
| Thin, patchy spray pattern | Pressure set too low for the paint | Raise pressure in small steps |
| Sprayer clogs constantly | Paint too thick for the tip | Thin per label, strain the paint |
| Heavy drips and runs | Too much material, passes too slow | Speed up, overlap less, lower pressure |
| Overspray drifting onto cars | Wind above roughly 10 mph | Wait for calm, tarp everything nearby |
| Sputtering with paint left | Loose siphon or air leak | Tighten fittings, check the seal |
| Pattern tails or streaks | Tip too small or worn out | Step up a size or replace the tip |
Uneven Fan Pattern or Spitting: Tip and Pressure Fixes
A worn tip or low pressure is almost always the culprit. Replace the tip when the fan looks ragged, and raise pressure in small steps until the spray pattern is even. Keep the nozzle parallel to the surface as you move.
Clogs and Thinning Mistakes
Clogs usually mean your paint is too thick for the tip you chose. Thin only per the manufacturer’s label, strain the paint first, and match tip size to the material. Flush the gun and nozzle thoroughly during cleaning.
Drips, Runs, and Overspray in Windy Conditions
Drips come from moving too slowly or laying on too much paint, so speed up your passes and overlap less. Skip exterior spraying above roughly 10 mph wind, and use masking and drop cloths to protect everything downwind.
Quick Checklist: Are You Actually Ready to Spray?
Gear, Paint, and Surface Checks
Safety gear first: a respirator rated for solvent and paint vapors, sealed goggles, gloves, and long sleeves. Confirm your primer is dry and the surface is clean, dull, and repaired before any paint goes in the cup.
Sprayer Setup and Test Pass
Set your spray pattern and pressure on scrap cardboard before touching the house. A fan pattern with fine atomization and no runs means you are dialed in; adjust the tip or thin the paint per the manufacturer’s chart if it spits or tails.
Weather and Masking Confirmed
Exterior work needs 50 to 85 F, low wind, and no rain forecast for at least 24 hours. Mask windows, trim, lights, and outlets, and lay drop cloths over walkways and plants before the first pull of the trigger.
- Respirator and goggles: wear a vapor-rated respirator and sealed eye protection every time you spray, even outdoors.
- Surface prep: scrape, sand, and prime bare or peeling spots, then let primer cure fully before topcoating.
- Test spray pattern: practice on cardboard to confirm a uniform fan and fine atomization before aiming at siding.
- Pressure and tip check: match the nozzle and tip to your coating, and thin only as the manufacturer specifies.
- Weather window: spray exteriors between 50 and 85 F with low wind and no rain expected for 24 hours.
- Masking done: tape windows, trim, and fixtures, and cover walkways, cars, and plants with drop cloths.
- Cleaning supplies staged: have solvent, flushing fluid, and rags ready so you can clean the sprayer immediately after the job.
Common Mistakes That Ruin a Spray Job (and How to Dodge Them)
Most spray failures come from technique and prep, not equipment. Fix these four habits first.
Spraying Too Close or Too Fast
Hold the sprayer 10-12 inches from the surface and move steadily. Closer or slower causes drips; farther or faster gives a grainy, thin coat. Overlap each pass about 50 percent.
Skipping Primer on Bare Wood
Bare wood soaks up paint unevenly, so prime first with a stain-blocking primer to seal grain and help bonding. Spot-prime patched areas or they’ll flash through.
Ignoring Overspray and Wind
Overspray drifts onto cars, windows, and plants. Mask everything and check wind before starting. HVLP sprayers reduce but don’t eliminate overspray.
Not Cleaning the Sprayer Immediately
Flush the gun and nozzle right after the job, before paint cures. Dried paint clogs tips and ruins spray patterns. Follow manufacturer cleaning steps and store dry.
- Test spray pattern on scrap first.
- Keep the gun moving at pass start and end.
- Thin paint only to maker’s spec.
- Wear a rated respirator.
- Lay drop cloths wide; overspray travels far.
When to Call a Pro: Real Warning Signs You Shouldn't Spray Yourself
Lead Paint, Height, or Structural Repairs
Stop if your home was built before 1978 and has not been tested for lead paint. The EPA requires certified renovators for disturbing lead-based coatings, and spraying aerosolizes those particles. Hire a certified pro instead of risking your family’s health.
Walk away from any surface above one story, rotted siding, or loose trim. Spraying over failing wood wastes product and hides damage. Fix structure first, or hand it to a contractor.
Toxic or Oil-Based Coatings Without Proper Ventilation
Oil-based and catalyzed coatings demand serious airflow and a fitted respirator, not a dust mask. If you cannot vent the space or lack the right cartridge, do not spray. OSHA ventilation rules exist for a reason.
Skip solvent-heavy products in enclosed garages or basements. Fumes pool and ignite. A pro brings the equipment and insurance to handle them safely.
When Rental and Cleanup Costs Exceed a Pro Quote
Price the whole job before you commit. An airless sprayer rental, masking supplies, drop cloths, primer, and thinning agents can run $300 to $800 for a typical exterior, and cleanup eats hours.
If a pro quote lands close to that total, pay the difference. You get a warranty and none of the disposal headaches.
Stop and call a professional if:
- Stop immediately if your home was built before 1978 and has not been tested for lead paint.
- Do not spray any surface above one story or over rotted siding and loose trim.
- Never spray oil-based or catalyzed coatings without proper ventilation and a fitted respirator.
- Call a pro if your rental and cleanup costs approach the contractor's quote.
- Do not spray solvent-heavy products in enclosed garages or basements where fumes pool and ignite.
How to Paint a House with a Paint Sprayer: Frequently Asked Questions
?Can I Paint a House with a Paint Sprayer Without Masking Everything First?
No, masking is not optional when you paint a house with a paint sprayer. Skip it and overspray will coat windows, trim, and cars, costing you days of scraping. Mask glass, doors, fixtures, and anything you cannot move, and use drop cloths on floors and landscaping. The spray pattern travels farther than you expect, especially with a high-pressure airless sprayer. Masking is the cheapest insurance you will buy on this job.
?How Do I Paint a House with a Paint Sprayer Without Ruining the Finish?
Keep the nozzle parallel to the surface and overlap each pass by about half when you paint a house with a paint sprayer. Move at a steady speed, trigger off at the end of each stroke, and avoid arcing your wrist. Thin the paint only per the manufacturer's spec, and test the spray pattern on scrap before touching the house. Consistent distance and speed matter more than fancy technique.
?What Safety Gear Do I Actually Need to Paint a House with a Paint Sprayer?
At minimum, a respirator rated for paint vapors, eye protection, gloves, and long sleeves. Overspray is a fine mist that gets everywhere, including your lungs. If you're using an airless sprayer, add hearing protection. Ventilate interior spaces and never spray solvent-based paint without a properly fitted respirator. The gear costs less than one ER visit.
?How Does the Type of Paint Sprayer Change How I Paint a House with a Paint Sprayer?
It changes everything about prep and technique. An airless sprayer moves thick exterior paint fast but needs careful pressure and tip sizing. An HVLP sprayer gives a finer finish but requires thinning and slower passes. Compressed air setups demand the most tuning. Match the sprayer to your paint first, then practice the spray pattern before committing to the house.
?When Should I Thin Paint for a Paint Sprayer on a House Project?
Only when the sprayer's manual or the paint label says to. Most modern exterior paints spray fine unthinned through an airless sprayer with the right tip. Over-thinning causes runs, poor coverage, and a finish that fails early. If the spray pattern looks splotchy or the pressure seems wrong, check the tip and cleaning first, then thin as a last resort.
?Why Does My Paint Sprayer Spit or Clog When I Paint a House with a Paint Sprayer?
Almost always it's dirty paint, a worn tip, or a loose nozzle. Strain the paint before loading, tighten the tip and nozzle, and clean the sprayer thoroughly after every session. Partial clogs show up as a split or streaky spray pattern, so stop and fix it rather than pushing through. A five-minute cleaning beats a repaint.
?is It Worth Learning How to Paint a House with a Paint Sprayer for One Project?
Yes, if you have large flat surfaces and realistic expectations. A paint sprayer saves serious time on siding and big walls, but the masking, cleaning, and learning curve eat into that. For one small room, rollers win. For a whole exterior or a large interior, practice on scrap, budget the prep time, and the sprayer pays off.
Conclusion
Getting a smooth, even finish comes down to preparation and control, not luck. Mask thoroughly, thin the paint exactly as the manual says, and match your tip and pressure to the material so the spray pattern stays consistent. A proper respirator and drop cloths are non-negotiable, and rushed cleaning is where most expensive mistakes happen.
Your best next step: test the spray pattern on scrap material before touching the house, then adjust pressure and tip until it lays down evenly. That five-minute check saves hours of rework and keeps your finish looking professional.