
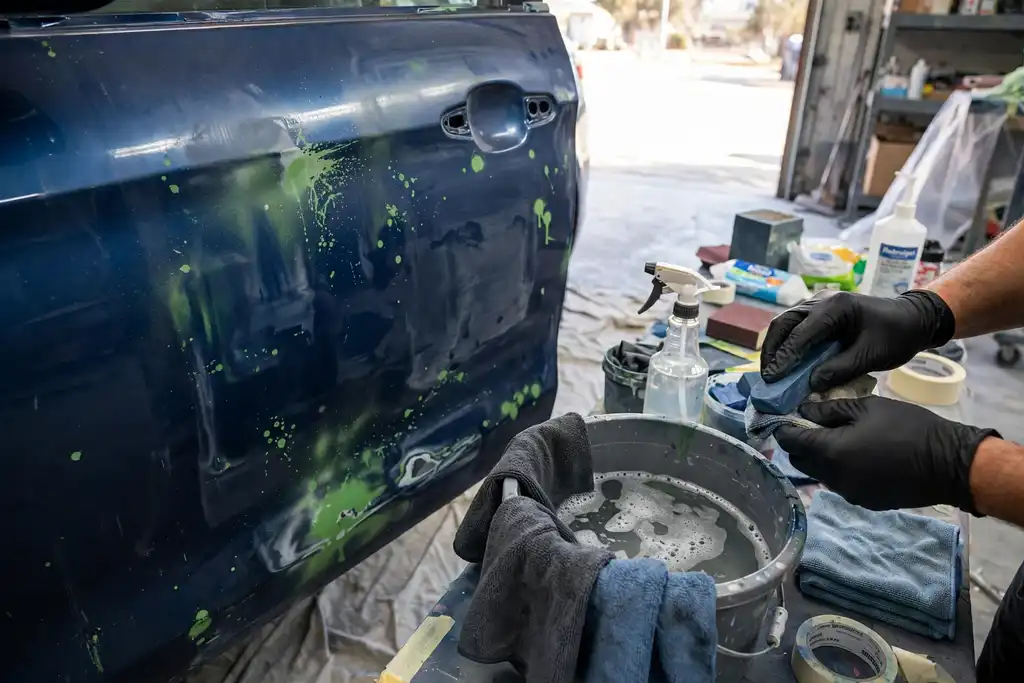
The safest way to remove spray paint from car paint is to start with the least aggressive method, like a clay bar or isopropyl alcohol, and only step up to solvents if the overspray persists. Aggressive rubbing or strong thinners can damage the clear coat.
You walk out to your car and spot a fine mist of spray paint overspray on the hood, or a stray stripe on the door from a weekend project. Before you grab the strongest solvent in the garage, know that how to remove spray paint from car paint depends on protecting the clear coat, the thin transparent layer that gives your finish its gloss and UV protection. The wrong product can soften or haze it in seconds.
This article gives you a step-by-step method to lift overspray without harming the factory finish. You will learn which solvents are paint safe, how to use a clay bar and polishing compound, and when to stop before you make things worse. Every step includes a test spot, so you can confirm the approach works on your car before you commit.
- Start with the least aggressive method: clay bar or isopropyl alcohol.
- Always test any product on a hidden spot first.
- Avoid lacquer thinner on clear coat unless a pro confirms it.
- Use a dual-action polisher with polishing compound for light marks.
- Wear gloves and work in a ventilated area with solvents.
How to Remove Spray Paint from Car Paint: the Quick Decision Before You Start
Before you touch the panel, answer two questions: what kind of spray paint landed there, and how fresh is it? That answer decides whether you reach for a clay bar or a solvent, and getting it wrong is how clear coat gets burned.
| Your situation | What to do | Why |
|---|---|---|
| Fresh overspray, still tacky | Wait for full cure, then clay bar | Wet paint smears deeper into clear coat |
| Dry overspray, light dusting | Clay bar with lubricant | Lifts surface contaminants, paint safe |
| Small hardened speckles | Isopropyl alcohol on a microfiber towel | Softens fresh paint without attacking clear coat |
| Thick paint layer or runs | Automotive solvent, test spot first | Dissolves paint, can dull clear coat |
| Unknown paint type | Test spot in a hidden area | Reveals risk before you commit |
| Overspray across multiple panels | Professional assessment | Whole-car correction beats spot fixing |
| Paint feels rough after removal | Polishing compound, then dual-action polisher | Restores gloss the solvent stripped |
Recommended for this job

Mothers California Gold 3 Clay Bar
Clay bar lifts overspray contaminants off clear coat without aggressive abrasion.

Turtle Wax T230A Rubbing Compound Heavy
Heavy-duty rubbing compound abrades away light spray paint mist from panels.
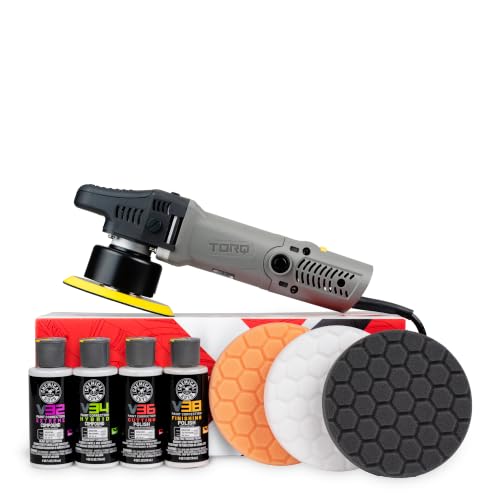
Chemical Guys Car Polisher
Dual-action polisher powers compound to safely correct paint and remove overspray.
Spray paint removal starts with identification, not aggression. Rattle can and automotive paint cure differently, so check the label or overspray pattern. Fresh overspray lifts easier once set; wet paint smears.
Is It Overspray or a Full Repaint Situation?
Light overspray is a surface problem; a heavy cured coat is a repaint decision. Thin mist under 0.5 mm responds to clay bar and mild solvent. Solid film with texture or runs means stop and get a pro opinion.
Match the Method to the Cure Stage
Start least aggressive, escalate only after a test spot proves it. Clay bar handles fresh dry overspray. Isopropyl alcohol (a solvent that softens light specks) works on fresh mist. Lacquer thinner (a strong solvent that can dissolve paint) attacks clear coat, so use it last.
- Confirm cure time on the can: typically 24 to 48 hours for rattle cans to fully cure.
- Test every product on a hidden panel like the door jamb.
- Keep microfiber towels and clean water for immediate wipe-off.
Wetsanding with 2000-grit and rubbing compound remove paint residue, use only after solvents fail. A dual-action polisher with polishing compound restores gloss afterward.
The 5-Minute Diagnostic: What You're Actually Dealing with
Before you touch a chemical or a towel, run these quick checks so you treat the overspray correctly the first time.
Fingernail Test: is the Spray Paint Sitting on Top or Biting in?
Press a fingernail gently into a speck to judge whether it sits on top of the clear coat or has bonded into it. A speck that flakes off easily is surface spray paint overspray; one that feels locked in needs a gentler approach. If the nail catches and the edge lifts, start with a clay bar and lubricant before any solvent.
Check the Cure Clock: Fresh, Tacky, or Rock Hard?
Read the can label for the recoat window and full cure time, typically 24 to 48 hours. Fresh, tacky paint smears when you wipe it, so let it cure fully before removal. After full cure, rattle-can paint often hardens past the point where isopropyl alcohol, a paint safe cleaner, will lift it.
Find Your Hidden Test Spot
Choose a low, hidden panel like a door jamb or rocker to try your method first. Apply it, wait 10 minutes, then wipe with a microfiber towel and check the car paint for dulling. Keep lacquer thinner and wetsanding off that spot until a polishing compound pass proves the clear coat holds up.
A microfiber towel is a soft cloth with tiny fibers that lifts residue and grit without scratching the clear coat.
Before you touch a chemical or a towel, run these quick checks so you treat the overspray correctly the first time.
How Overspray Removal Actually Works (Without Eating Your Clear Coat)
Solvents Dissolve, Abrasives Level, Polishes Refine
Every safe removal method works on one principle: attack the fresh spray paint overspray while leaving the cured clear coat alone. Start with the least aggressive method and escalate only if the paint does not budge.
Begin with isopropyl alcohol, a mild solvent that softens light overspray without stripping cured finish. If that fails, step up to an automotive solvent or a clay bar, which is a resin tool that pulls contaminants off the surface. Lacquer thinner is a solvent that dissolves lacquer, so treat it as a last resort and never let it dwell on the panel.
For stubborn spots, polishing compound on a microfiber towel or a dual-action polisher levels the residue gradually. Reserve wetsanding and rubbing compound for cases where nothing else works.
Why Clear Coat Thickness is Your Budget
Your clear coat is a finite layer, and every aggressive step spends some of it. Run a test spot on a hidden area first, then inspect the result in direct light before touching the whole panel.
Before You Start: Tape off Trim, Gear up, and Stage Your Rags
Mask adjacent panels with painter’s tape before touching the affected area; a stray swipe of solvent on trim or glass can cost more to fix than the overspray. Work slowly.
Protect Trim, Glass, and Plastic Before Starting
Cover rubber seals, textured plastic, and glass with painter’s tape so drips and solvent stay off them. Tape edges tight and keep a dry microfiber towel nearby for spills.
Solvent Safety: Gloves, Ventilation, and Fume Control
Wear nitrile gloves and work outdoors or in a well-ventilated bay, since solvents like lacquer thinner give off strong fumes. Keep containers lidded and never smoke nearby.
Microfiber and Pad Choices That Prevent Swirls
Use clean, plush microfiber towels and soft foam pads, swapping them once loaded with residue; trapped grit causes swirl marks.
- Nitrile gloves and safety glasses resist solvents and splash-back.
- Ventilation keeps fumes down, per OSHA guidance.
- Solvent-soaked rags go in a sealed metal container to household hazardous waste, not the trash.
- Painter’s tape protects trim, glass, and plastic edges.
- Buy several clean microfiber towels.
- Soft foam pads pair well with a dual-action polisher later.
- Protect trim first: tape rubber seals, glass, and textured plastic before any solvent touches the car.
- Glove up: nitrile gloves and safety glasses keep solvents off skin and out of eyes.
- Ventilate: work outdoors or with strong airflow, since lacquer thinner and similar solvents fume heavily.
- Dispose safely: seal solvent-soaked rags in a metal container and take them to household hazardous waste.
- Pick plush microfiber: clean, soft towels lift residue without dragging grit across the clear coat.
- Swap cloths often: a loaded towel is the main cause of swirl marks during removal.
- Choose soft pads: foam pads and a dual-action polisher keep pressure even on the panel.
Step-by-Step: the Least-Aggressive-First Removal Path
Work from mildest to strongest, stopping as soon as overspray lifts, since each step removes more clear coat.
Wash and Degrease the Panel First
Dirt under your towel scratches paint, so wash with car soap, then wipe with degreaser to strip wax and road film.
Clay Bar the Light Overspray
Lubricate a clay bar with detail spray and rub in straight passes until smooth; it pulls contaminants without cutting paint.
Wipe with Isopropyl Alcohol Before Reaching for Thinner
Isopropyl alcohol lifts fresh residue and shows what remains. Lacquer thinner is stronger and can dull paint, so test on a hidden spot first.
Polish with Rubbing Compound for Stubborn Spots
Polishing compound smooths light marks; rubbing compound cuts harder. Apply by hand for 30 to 60 seconds; a dual-action polisher speeds large panels.
Wetsand Only as a Last Resort
Wetsanding removes clear coat. Use 2000 to 3000 grit with water, polish out marks, dry fully, and wait 24 hours before waxing.
Work from the mildest method to the strongest, and stop as soon as the overspray lifts, because every step up removes a little more clear coat.
Glass, Wheels, and Follow-Up Care After the Paint is Clean
Removing Spray Paint from Glass and Wheels
Glass and wheels take solvents more readily than car paint, but keep them off rubber and brakes. Scrape glass with a plastic razor blade, and use a paint safe solvent on wheels with a soft brush.
Let Solvents Flash off Before Polishing
Give solvents 24 to 48 hours to flash off before polishing so trapped residue does not smear. Work in shade and keep the panel cool.
Inspect for Swirl Marks Under Direct Sun
Check every panel under direct sun after polishing. Light passes with a dual-action polisher and fine compound remove haze before it sets.
Once the painted panels are clean, treat the other surfaces on their own terms and finish with a careful polish to protect the clear coat.
DIY Supplies vs a Pro Overspray Removal Service: What It Really Costs
DIY supplies usually run $20 to $80, while a pro overspray removal service typically charges $150 to $600 per panel depending on severity and labor.
| Option | Upfront cost | Ongoing cost | Notes |
|---|---|---|---|
| Clay bar kit | $15 to $35 | Replace as it wears | Mild overspray only, paint safe when lubricated |
| isopropyl alcohol and microfiber towel | $8 to $20 | Low, towels wear out | Test spot first, avoid strong concentrations on fresh paint |
| Polishing compound and applicator | $10 to $30 | Replace when spent | Hand work for light haze, follow with wax |
| dual-action polisher and pads | $80 to $200 | Pad replacement over time | One-time tool cost, reusable across jobs |
| Wetsanding and rubbing compound supplies | $15 to $40 | Grit and compound refills | Last resort, risk to clear coat if rushed |
| Pro overspray removal, light case | $150 to $300 | None | One panel, minor speckle, no sanding needed |
| Pro overspray removal, heavy case | $300 to $600+ | None | Multiple panels, solvent or wetsanding involved |
Ranges reflect typical US retail supply prices and independent shop labor for one to two affected panels. Heavy overspray, custom paint, or full-body coverage pushes pro costs higher. DIY figures exclude the cost of fixing damage from a botched attempt.
Typical DIY Supply List and Ranges
Expect $20 to $80 for a basic kit: clay bar, isopropyl alcohol, microfiber towels, and polishing compound. A dual-action polisher adds $80 to $200 if you do not own one.
What Shops Charge for Overspray Removal
Most shops quote $150 to $300 for light spray paint overspray on one panel. Heavy cases with multiple panels or wetsanding run $300 to $600 or more.
Assumptions Behind the Numbers
Figures assume one to two affected panels and standard factory clear coat. Custom finishes or full-body overspray raise pro quotes fast.
Troubleshooting: Burned Clear Coat, Sticky Residue, and Swirls
When a removal job goes sideways, the fix depends on how deep the damage runs. Match the symptom to the cause before you touch the panel again.
| Problem | Likely cause | Fix |
|---|---|---|
| Burned through clear coat | Too much friction or grit | Stop, then consult a paint pro |
| Sticky residue | Solvent flashed before wiping | Re-wipe with isopropyl alcohol |
| Swirl marks after wiping | Dry or dirty microfiber towel | Switch to clean towel, light pressure |
| Dull haze on panel | Aggressive polishing compound | Finish with finer polishing compound |
| Overspray still visible | Solvent dwell time too short | Reapply, wipe while wet |
| Scratches from clay bar | Insufficient lubrication | Re-clay with soapy lubricant |
| Paint feels rough | Contaminants left behind | Clay bar, then re-inspect |
What to Do If You Burn Through the Clear Coat
Stop immediately and do not polish further. Once the clear coat is gone, only a body shop can respray it, so cover the spot and get a quote. Typical repairs run a few hundred dollars per panel.
Residue That Won’t Flash off
Wipe again with isopropyl alcohol on a clean microfiber towel. Sticky film usually means the automotive solvent evaporated before you wiped. Work small sections and keep the towel turning.
Swirl Marks After Wiping
Switch to a fresh microfiber towel and lighten your pressure. Swirls come from grit trapped in the cloth, so fold, flip, and replace often. A dual-action polisher with polishing compound removes light marks safely.
Quick Checklist Before You Touch the Panel
Confirm Cure Stage and Paint Type
Fresh overspray wipes off far easier than paint that has fully cured, so figure out what you are dealing with first. Rattle can paint that is still soft behaves differently from a cured enamel, and your removal approach changes with it.
Hidden Spot Tested?
Never treat a visible panel until you have proven the method on a hidden spot. Pick a spot inside a door jamb or under a rocker panel, apply your chosen product, and check the clear coat afterward.
Trim Taped and Rags Staged?
Mask off rubber seals, plastic trim, glass, and emblems before any liquid touches the car. Keep clean microfiber towels and a dedicated rag pile ready so you are not reusing a contaminated cloth on fresh paint.
Least Aggressive Method Chosen First?
Start with the gentlest option that could work, usually a clay bar or isopropyl alcohol, and escalate only if the overspray stays put. Work up through polishing compound and, as a last resort, wetsanding, because each step removes more material.
- Identify the spray paint type and cure time: note whether the overspray is soft rattle can paint or a hardened coating, since cure stage drives your method.
- Test a hidden spot before treating: try your product on a door jamb or lower rocker to confirm it is paint safe.
- Protect trim, glass, and plastic: tape off rubber seals, emblems, and textured plastic so solvent stays off them.
- Stage clean cloths: keep separate microfiber towels for application and removal to avoid dragging grit.
- Start with the least aggressive method: begin with a clay bar or isopropyl alcohol and only escalate if the mark persists.
- Skip lacquer thinner on factory finishes: strong solvents can soften clear coat, so treat them as a last resort on a test spot only.
Aftercare: Curing, Polishing, and Preventing the Next Overspray
Wait Before You Polish or Wax
Let fresh paint and solvent residue dry fully before polishing, wait 24 to 48 hours after removal, longer in cold or humid conditions, so trapped solvent can escape. Polishing too soon can seal solvent under wax and dull the finish. Once cured, apply polishing compound with a dual-action polisher or microfiber towel by hand; keep pressure light and test first.
Preventing Overspray When Painting Nearby
Mask the car completely before spraying anything within range, rattle can mist travels farther than expected, especially outdoors on breezy days. Use plastic sheeting and automotive masking tape, and park upwind or in another bay.
Safe Disposal of Solvent-Soaked Rags
Never toss solvent-soaked rags in normal trash, lacquer thinner and similar solvents can self-heat and ignite. Spread rags flat outdoors to dry completely, then seal in a metal container and take to household hazardous waste. Follow EPA or municipal rules.
Common Mistakes That Cost You Clear Coat
Reaching for Lacquer Thinner First
Lacquer thinner is a solvent able to dissolve lacquer, and it will happily attack your clear coat too. Start with isopropyl alcohol on a microfiber towel, then step up to a paint-safe automotive solvent only if needed.
Skipping the Degrease
Wash and degrease the panel before any spray paint overspray removal, or you grind grit into the finish. A clean surface also lets you see what is paint and what is dirt.
Sanding Before Testing
Never touch wetsanding until a test spot proves the overspray is above the clear coat. Wetsanding removes material, so save it for stubborn spots and follow with polishing compound on a dual-action polisher.
Ignoring Rag Combustion Risk
Solvent-soaked rags can self-ignite, so spread them flat to dry outside, then dispose per your local rules and the manufacturer’s label. Keep a clay bar and rubbing compound for the final pass instead of more solvent.
- Solvent choice: isopropyl alcohol first, lacquer thinner last, since it dissolves more than overspray.
- Prep work: wash and degrease the panel before any solvent touches the car paint.
- Test spot: try a hidden area before committing to a full panel.
- Wetsanding: treat it as a last resort, only after testing confirms the overspray sits above the clear coat.
- Rag safety: dry solvent-soaked rags flat outdoors and dispose of them per local rules to avoid combustion.
- Finishing: use clay bar, polishing compound, and a dual-action polisher rather than more solvent.
When to Stop and Call a Body Shop
Warning Signs You’re Past DIY
Halt when the color coat lifts or the surface turns dull and chalky, you’ve likely burned through the clear coat. Keep rubbing and you’ll hit base color, which no polish can fix.
- Stop if a test spot turns cloudy, dull, or shows a different color.
- Stop if overspray covers a large or multiple panels, spot removal rarely blends evenly.
- Stop if paint feels rough or pitted after a gentle clay bar pass.
- Stop if a fingernail catches the mark’s edge, meaning it’s etched into the finish.
- Stop if the area is on plastic bumpers, trim, or a repainted panel with unknown history.
What a Pro Will Assess
A body shop measures clear coat thickness with a gauge and decides whether the panel can be polished or needs refinishing. If you burned through the clear coat, they’ll recommend a spot blend or full panel respray, typically a few hundred dollars depending on color and panel. They also check for solvent damage and advise paint-safe options before anyone uses lacquer thinner. Get a written estimate first.
How to Remove Spray Paint from Car Paint: Frequently Asked Questions
?Can You Remove Spray Paint from Car Paint Without Damaging the Clear Coat?
Yes, if you stay mild and test first. The clear coat is your thin top layer, so start with the least aggressive method: clay bar, then isopropyl alcohol, then polishing compound. Only step up to stronger automotive solvent or lacquer thinner on a test spot in a hidden area. If the paint softens or the towel picks up color, stop.
?How Do I Remove Spray Paint from Car Paint When it's Just Light Overspray?
Start with a clay bar and lubricant. Light spray paint overspray usually sits on top of the clear coat and lifts off before you need solvents. Work a small section with a microfiber towel, keep the surface wet, and check your progress in good light. If clay doesn't move it, move to isopropyl alcohol on a test spot, not straight to thinner.
?What is the Safest Way to Remove Spray Paint from Car Paint with Solvent?
Use the mildest automotive solvent that works, and never pour it on the panel. Dampen a microfiber towel, wipe one small test spot, and let it dwell only seconds. Lacquer thinner is a solvent that dissolves lacquer, and it can attack car paint and clear coat, so treat it as a last resort. Rinse residue with water and re-polish.
?Why Does Aggressive Rubbing Make It Harder to Remove Spray Paint from Car Paint?
Because friction and strong solvents can soften or burn the clear coat faster than they remove the spray paint. Once the clear coat is hazed or thinned, you can't wipe that damage away. That's why you test spot first, use light pressure, and let chemistry do the work. If you feel heat building or see dulling, stop immediately.
?When Should I Stop Trying to Remove Spray Paint from Car Paint and Call a Pro?
Stop when the spray paint has cured hard, covers a large panel, or your test spot shows dulling, stickiness, or color on the towel. Those are signs you're into the clear coat. A body shop can wetsand and polish safely or spot-repair the panel. Paying once beats a repaint after a DIY mistake.
?Does Wetsanding or a Dual-Action Polisher Help Remove Spray Paint from Car Paint?
Only after chemical and clay methods fail, and only with care. Wetsanding is abrasive and removes a sliver of clear coat, so it's a pro-level step on factory paint. A dual-action polisher with polishing compound is safer for final cleanup and swirl removal. Never wetsand a panel you haven't tested, and keep the paper fine.
?What Mistakes Should I Avoid When I Remove Spray Paint from Car Paint Myself?
Don't skip the test spot, don't use lacquer thinner on a whole panel, and don't scrub hard with a dry towel. Don't work in direct sun or on a hot panel, and don't let solvent dwell. Use paint-safe products, fresh microfiber towels, and rinse residue. If the spray paint overspray is thick or cured, stop and get a pro quote.
Conclusion
Work from the mildest option upward and stop the moment the spray paint overspray lifts. A clay bar, isopropyl alcohol (a common solvent that breaks down light paint residue), or polishing compound will handle most fresh marks without touching the clear coat underneath. Save lacquer thinner and other harsh automotive solvents for last, and only after a test spot proves they are paint safe.
Your best next step: pick one inconspicuous area, test your chosen method there, and inspect the clear coat in good light before repeating it anywhere else. Patience with a microfiber towel beats speed with a dual-action polisher every time.