
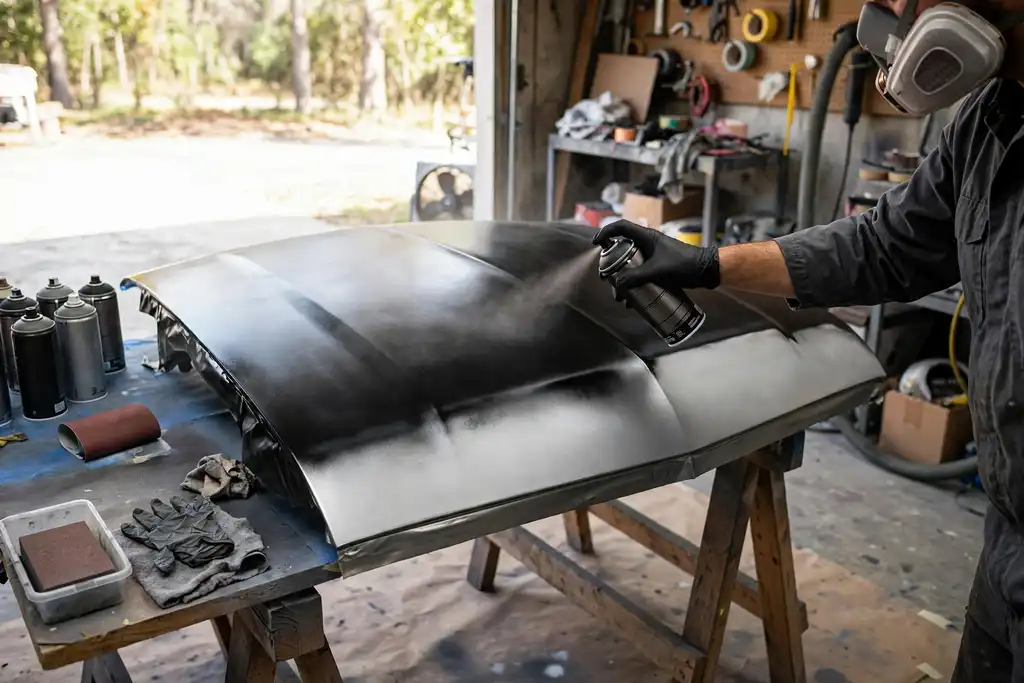
You can paint a car hood with spray cans and get a durable finish, but only if you treat safety and surface prep as non-negotiable. Skip the respirator or the tack cloth and the job fails before the first coat.
Your neighbor’s hood is peeling after a cheap spray can job, and you are determined not to repeat that mistake. Learning how to paint a car hood with spray cans starts with understanding that safety and surface prep decide the outcome, not the brand of paint.
You will get the exact sequence: masking, sanding, primer, spray paint, clear coat, and curing. Each step has a common failure point, and this article flags them before you waste a can. Expect typical dry times between coats and a realistic list of what can go wrong if you rush.
- Prep and sanding decide the finish; spray paint only reveals your work.
- Wear a respirator with organic vapor cartridges, not a dust mask.
- Apply primer, then even coats, respecting flash time between passes.
- Mask edges and use tack cloth to remove dust before every coat.
- Let clear coat cure fully before buffing; rushing causes swirls.
How to Paint a Car Hood with Spray Cans: Quick Decision Before You Start
Decide now whether spray cans are the right tool for your car hood, because a wrong call costs more than paint. This quick check keeps you safe and stops common mistakes before you buy a single can.
| Your situation | What to do | Why |
|---|---|---|
| Hood has deep rust or dents | Fix metal first or skip DIY | Spray paint hides nothing |
| You want a factory match | Order custom-filled cans | Off-the-shelf colors rarely match |
| Budget under a few hundred dollars | Spray cans can work | Pro shops cost several times more |
| You lack a respirator and ventilated space | Do not spray | OSHA warns of isocyanate exposure |
| Hood is plastic or aluminum | Test compatibility first | Primer must match substrate |
| You expect show-car gloss | Practice on a test panel | Rattle cans need buffing for shine |
| Temperatures below 60F or above 90F | Wait for milder weather | Spray paint cures poorly outside range |
Recommended for this job
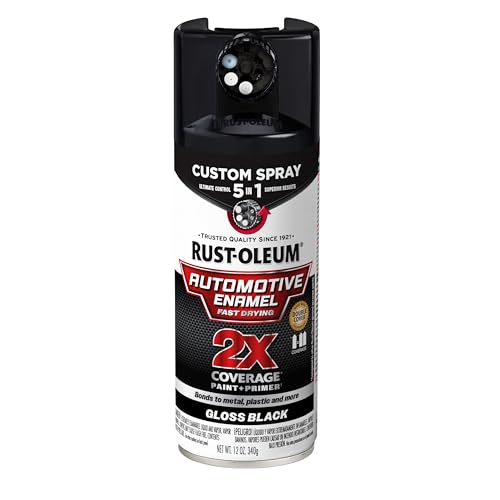
Rust-Oleum 2X Automotive Enamel 5-in-1 Spray
Provides durable gloss black topcoat with adjustable dial for even hood coverage.
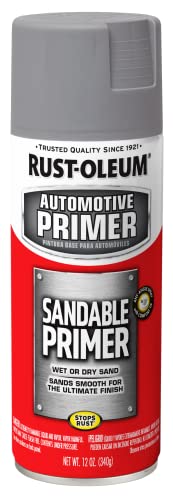
Rust-Oleum Automotive Sandable Primer Spray
Creates sandable gray base coat that fills imperfections and improves topcoat adhesion.

Rust-Oleum Painter's Touch 2X Ultra Cover
Adds protective clear gloss layer over color for lasting hood finish.
Is Spray Can Painting Right for Your Hood?
Spray cans handle cosmetic repairs up to about 1 square foot per panel and custom color, not structural damage. Sand out rust pits deeper than 1/16 inch or dents first; aerosol is a topcoat job, not bodywork.
Budget roughly $60 to $150 for primer, automotive paint, clear coat, 400 to 800 grit sanding paper, masking tape, tack cloth, and an organic-vapor respirator. A pro respray runs $300 to $800, so expect 6 to 10 hours of your own labor and possible buffing.
Automotive paint is a coating formulated for vehicle panels, offering UV and chemical resistance that hardware-store enamel lacks.
Buffing is polishing the cured clear coat with compound to smooth texture and bring out gloss.
A tack cloth is a sticky-treated cloth wiped over the sanded hood to lift dust so primer and paint can bond.
Masking means covering trim, gaps, and glass with tape and film so overspray does not reach surfaces you want to keep clean.
What You’ll Need to Know Before Spraying
Match your spray paint to the existing finish: use automotive aerosol, not hardware-store enamel, and confirm the can lists your OEM color code. Test on a hidden panel or spare scrap first.
Spray one light coat on the test panel, wait the labeled flash time (typically 10 to 15 minutes), then watch for wrinkling or lifting. If it reacts, switch to a compatible primer sealer before touching the car hood.
Wear an organic-vapor respirator rated for isocyanates, spray outdoors or in a garage with cross-ventilation, and hold the can 8 to 10 inches away in overlapping even coats. Follow the can’s curing window before sanding between layers.
Curing is the slow chemical hardening of the paint after it dries, during which the finish gains full durability and solvent resistance.
Even coats are light, overlapping passes applied at a steady distance and speed so the finish builds uniformly without runs.
5-Minute Diagnostic: Check These Before Any Work
Assess Hood Condition: Dents, Rust, or Just Faded Paint?
Run a bare hand across the car hood to map dents and rough patches before you buy anything. Hold a cloth-wrapped magnet over the panel; it will not stick where filler or rust bubbles sit. Any rust hole larger than a quarter means sanding to bare metal first.
Test Paint Compatibility on a Hidden Spot
Spray a test pass on a 6-inch area near the cowl to confirm your spray paint will not lift the factory finish. Wipe the spot with wax and grease remover, then apply one light coat. Wait the full flash time, usually 10 to 15 minutes, and check after an hour for wrinkling. Lifting here means you need a primer sealer.
Check Weather and Workspace Conditions
Read the spray can label for its temperature and humidity window before masking anything. Aim for 65 to 80 degrees Fahrenheit and humidity under 60 percent, ideally mid-morning. Set up at least 10 feet of clearance with cross ventilation, and wear a respirator rated for organic vapors.
Run these checks first, because a five-minute inspection now saves you a full repaint later.
How Spray Can Painting Works: a Quick Primer
The Layers: Primer, Color, Clear Coat
You build the finish in three stages, and each one has a job. Primer is a preparatory coating that bonds to the sanded surface and gives the color something to grip. Apply two or three thin coats, keeping the spray can moving.
Color coats go on next in light passes until coverage is even, usually three to four. Then comes clear coat, the protective top layer that adds gloss and shields the automotive paint from sun and debris. Two or three coats work for most hoods.
Why Surface Prep Determines Success
Skipping prep is the mistake that ruins most spray can jobs. Sanding removes surface imperfections and gives paint a mechanical bite, so the finish holds instead of peeling.
Wipe the hood with a tack cloth after sanding to lift dust, then mask edges and trim. Wear a respirator rated for organic vapors, per OSHA guidance, and spray outdoors or in a ventilated space.
Before You Start: Tools, Materials, and Safety
Gather everything before you touch the car hood so you never stop mid-job.
Gathering Materials and Tools
- Core supplies: automotive spray paint, primer, clear coat, sanding paper in several grits, masking tape, tack cloth.
- Safety gear: organic-vapor respirator and nitrile gloves.
- Prep tools: degreaser, microfiber cloths, sanding block.
- Work area: ventilated garage or outdoors with drop cloth and good lighting.
Safety Precautions: Respirator and Ventilation
- Check respirator seal before every session.
- Keep doors open and a fan moving air; follow OSHA solvent limits.
- Keep cans away from pilot lights, heaters, and sparks; store them in a cool, dry place.
Cleaning and Degreasing the Hood
- Degrease, then rinse and dry before sanding.
- Tack cloth right before primer.
- Inspect by hand for grit.
Masking Surrounding Areas
- Press tape edges firmly to prevent bleed.
- Use masking paper or plastic for large areas.
- Unbolt emblems and trim rather than taping around them.
Removing the Hood for Painting
- Have a helper lift it off hinges.
- Store on padded sawhorses.
- Mark hinge positions before removal for easy reinstall.
- Core supplies: You need automotive spray paint, primer, clear coat, sanding paper in several grits, masking tape, and a tack cloth.
- Safety gear: A respirator rated for organic vapors and nitrile gloves protect your lungs and skin from aerosol chemicals.
- Prep tools: Degreaser, clean microfiber cloths, and a sanding block keep the surface flat and clean.
- Work area: A ventilated garage or outdoor space with a drop cloth and good lighting makes defects visible.
- Respirator fit: Check the seal against your face before every session; a loose fit lets vapors leak in.
- Ventilation: Keep doors open and a fan moving air, and follow OSHA guidance for solvent exposure limits.
- Fire safety: Keep spray cans away from pilot lights, heaters, and sparks, and store them below 120 F.
- Two-step clean: Degrease first, then rinse and dry completely before any sanding.
Step-by-Step: Painting Your Hood with Spray Cans
Sanding the Hood for Better Adhesion
Scuff the whole hood so the new coating grips. Use 400-grit wet paper, then 600-grit, keeping the surface evenly dull. Skipping sanding causes flaking. Wipe off slurry with a tack cloth, then mask trim and edges.
Applying Primer in Thin Coats
Primer bonds color and blocks old layers. Hold the can 8-10 inches out; mist two or three thin coats, letting each flash 10-15 minutes. Heavy passes cause runs.
Applying Color Coats Evenly
Build color in several light passes, overlapping by half. Three to four coats with 10-15 minutes flash time gives even coverage without sagging.
Applying Clear Coat for Protection
Clear coat seals color and adds UV and chemical resistance. Apply two or three thin passes, then cure 48 hours at room temperature before buffing.
Using a Spray Can Trigger for Control
Clip a trigger onto the nozzle for steadier control, consistent angle, more even coats, and less wrist fatigue.
Work through these steps in order and you will get a finish that holds up, not one that peels in a year.
After the Paint: Drying, Buffing, and Reassembly
Drying and Curing Times: How Long to Wait
Give the hood at least 24 hours before touching it, and plan on 7 to 30 days for full curing depending on heat and humidity. Cool, damp weather pushes that toward the long end.
Buffing and Polishing for a Smooth Finish
Buff only after the paint has cured, never while it still smells of solvent. Wet-sand with 1500 to 2000 grit, then compound and polish in small sections.
Keep the pad moving and check your work under bright light to avoid burn-through.
Finishing Touches and Reassembly
Reinstall the car hood once the paint is hard enough to resist a fingernail press. Thread bolts by hand first, then torque to the manufacturer’s spec.
Maintenance After Painting
Wash with pH-neutral soap and skip wax for the first month. After that, wax every 3 to 4 months to protect the spray paint from UV and road grime.
Once your final coat flashes off, the work shifts from spraying to patience, polishing, and putting the hood back together correctly.
Cost Breakdown: Spray Cans vs Professional Paint Job
Spray cans look cheap until you tally the whole job. Here is what each route actually runs, with the assumptions stated.
| Option | Upfront cost | Ongoing cost | Notes |
|---|---|---|---|
| DIY spray cans, basic materials | $60 to $150 | Reapply every 1 to 3 years | Rattle cans, primer, clear coat, sandpaper |
| DIY spray cans, full kit | $150 to $300 | Same as above | Adds masking supplies, tack cloth, respirator |
| DIY spray cans, tools you may lack | $50 to $200 | One-time | Sander, buffer, buffing pads |
| Professional single-panel repaint | $300 to $800 | None beyond normal care | Shop labor, booth, automotive paint |
| Professional full hood, color match | $500 to $1,200 | None beyond normal care | Blending into fenders may add cost |
| Professional custom or show finish | $1,000 and up | None beyond normal care | Multiple stages, extra prep hours |
| Hidden costs, both routes | Varies | Varies | Mistakes, rework, disposal fees |
Ranges assume a standard mid-size car hood, US pricing, and a solid-color finish. Custom colors, metallic paints, and heavy rust repair push costs higher. Shop quotes vary by region and labor rate.
DIY Spray Can Costs: Paint, Sandpaper, Clear Coat
Budget roughly $60 to $150 in materials for a basic solid-color job. That covers spray paint, primer (a preparatory coating that helps paint bond), clear coat, and sanding supplies. Add $50 to $200 if you need a sander or buffer.
Professional Costs: What You Pay for
A shop typically charges $300 to $800 for one panel. You are paying for a spray booth, color matching, and labor hours you do not spend. Custom finishes run $1,000 and up.
Hidden Costs to Consider
Mistakes cost the most. A runny coat or poor prep means sanding back down and buying more product. Disposal of old paint and solvents may carry a fee where you live.
How Weather and Season Affect Spray Can Painting
Ideal Temperature and Humidity
Conditions are ideal for spraying when air and hood are 65â80°F with humidity under 60%. Check forecast for rain and wind; keep hood out of direct sun. High humidity slows solvent escape, dulling finish; low humidity causes dry spray and grainy texture. Use a thermometer and hygrometer to confirm conditions before spraying.
Painting in Cold or Hot Weather
Below 60°F, aerosols stop atomizing well and curing drags out. Warm cans in tap water (never near flame) and work in a heated garage with cracked door. Above 90°F, paint skins too fast, trapping solvent and causing solvent pop or orange peel. Use morning shade, thin coats, extended flash time. Avoid wind that blows dust onto wet primer.
Legal and Environmental Considerations
Aerosols are flammable and release VOCs; paint outdoors or ventilated, follow local air rules. Some districts restrict solvent-based aerosols on smoggy days. Wear OSHA-rated respirator, gloves, eye protection. Use masking film and cardboard for overspray; take leftover cans and sanding dust to hazardous waste site. Never spray near pilot lights or drains.
Troubleshooting Common Spray Can Painting Issues
Most spray can defects trace back to prep or technique, and nearly all are fixable once the coat is dry. Match the symptom to the cause before you add more paint, because extra coats hide nothing and usually make the flaw worse.
| Problem | Likely cause | Fix |
|---|---|---|
| Runs or drips | Too heavy a pass or can held too close | Let it cure, sand flat, recoat |
| Orange peel texture | Paint drying before it flows out | Sand smooth, adjust distance and speed |
| Uneven color | Inconsistent overlap or thin coats | Sand level, apply more even coats |
| Primer showing through | Too few coats or sanded too far | Add primer, then color |
| Paint peeling or flaking | Grease left on the car hood | Strip, clean, reapply primer |
| Blushing or cloudy finish | High humidity during spraying | Wait for drier weather, sand, recoat |
| Bubbling or lifting | Incompatible old finish underneath | Sand to bare metal, seal, reprime |
Fixing Runs and Drips
Runs mean you sprayed too heavy or held the spray can too close. Let the area cure fully, sand the drip flat with fine grit, then apply thinner even coats.
Dealing with Orange Peel Texture
Orange peel happens when spray paint dries before it can flow out. Sand the texture smooth, then adjust your distance and pass speed on the next coat.
Correcting Uneven Color or Primer
Patchy color usually comes from inconsistent overlap or coats that were too thin. Sand level, then build primer and color back up in even coats.
What to Do If Paint Doesn’t Adhere
Peeling almost always means grease or wax survived your prep. Strip the area, clean it again with a tack cloth, and reapply primer before color.
Myths vs Facts: Spray Can Painting Edition
Myth: Spray Cans Can’t Match Professional Quality
False. Aerosol results hinge on prep and technique, not the can itself. Choosing the right spray paint matters most: pick an automotive paint labeled for car hoods, not general-purpose hardware store enamel.
Lay down thin, even coats instead of one wet pass. Respect the flash time on the label between coats, and the finish will look factory-flat.
Myth: You Don’t Need a Respirator
Wrong, and this is the mistake that actually hurts you. Aerosol automotive paint and clear coat release isocyanates and solvents that a dust mask won’t stop. Wear a fitted respirator rated for organic vapors, and spray outdoors or in a ventilated space.
OSHA guidance on isocyanate exposure backs this up. Skip it and you risk headaches, dizziness, and worse.
Myth: Clear Coat Isn’t Necessary
It is, unless you want your work to fail within a season. Clear coat seals the color and shields it from UV, salt, and bird droppings.
Apply it within the window the paint label specifies, then let curing finish before buffing.
Common Mistakes to Avoid When Painting a Hood
Skipping Surface Prep
Prep decides the finish. Wash the car hood, then sand with 400 to 600 grit to remove gloss and imperfections. Wipe with a tack cloth and degreaser before primer, or the spray paint will lift and peel.
Applying Thick Coats
Multiple thin layers beat one wet pass. Build 2 to 3 even coats, respecting flash time between passes. Heavy coats cause runs, solvent trapping, and hazy curing.
Painting in Poor Conditions
Spray between 65 and 80°F in low humidity, out of wind and direct sun. Cold or damp air dulls the finish and extends curing. Wear a respirator and mask trim, gaps, and glass before you start.
Not Testing Paint Compatibility
Test your spray can on a scrap panel first. Mismatched primer, base, or clear coat can wrinkle or lift the automotive paint underneath. Stick to one system from a single manufacturer, then buff after full curing.
- Prep first: wash, sand with 320 to 400 grit, then wipe with a tack cloth and degreaser.
- Build 2 to 3 thin, even coats; thick passes cause runs and trapped solvent.
- Respect flash time between coats to let solvents escape.
- Spray at 65 to 80°F in low humidity, away from wind and direct sun.
- Wear a respirator and mask trim, gaps, and glass before spraying.
- Test paint compatibility on a scrap panel: mismatched primer, base, or clear coat can wrinkle the finish.
- Buff only after the clear coat has fully cured.
When to Call a Pro: Warning Signs You Shouldn't Ignore
Large Dents or Rust
Deep dents and rust holes go beyond what spray paint can fix. Rust is like cancer in steel; sanding it out often reveals thin metal that needs welding or panel replacement. A body shop can pull dents and treat rust properly before any automotive paint goes on.
Metallic or Specialty Colors
Metallics, pearls, and candy colors are nearly impossible to blend evenly from a spray can. Those finishes need controlled gun pressure and a booth to lay flakes consistently. If your car hood is anything but a solid color, let a pro handle it.
Lack of Proper Ventilation or Space
You need a well-ventilated, dust-free space, or you should stop. A garage with the door cracked open is not enough; overspray and fumes build fast. OSHA treats aerosol isocyanates and solvents as serious respiratory hazards, so a respirator rated for organic vapors is non-negotiable.
Legal Restrictions on Spray Painting
Many US cities and states restrict aerosol painting outdoors or in residential areas. Check local air quality rules before you start; some areas ban solvent-based spray paint entirely. Fines can easily exceed the cost of a professional job.
How to Paint a Car Hood with Spray Cans: Frequently Asked Questions
?Can You Really Paint a Car Hood with Spray Cans and Get a Result That Lasts?
Yes, you can paint a car hood with spray cans and achieve a durable finish if you prepare properly and use automotive-grade paint. Sand, clean, and prime the hood first, then apply several thin, even coats with proper flash time between them. Finish with a clear coat to protect the color. This method holds up for years with basic care, though thin coats or skipping clear coat will shorten its life.
?How to Paint a Car Hood with Spray Cans Without Leaving Streaks or Dry Patches?
Keep the spray can moving and overlap each pass by about half. Hold the can 8 to 12 inches from the car hood and spray in steady, parallel lines, starting and ending off the panel. Apply light even coats instead of one heavy pass. Respect flash time between coats. Streaks come from uneven distance and speed, not from the paint itself.
?What Safety Gear Do You Need When You Paint a Car Hood with Spray Cans in a Garage?
You need a respirator rated for organic vapors, safety glasses, and nitrile gloves when you paint a car hood with spray cans. A dust mask is not enough because spray paint fumes are toxic. Ventilate the garage by opening doors and using a fan to pull air out. Keep spray cans away from pilot lights and open flames. If ventilation is poor, paint outside instead.
?How Much Spray Paint Does It Take to Paint a Car Hood with Spray Cans?
Plan on three to four cans of color and two to three cans of clear coat for a typical car hood. Small hoods need less; large truck hoods need more. Buy extra cans from the same batch so the color matches. Running short mid-panel forces you to blend a new can into a half-finished coat, which is exactly how you get visible uneven patches.
?Why Does Surface Prep Matter so Much When You Paint a Car Hood with Spray Cans?
Prep decides whether the job lasts. Sanding, which is shaping and removing surface imperfections with an abrasive, gives the primer something to grip. Primer, a preparatory coating applied before paint, seals the surface and helps color bond. Wipe with a tack cloth to lift dust, then mask edges and trim. Skip any of these and the paint lifts, chips, or peels.
?When Should You Avoid Trying to Paint a Car Hood with Spray Cans Yourself?
Skip DIY if the car hood has deep rust, cracks, or peeling down to bare metal across large areas. Those need stripping and bodywork first. Also walk away if it's below 50°F, humid, or windy, or if the hood is a factory metallic or pearl finish you can't blend. In those cases a pro shop saves you money over a failed repaint.
?What is the Biggest Mistake People Make After They Paint a Car Hood with Spray Cans?
Rushing the clear coat and curing stage. Clear coat needs proper flash time between coats, then real curing time, often a week or more, before buffing or reassembly. Mount the car hood too soon and you'll imprint the paint. Buff too early and you'll burn through soft clear. Read the can's cure times and double them in cool weather.
Conclusion
Safety and patience decide the outcome here. Wear a respirator rated for organic vapors, work in a ventilated space away from flames, and mask every edge you don’t want touched. Rushing coats or skipping flash time causes runs, orange peel, and peeling later.
Your smartest next step: practice the full sequence on a scrap panel first. Prime it, spray your color in even coats, let it cure, then try buffing. That dry run teaches you trigger control and distance before your car hood is on the line.